About fluidicice

Australia.

MOBAC .bsh Map Files

Lately I’ve been downloading maps of my region for bug-out planning and redundancies if the internet goes down. It’s been extremely helpful so far especially when camping in areas without internet access as well as marking points of interest on Alpine Quest for future reference.

However it wasn’t easy to find usable maps to download, especially when I have to “code” the .bsh files myself to make the maps downloadable via MOBAC.

I have uploaded some map files usable with any MOBAC version that can read the .bsh files which is typically version 2.0.0 onwards. This lets you view and download any portion of the map. All you have to do is place them in the “mapsource” folder of MOBAC and restart the program (if it’s open already).

Note: Don’t download more than you need or these services may block all connections from MOBAC and then nobody can download any maps. MOBAC has a built in limit of 500,000 tiles as it is and that already seems a bit too large for people’s needs.

The “z__” number in the file name is the maximum zoom level of that map. So Google Terrain only goes down to zoom level 15, where Google Maps goes to z20.


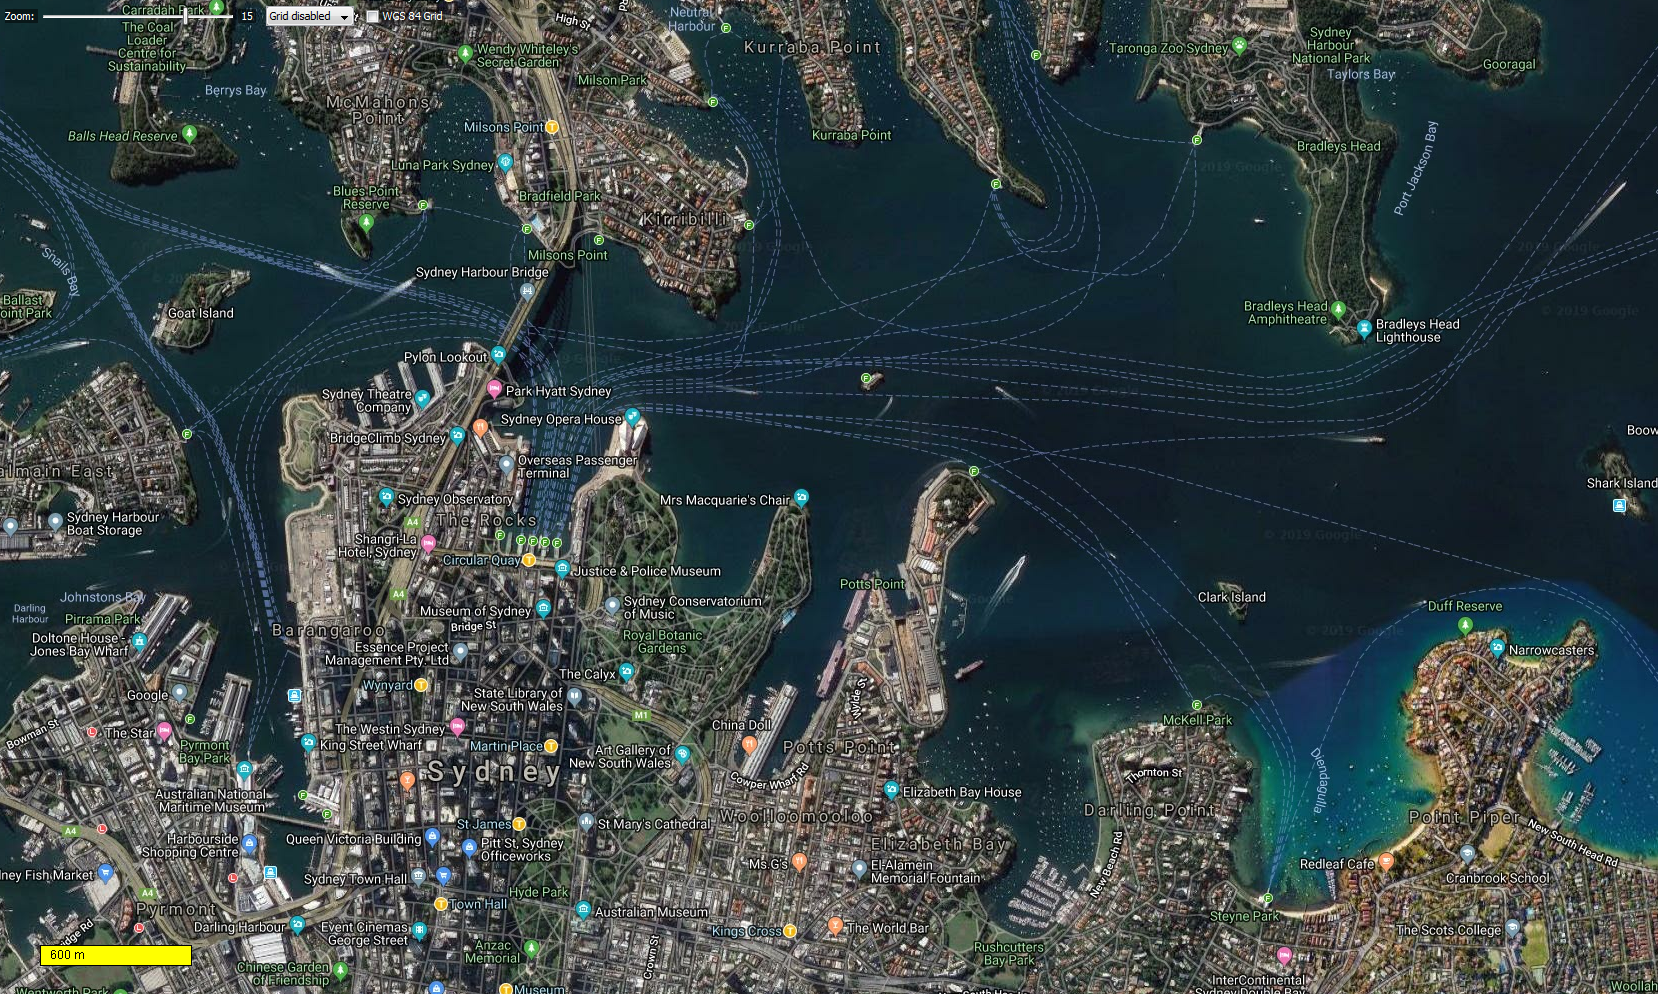
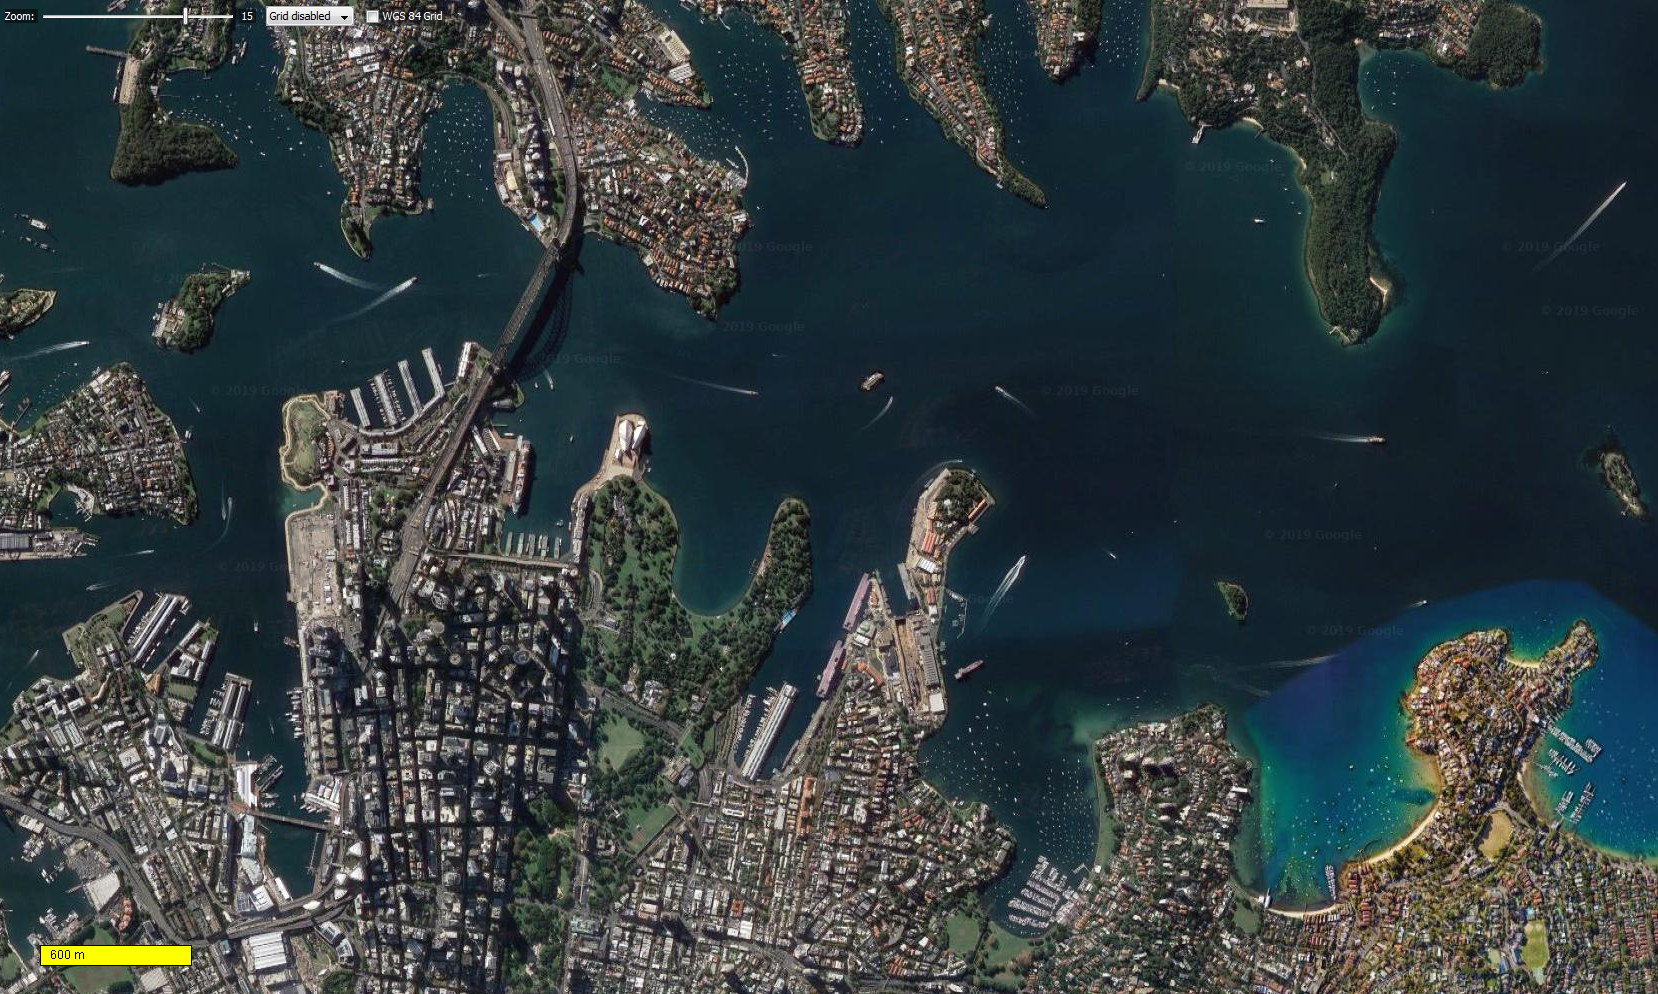
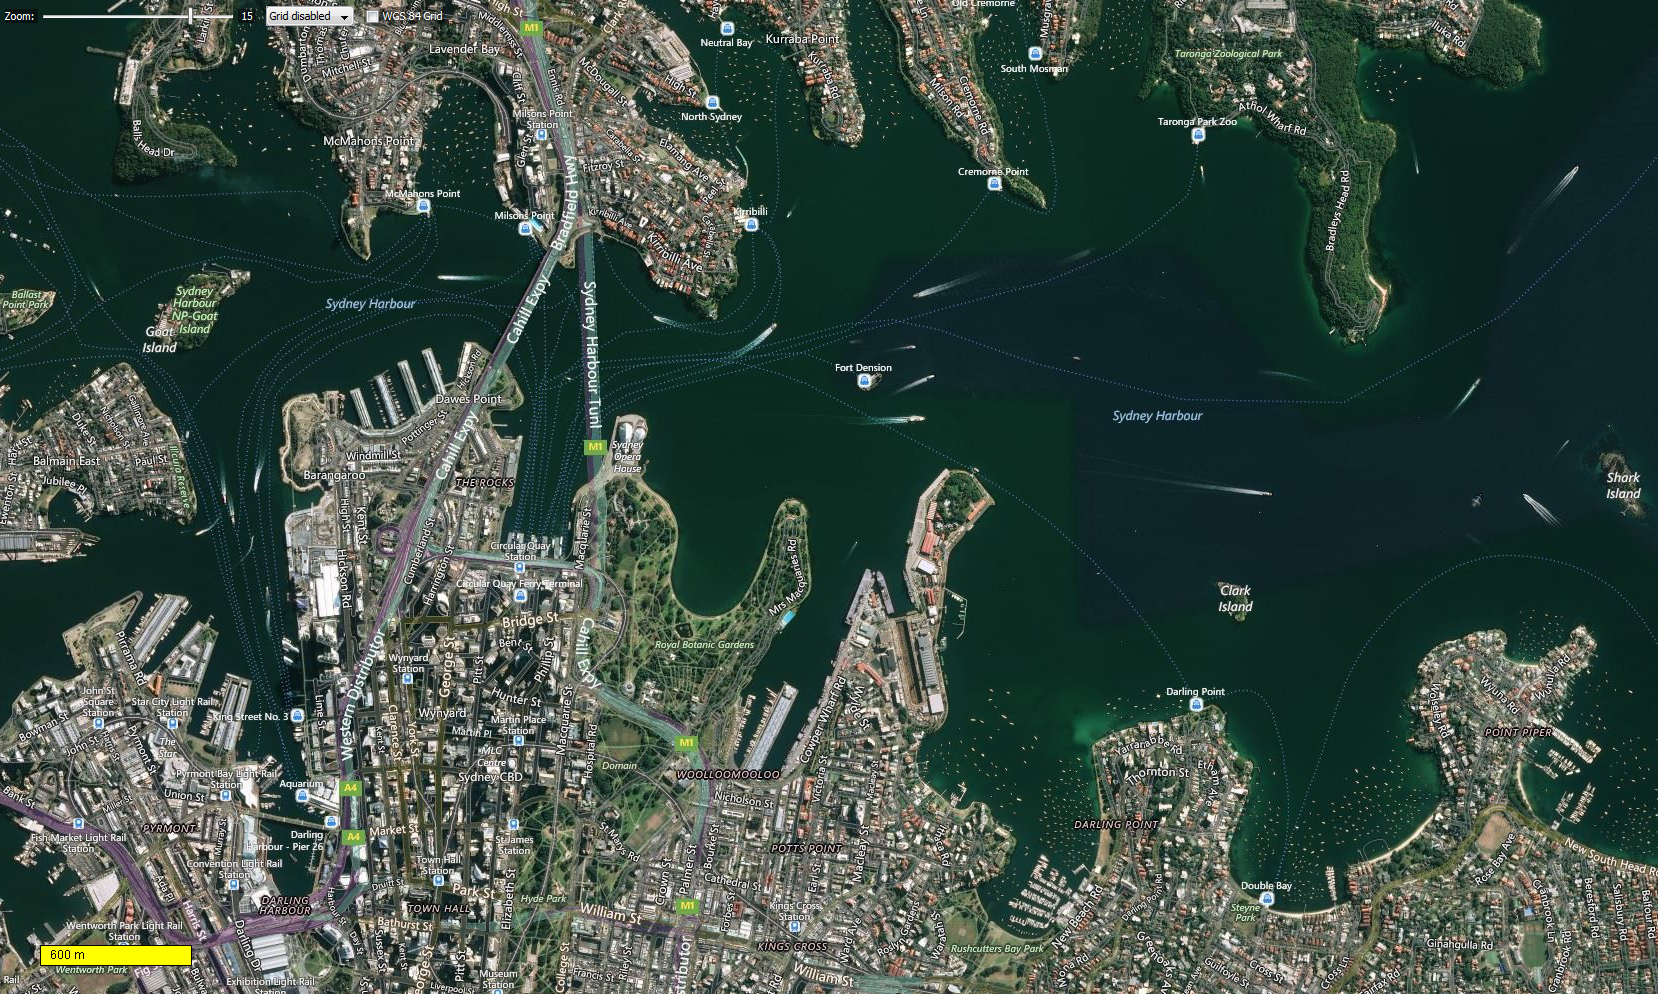
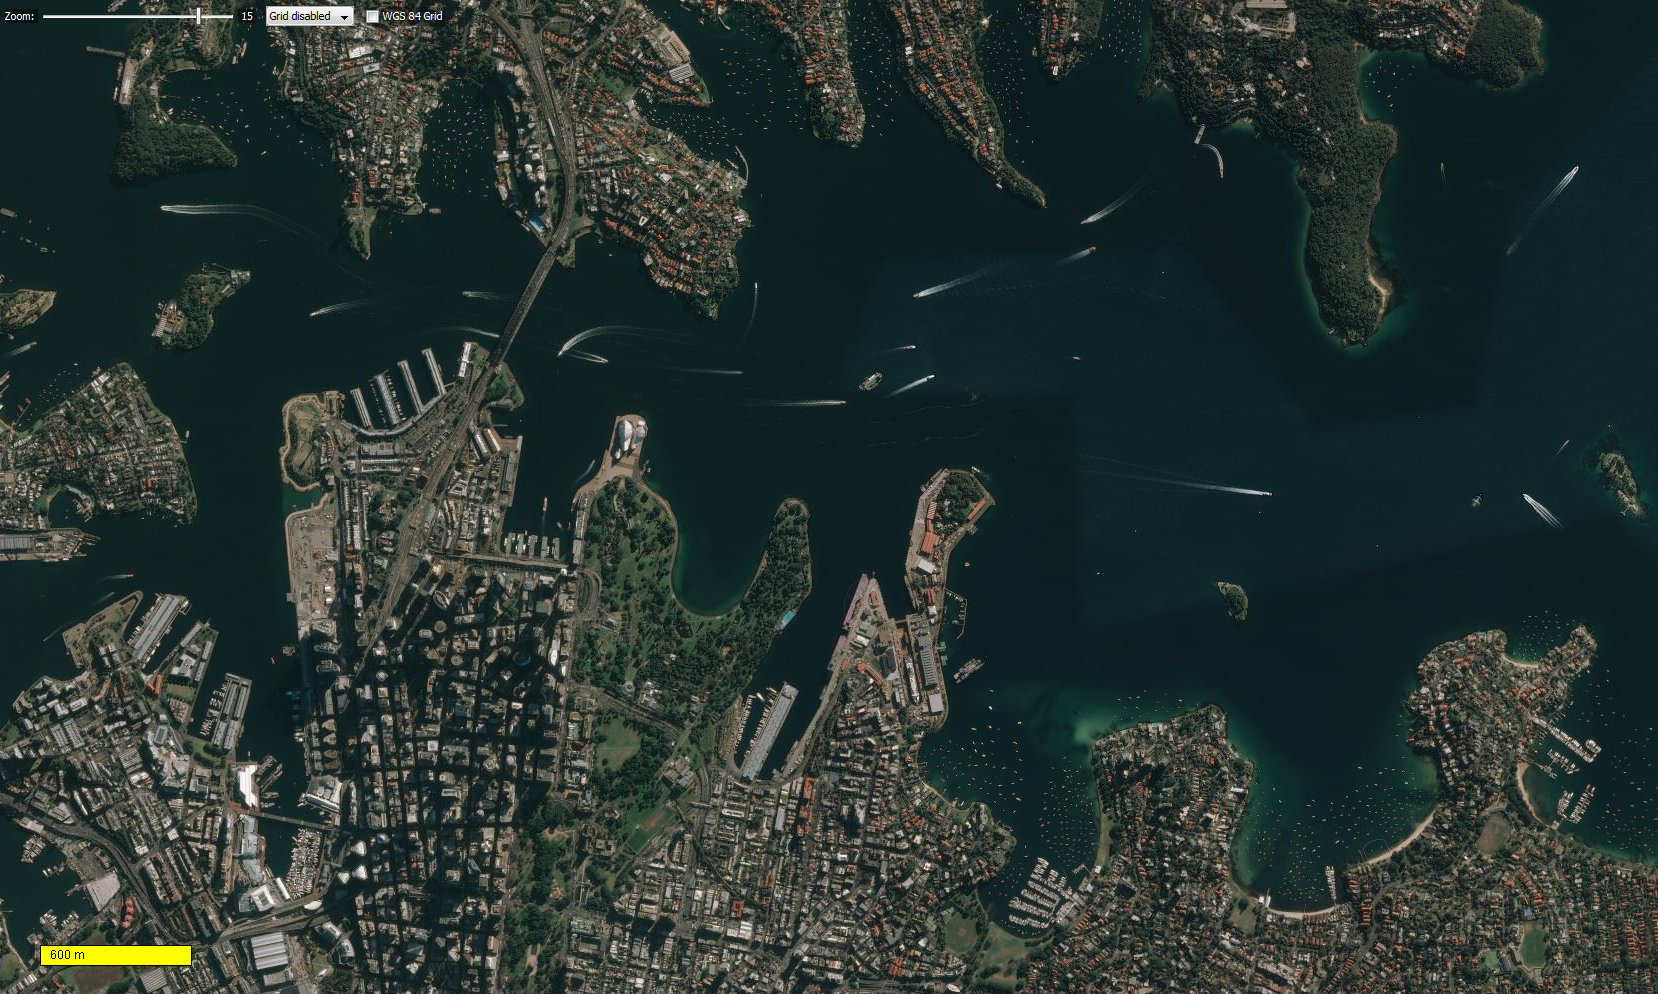
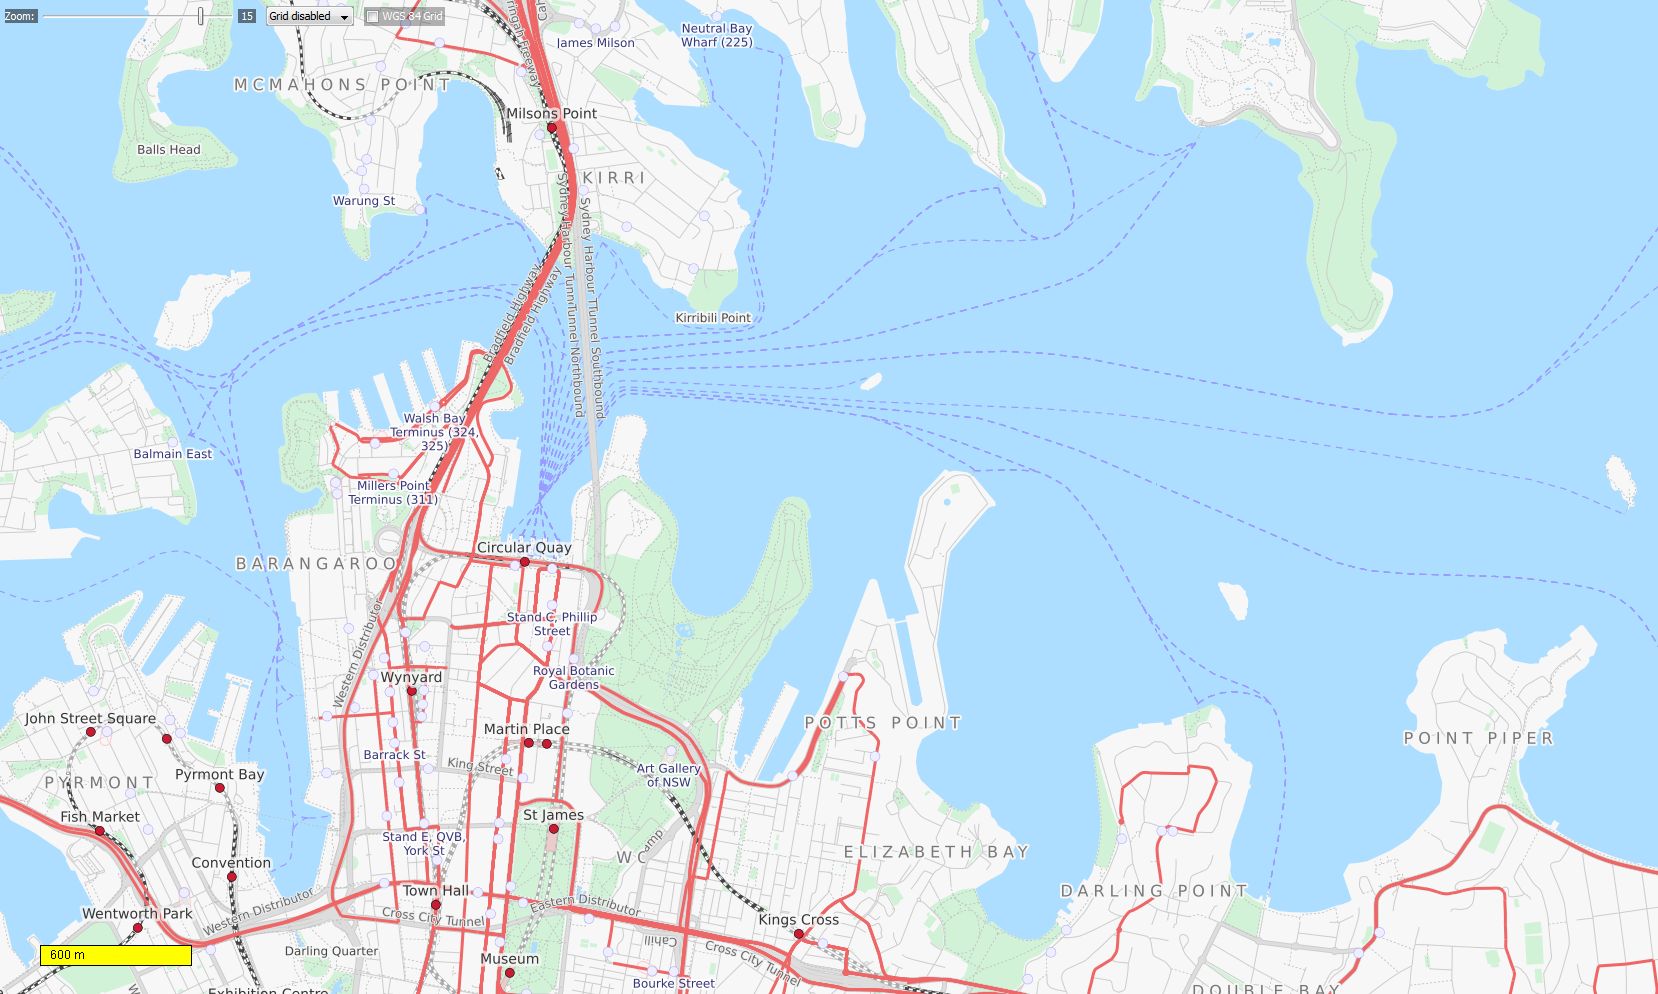
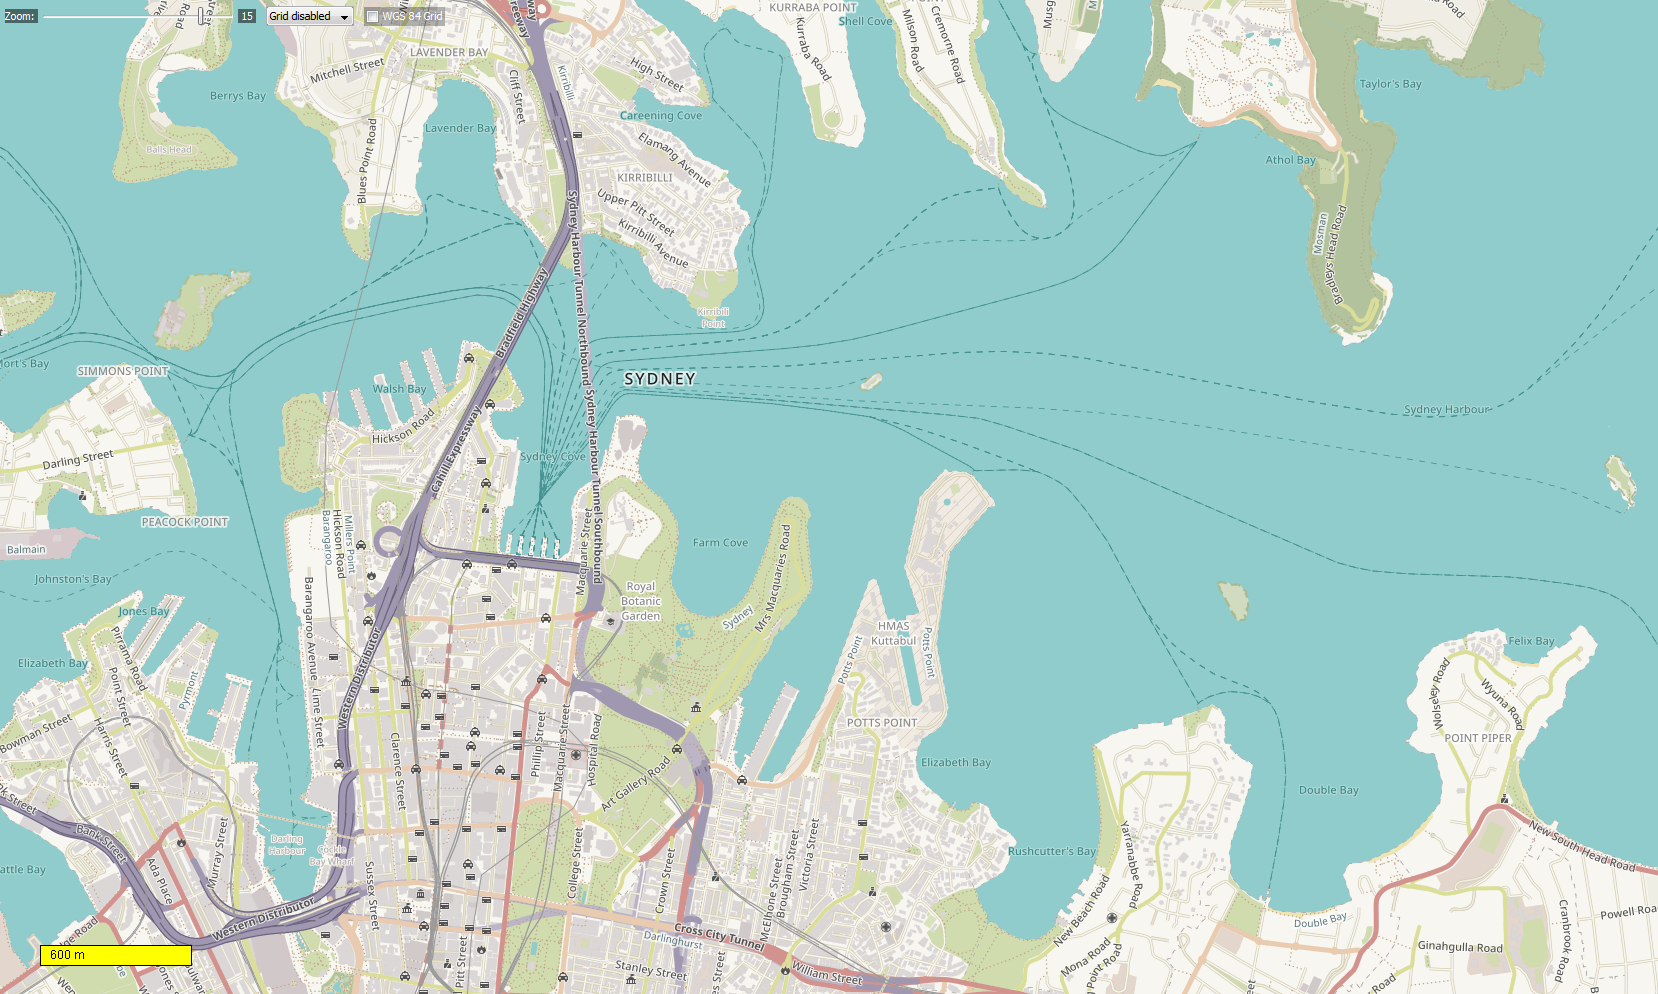
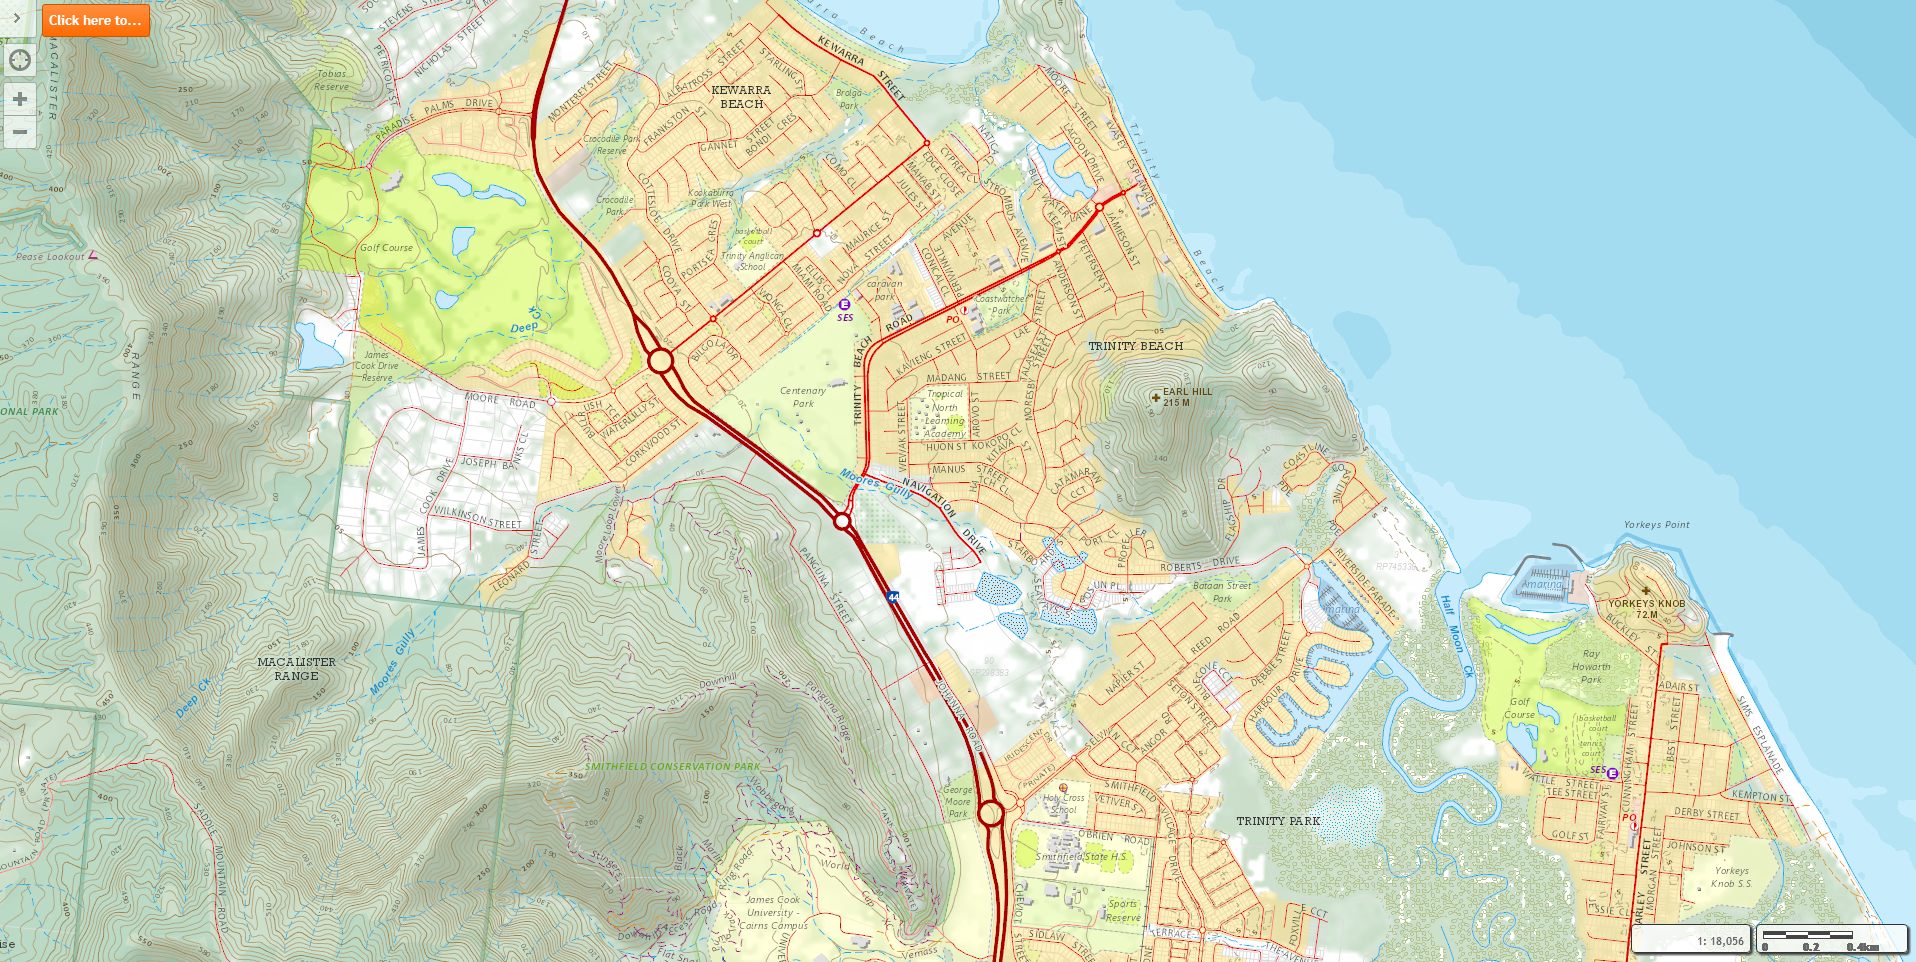
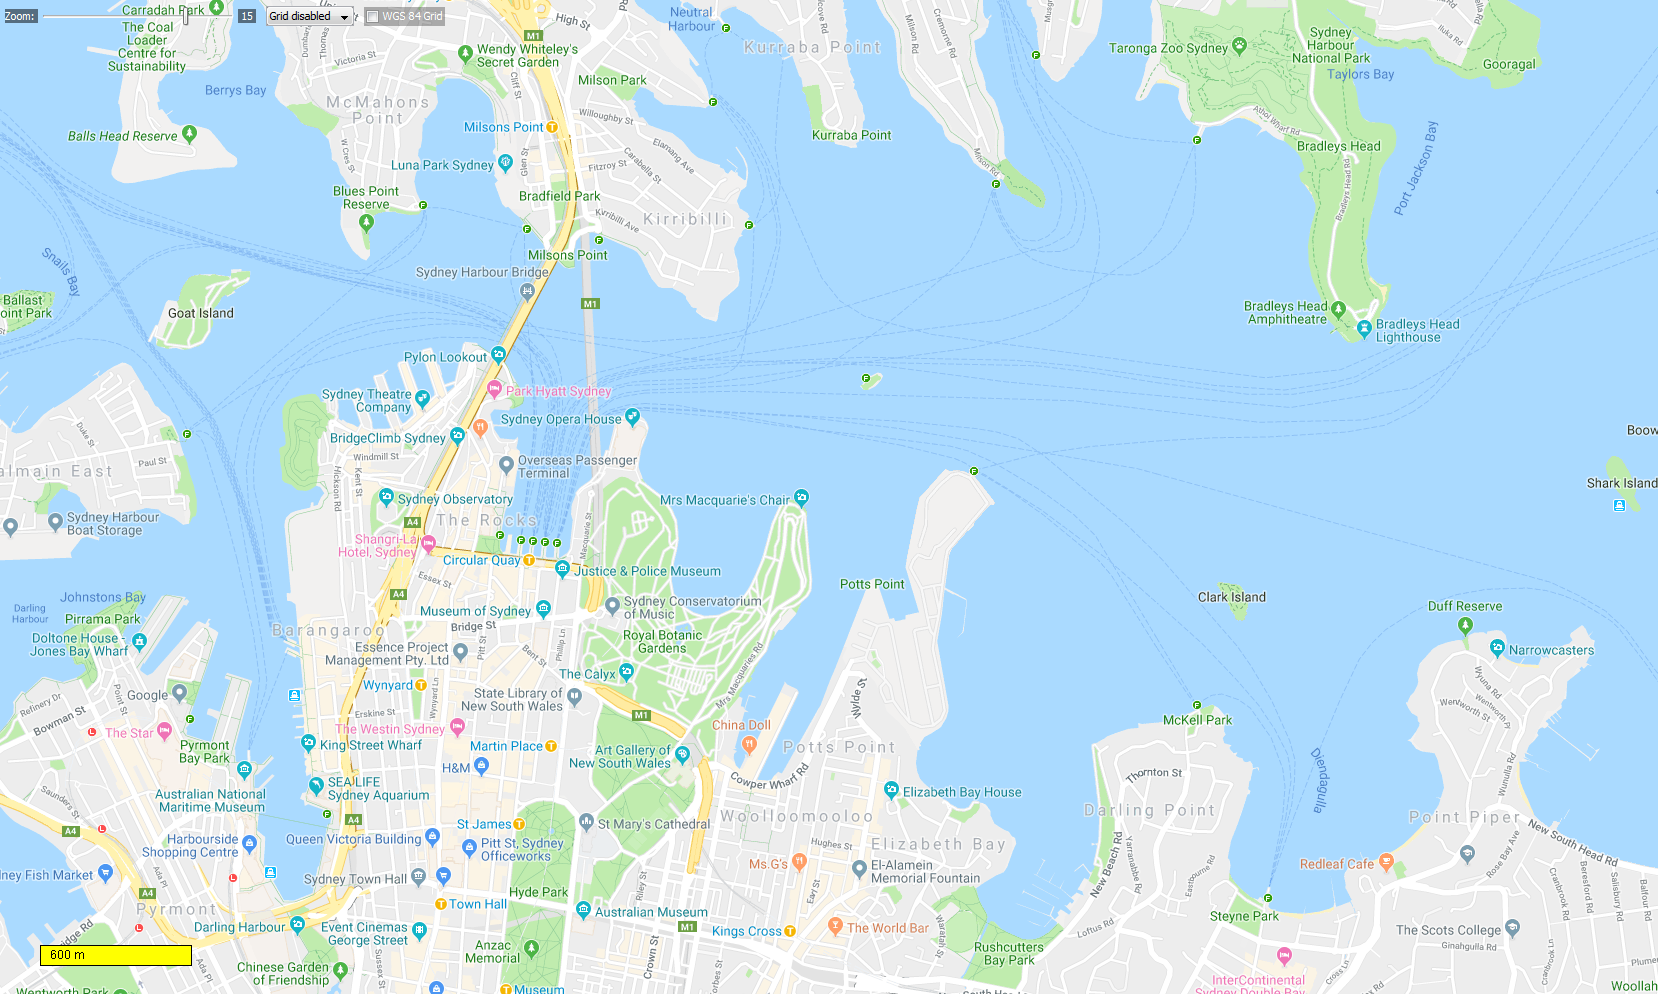
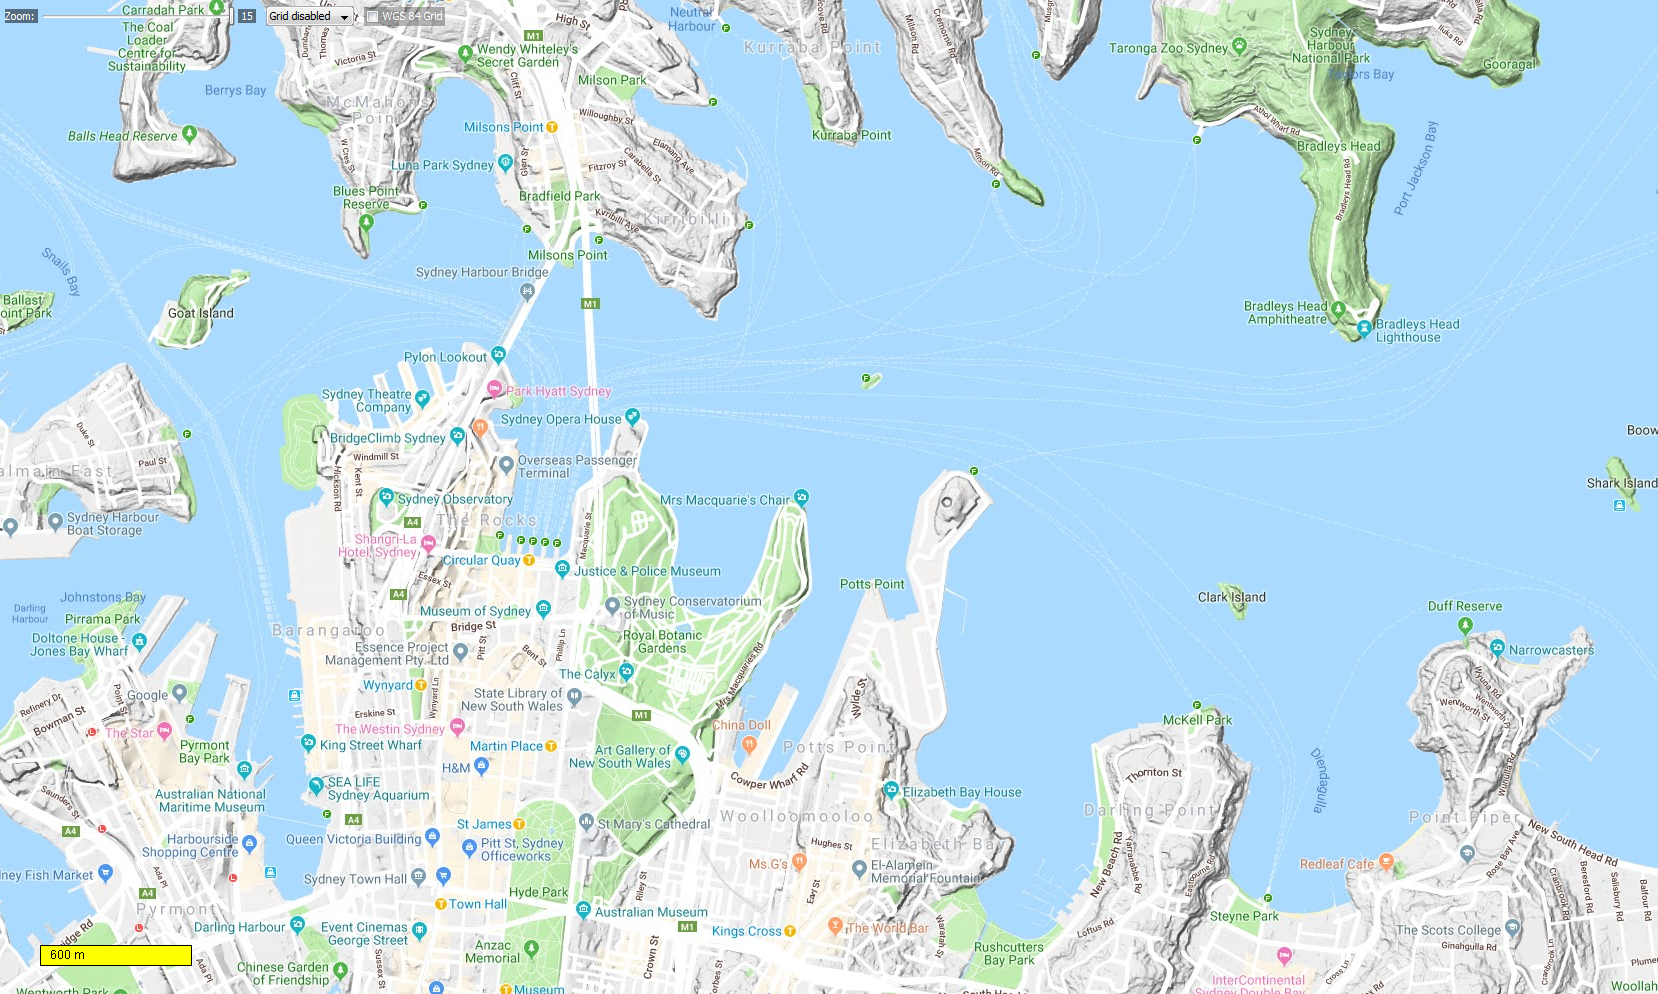
The map files are as follows and have an example image from Sydney showing what that map looks like:

Google Maps
• Max Zoom: Zoom 20
• Map Extent: Worldwide
• Map Type: Detail Map
Download Google Maps Bash File

MOBAC bsh Files
Fig1. – Google Maps. (Detail Map)

Google Terrain
• Max Zoom: Zoom 15
• Map Extent: Worldwide
• Map Type: Topographic Map
Download Google Terrain Bash File

MOBAC bsh Files
Fig2. – Google Terrain. (Topographic Map)

Google Hybrid
• Max Zoom: Zoom 20
• Map Extent: Worldwide
• Map Type: Hybrid Satellite Map
Download Google Hybrid Bash File

MOBAC bsh Files
Fig3. – Google Satellite Hybrid. (Satellite w/Place Names)

Google Satellite
• Max Zoom: Zoom 20
• Map Extent: Worldwide
• Map Type: Satellite Map
Download Google Satellite Bash File

MOBAC bsh Files
Fig4. – Google Satellite. (Satellite wo/place names)

Microsoft Hybrid
• Max Zoom: Zoom 19
• Map Extent: Worldwide
• Map Type: Hybrid Satellite Map
Download Microsoft Hybrid Bash File

MOBAC bsh Files
Fig5. – Microsoft Hybrid Satellite. (Satellite w/place names)

Microsoft Satellite
• Max Zoom: Zoom 18
• Map Extent: Worldwide
• Map Type: Hybrid Satellite Map
Download Microsoft Satellite Bash File

MOBAC bsh Files
Fig6. – Microsoft Satellite. (Satellite wo/place names)

Open Street Map – Transport
• Max Zoom: Zoom 18
• Map Extent: Worldwide
• Map Type: Transport Map
Download Open Street Map – Transport Bash File

MOBAC bsh Files
Fig7. – Open Street Map – Transport. (Transport Map)

Open Street Map – Humanitarian
• Max Zoom: Zoom 18
• Map Extent: Worldwide
• Map Type: Specialist Map
Download Open Street Map – Humanitarian Bash File

MOBAC bsh Files
Fig8. – Open Street Map – Humanitarian. (Specialist Map)

Queensland Topo
• Max Zoom: Zoom 15
• Map Extent: Australia – Queensland
• Map Type: Topographic Map
Download QTopo Bash File

MOBAC bsh Files
Fig9. – Queensland Topo Map. (Topographic Map)

If you’d like me to make a .bsh of a mapping service found on the internet let me know the site and I’ll give it a go depending on how busy I am.

Insulating Camping Pot Handles

Have you ever been camping with a new pot and burn yourself on the metal handles due to the lack of heat insulation rubber? Or perhaps you go to grab it and discover it’s extremely hot and you drop your meal all over the ground?

DIY Project
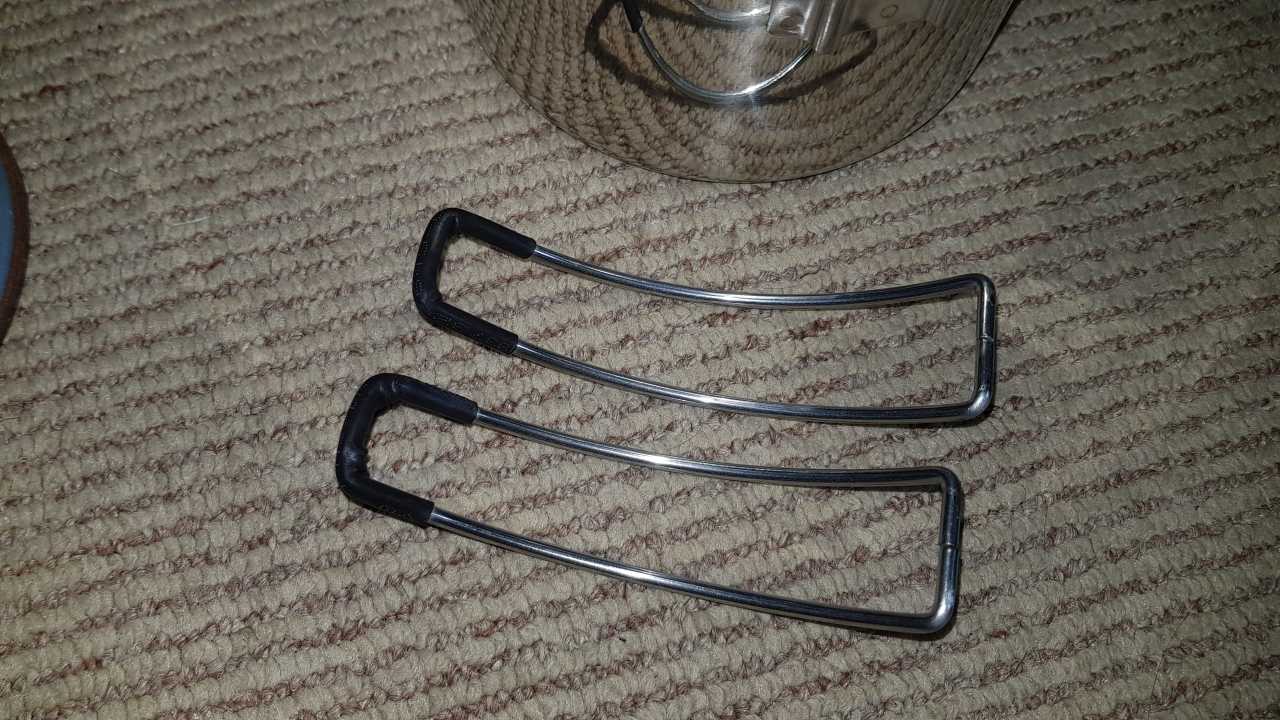
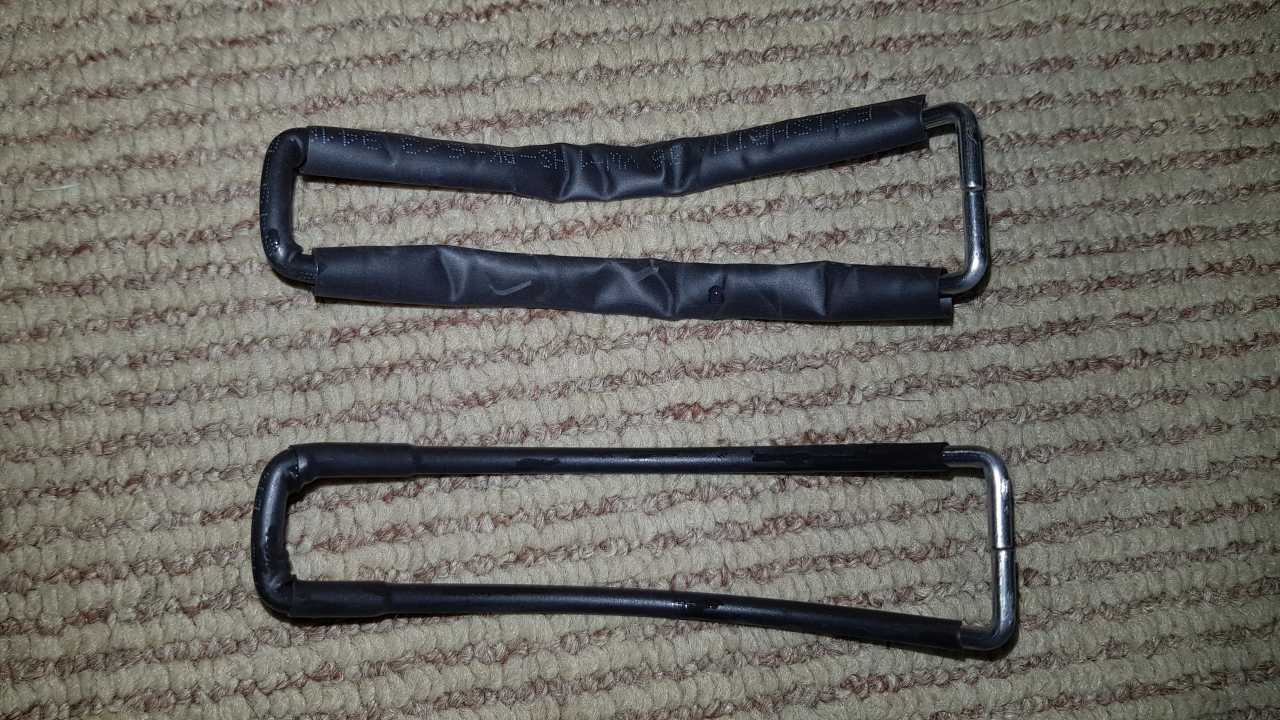
Fig1. – The results of heat shrink wrapping the handles.

Well not any more! I recently devised an elegant solution to partially fix this issue using heat shrink electrical wrap as an insulation material on the handles. Not only does it look slick and fits extremely well once shrunk but it can come in a multitude of colours and it’s almost impossible to get wrong!

To get started all you need is:
• Metal pot handles, which should be between 0-4mm thickness and may be difficult to remove
• 1m+ (3ft) of any coloured 6mm heat-shrink wrap (Depending on the thickness of your handles)
• A heat gun or open flame (Maybe an oven?)
• Scissors to cut the tubing to size
• Pliers to hold the hot handles

You can buy different thicknesses of the shrink wrap but 6mm is the best bet because it shrinks down to 2-3mm diameter. This is also a good choice for size because you need to be able to get it around any bends that may be in the metal unless you want to do some blacksmithing.

DIY Project
Fig2. – Sizing the tubing for the handle. This was a test so don’t actually put the tubing over the hinge!

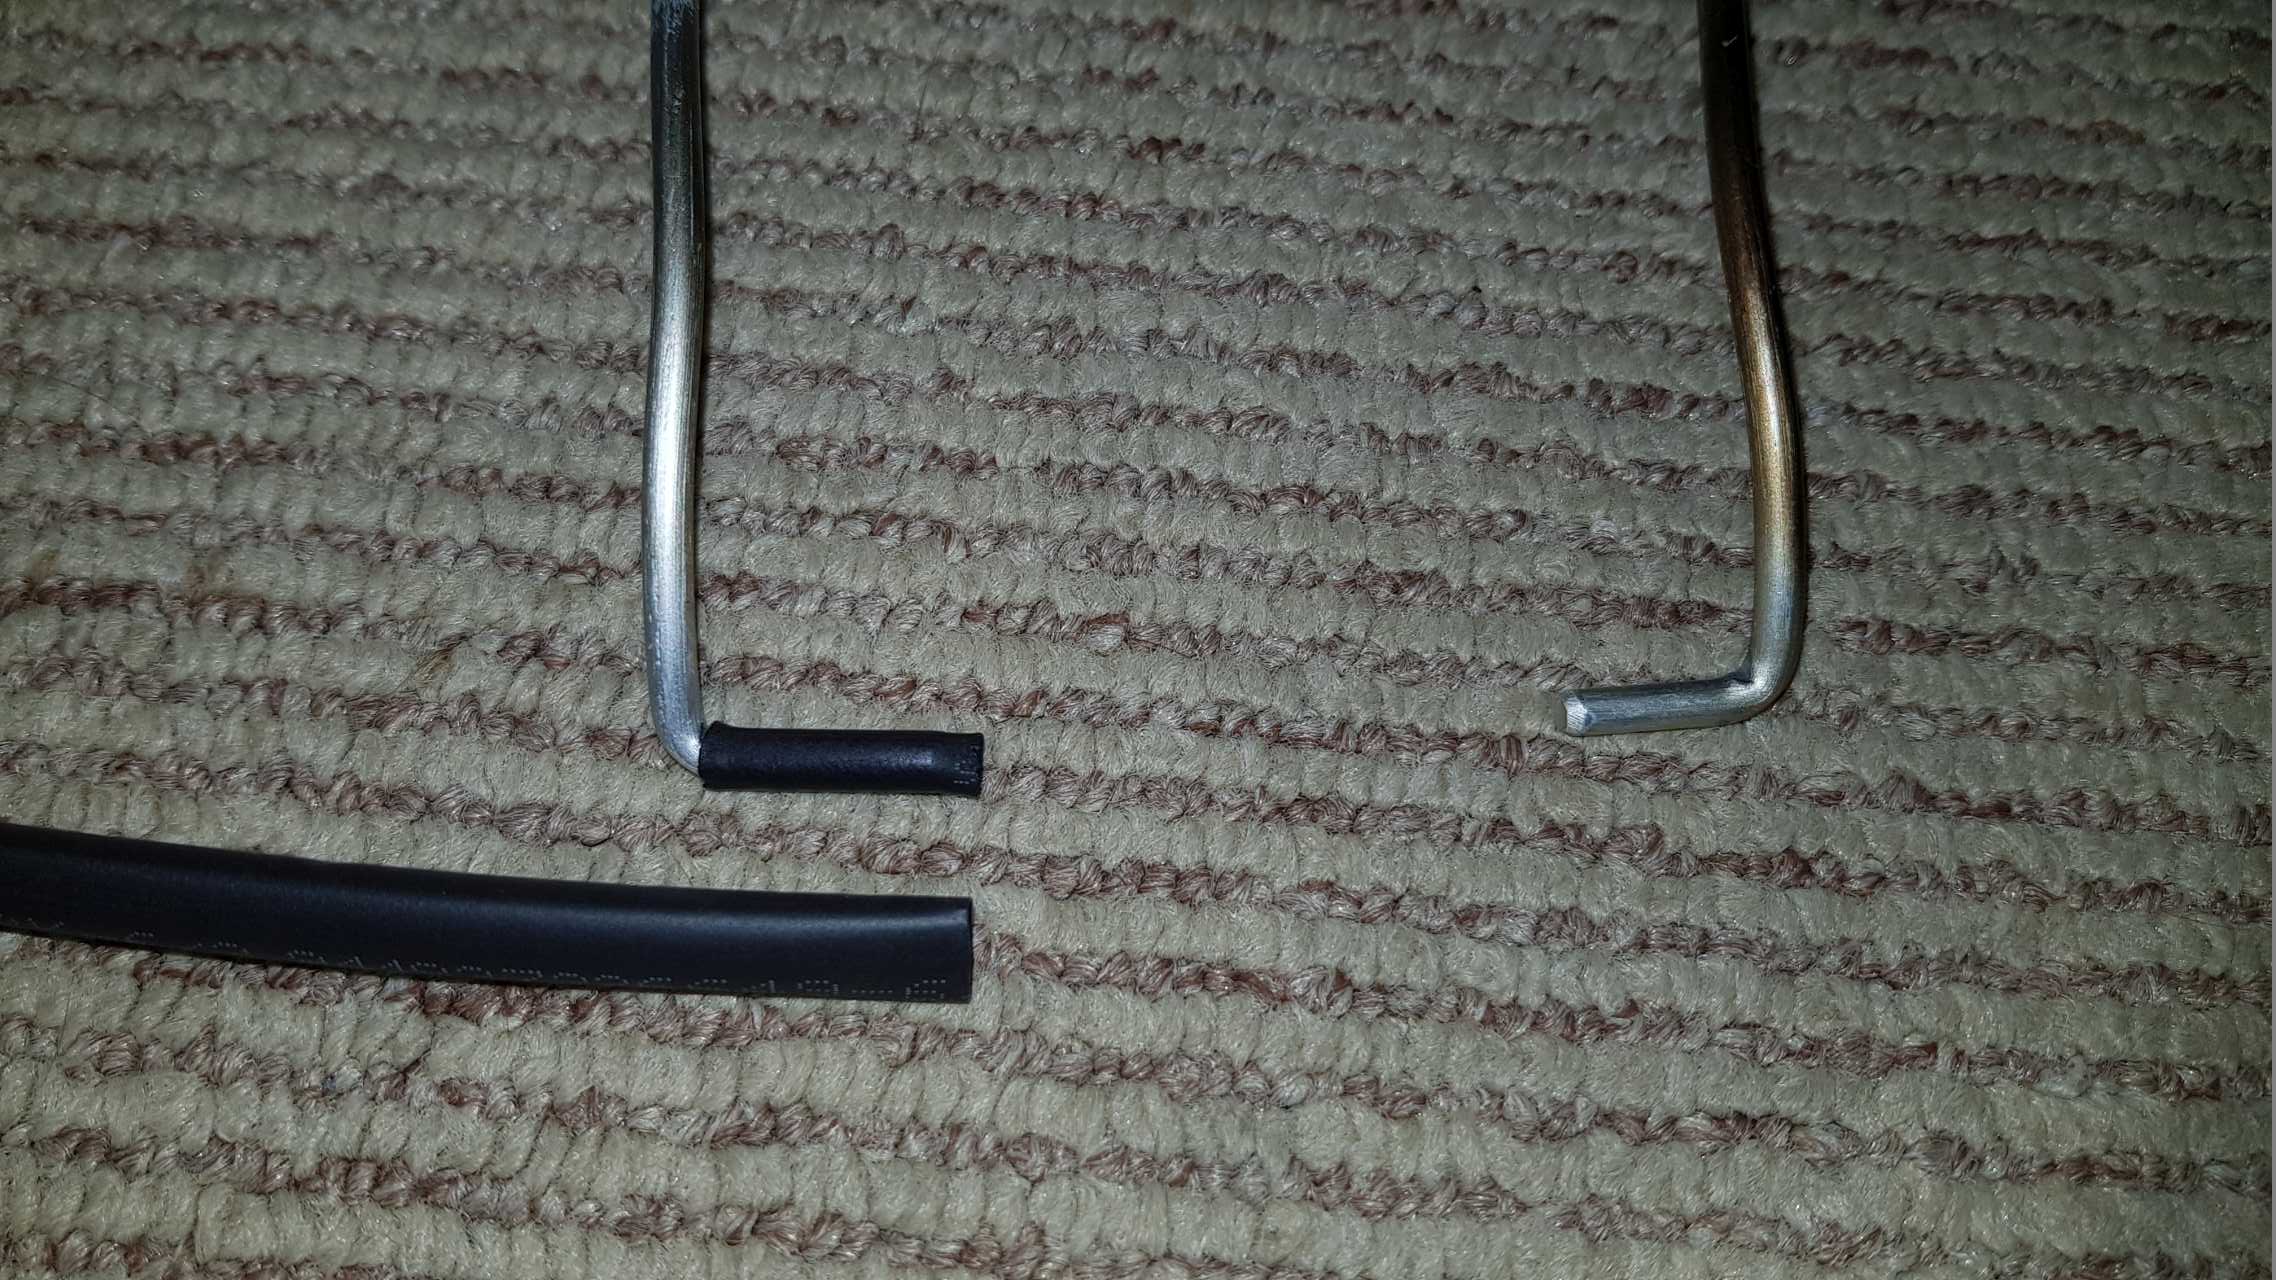
Once you’ve removed the handles, measure the tubing by eye and cut pieces to size. It may be easier to do it in a few sections if there’s multiple sharp bends. You can then simply overlap the sections to provide thicker coverage. Once you’ve got a few cut sections of tubing you now have to slide them up the handles into position. You can be rough with it as the tubing is resilient and it may be difficult to get it around some bends.

DIY Project
Fig3. – The first application of the tubing complete.

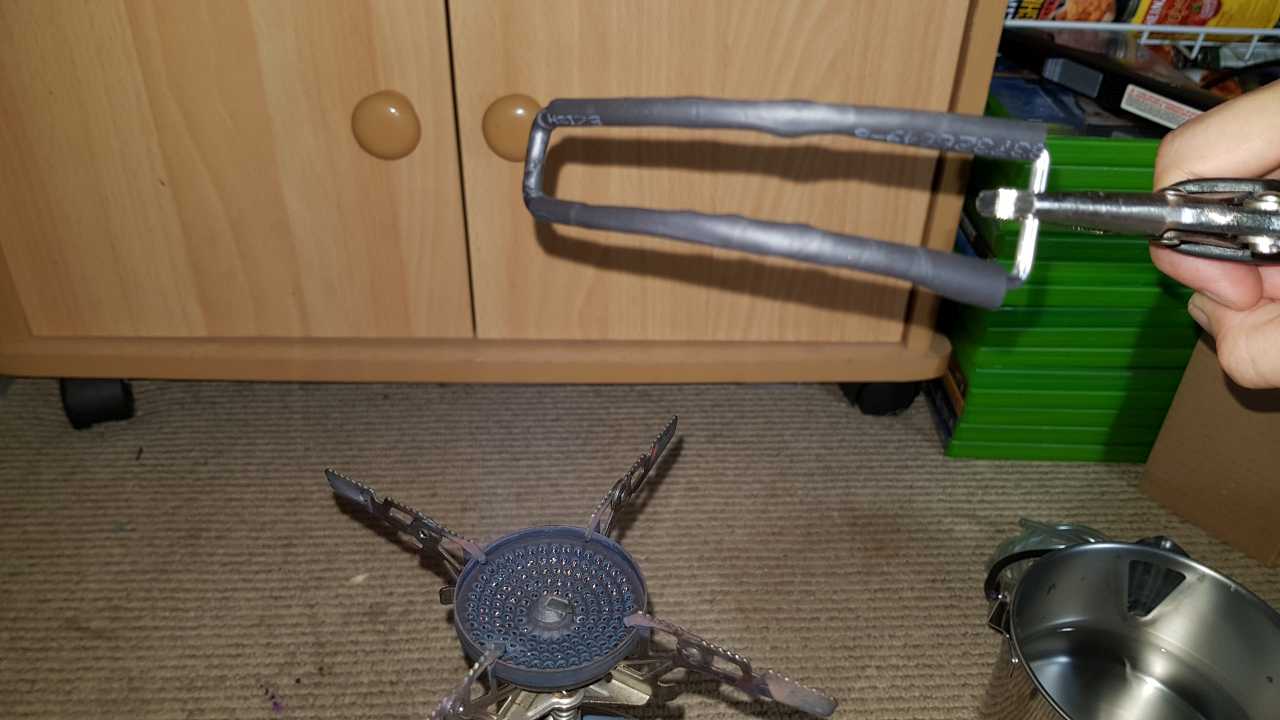
Once a section is in position you can heat it up to shrink it. You shouldn’t do overlapping sections at the same time in case the outer wrap shrinks first and distorts the inner one – but instead finish one layer at a time letting it cool between layers. Use the heat gun until it’s snugly fit around the metal and don’t forget to use pliers to hold the metal. An open flame is harder to control and provides variable heat output so be careful not to put it too close to the flame. Even if you put it in the flame, nothing happens if you pull it out quickly, however if you leave it in the tubing will start to form bubbles.

A point to note is the direction that the text on the wrap is facing. If you wish to try and hide it, ensure it’s facing down. You can see on Fig7 where I got it wrong and the text is facing up, but overall it’s not terribly noticeable.

DIY Project
Fig4. – Shrinking the tubing.

(Yes, I did mine indoors over an open flame, but as I said it’s pretty hard to get wrong if you follow some basic guidelines. I’m sure it would be even easier with an actual heat gun)

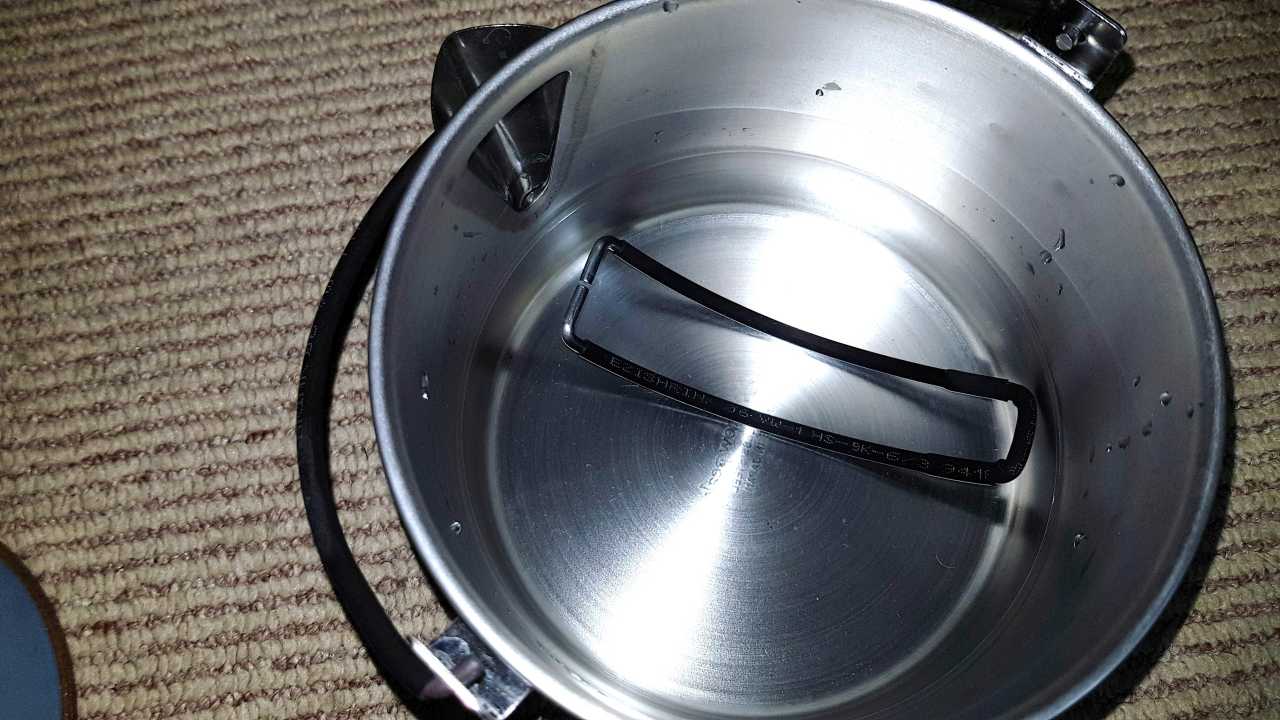
When you’ve got it looking how you want let it cool down before applying any additional layers as adding the tubing while it’s still warm may start to shrink it early. You can dip it into water if you’d like to help cool it faster, also known as quenching in blacksmithing (but that’s a little different). If you use the water method, ensure it’s dry before adding more layers. It’s cool enough when you can hold the handle without burning yourself, at which point you can begin to wiggle the next layer of tubing into position.

DIY Project
Fig5. – Cooling the handle faster than air drying.

Then simply repeat the heating step again until you’ve got a handle with a lovely looking layer of wrap over it.

DIY Project
Fig6. – The comparison between un-shrunk tubing and shrunk tubing.

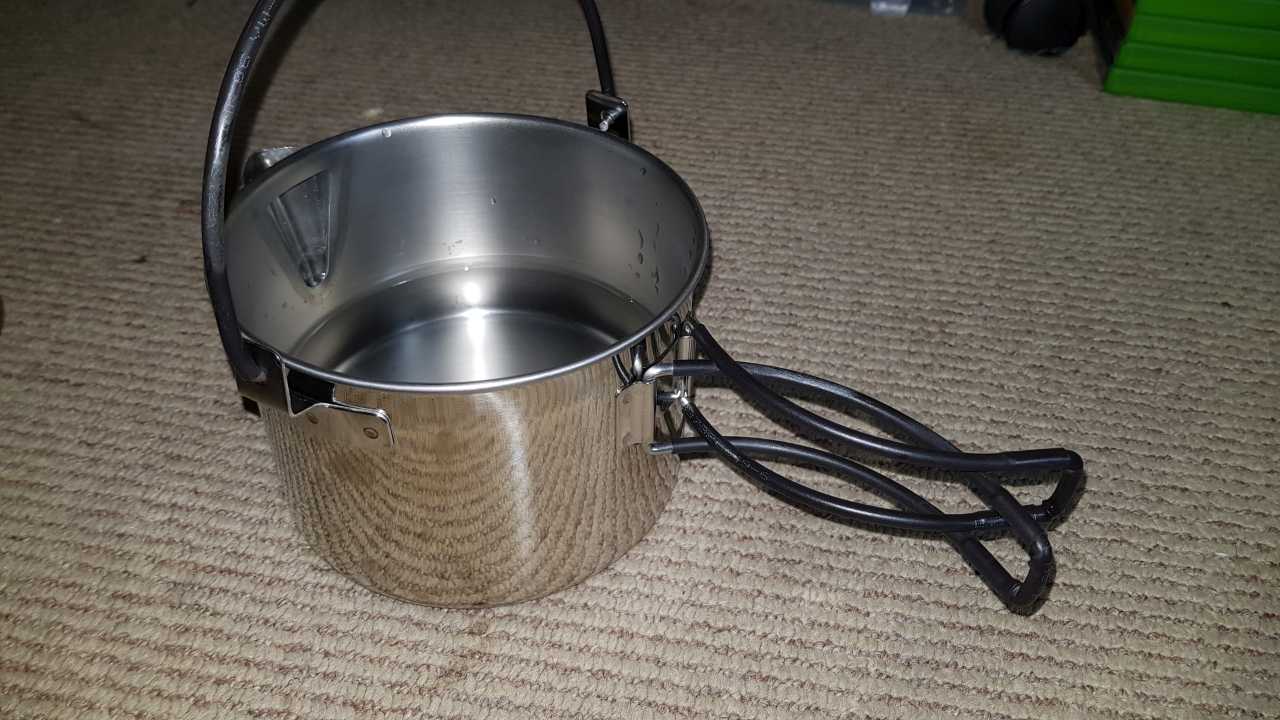
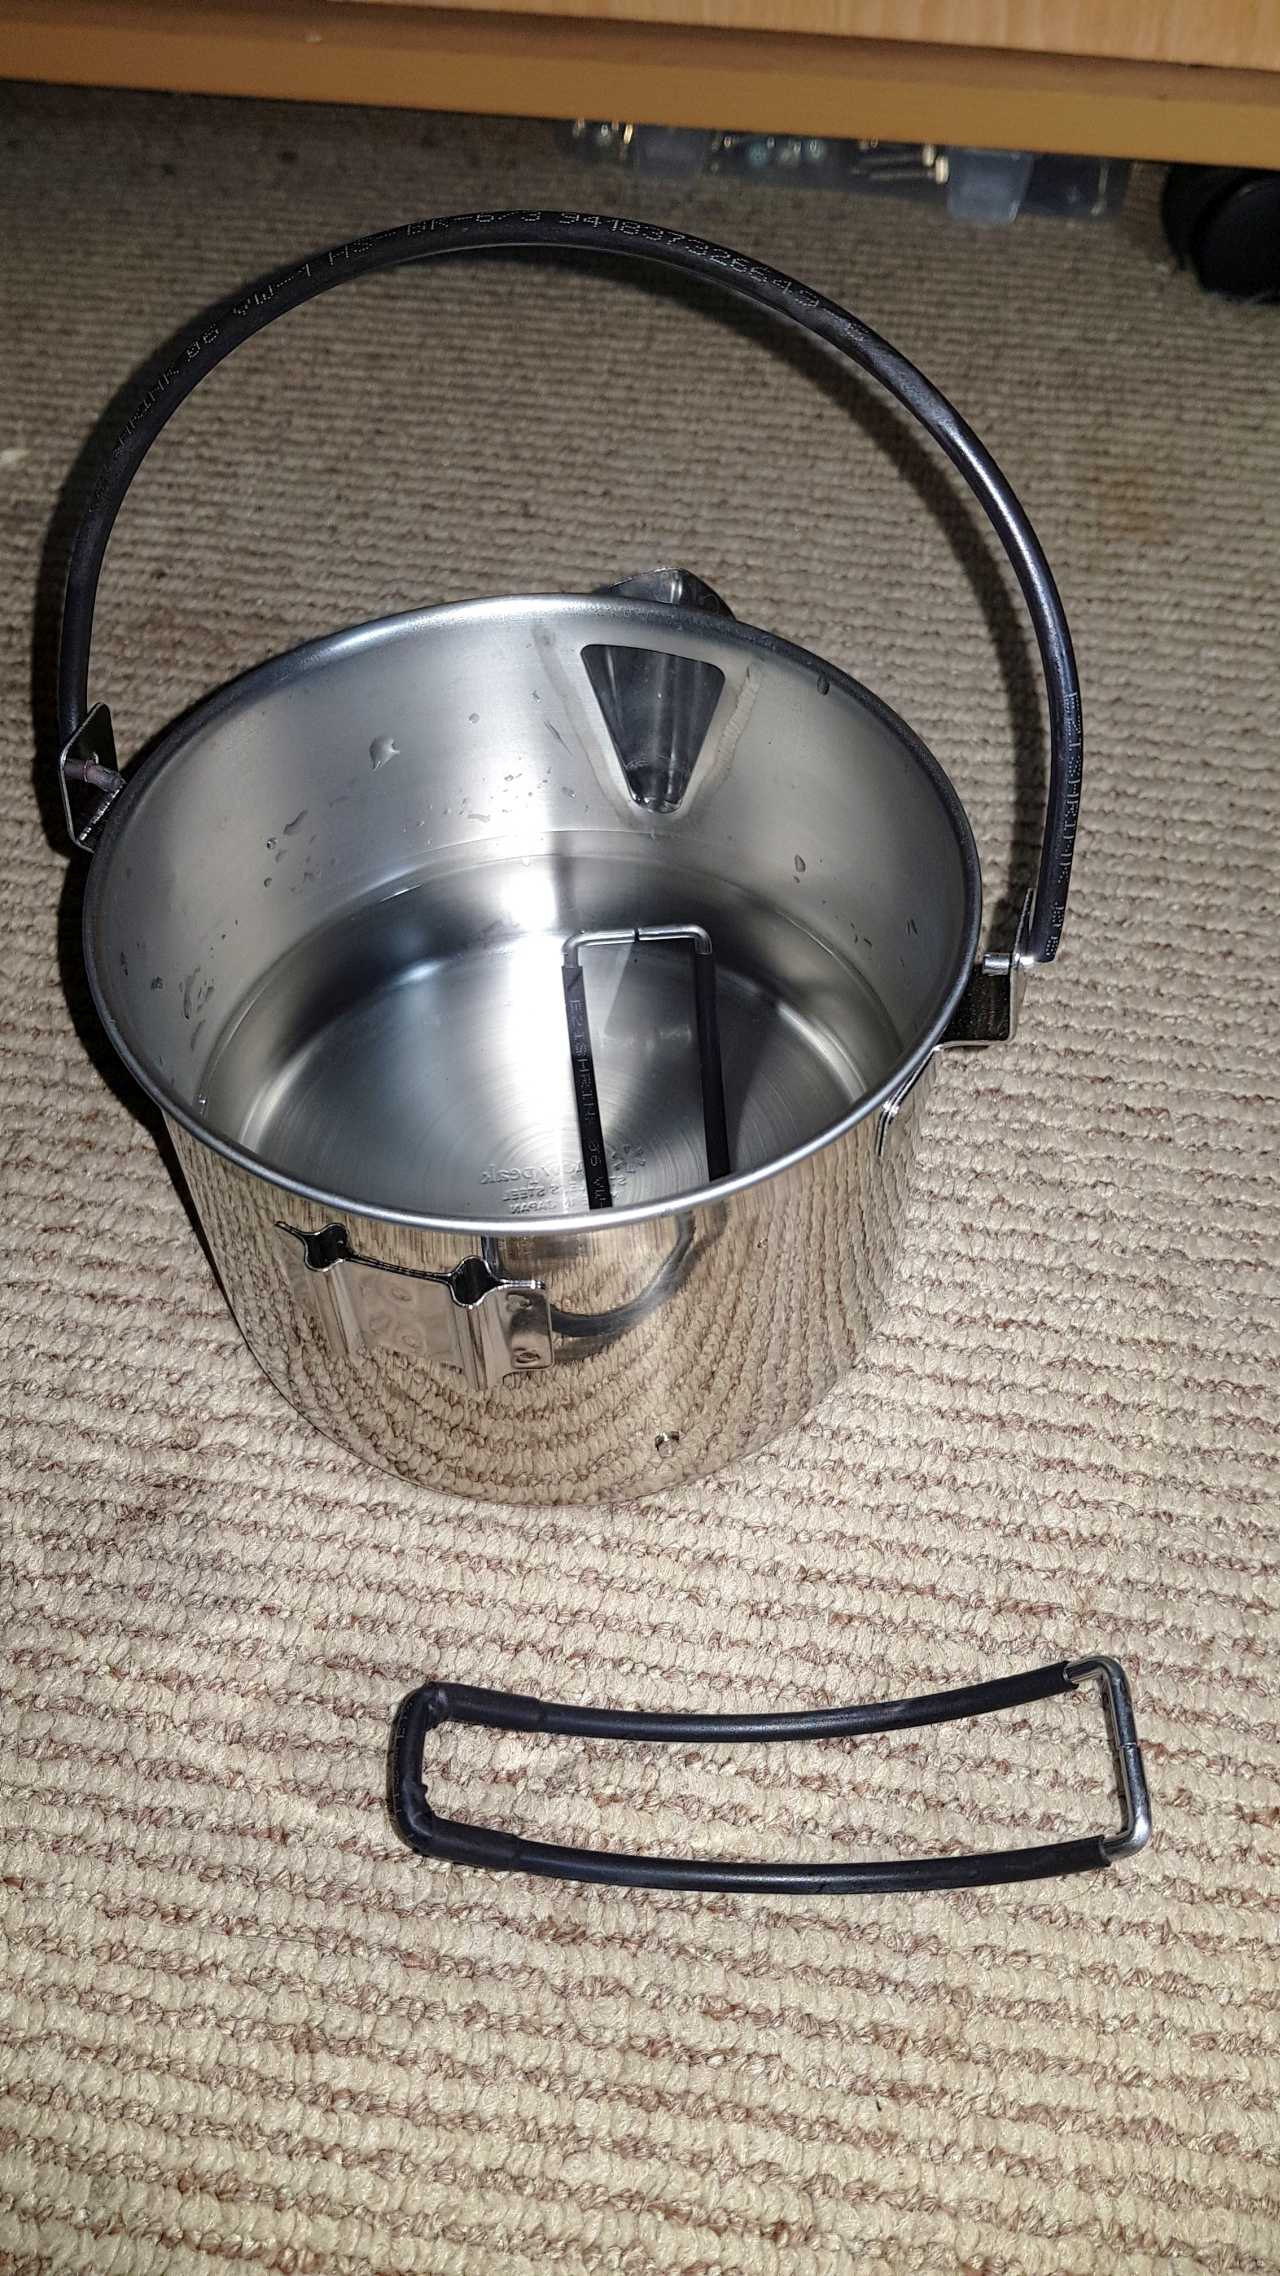
You can apply the same method for any and all of your camping pots with metal handles although some are extremely difficult to remove the handles on such as my stanley pot below (fig.7) which also had a sliding mechanism I had to remove.

DIY Project
Fig7. – My stanley cup with the tubing completed.

Results
Now for the results which is quite a fair improvement over just bare metal. You can definitely hold the handle for longer and feel about a 40% reduction in heat leaving about 60% heat. So with an additional layer you will feel about 36% of the heat down from 100%. You could probably add up to 5 layers if you wish, but each layer will become harder to slip on, but after so many layers I’m sure you won’t be able to feel much (if any) heat. Additional layers will also ass a bit more weight if ultralight backpacking is your thing and where every gram counts.

Below is an estimate of heat felt compared to number of layers:

0 Layers: 100% Heat
1 Layer: 60% Heat
2 Layers: 36% Heat
3 Layers: 21.6% Heat
4 Layers: 13% Heat
5 Layers: 7.8% Heat

If you wish to remove the tubing all you have to do is get some scissors and slice it up the side and peel it off. It won’t leave any sticky residue (Unless you melt the stuff over an open flame) and you won’t be able to tell it was even applied.

DIY Project
Fig8. – Letting a handle cool prior to putting them back on.

I only tried this on stainless steel and aluminium but it should work exactly the same for all other metals including titanium, copper, brass etc. Let me know what you think and if you tried this on your pots.

The Preparedness Encyclopedia (TPE) – Version 1

This post is out of date. Check out the latest version of TPE below:
Download TPE Here

As you may already know, we live in an extremely fragile world where reliance on the government, nature, water systems, electricity, internet, sewage, trucks etc, etc, etc, can all be disrupted so easily by events such as natural disasters, wars or simply bad luck. Humanity in general has had life pretty easy since WW2 ended with an explosion in technology and countless inventions to make life just that little bit easier. Unfortunately all this dependence has made us less reliant on ourselves and more on these fragile modern networks which are so delicately balanced. Over the years we’ve seen horrific disasters occur in other parts of the world and think that it will never happen here for various reasons, but eventually every region has their disaster and global disasters in particular are ones that nobody can hide from.

TPE Picture
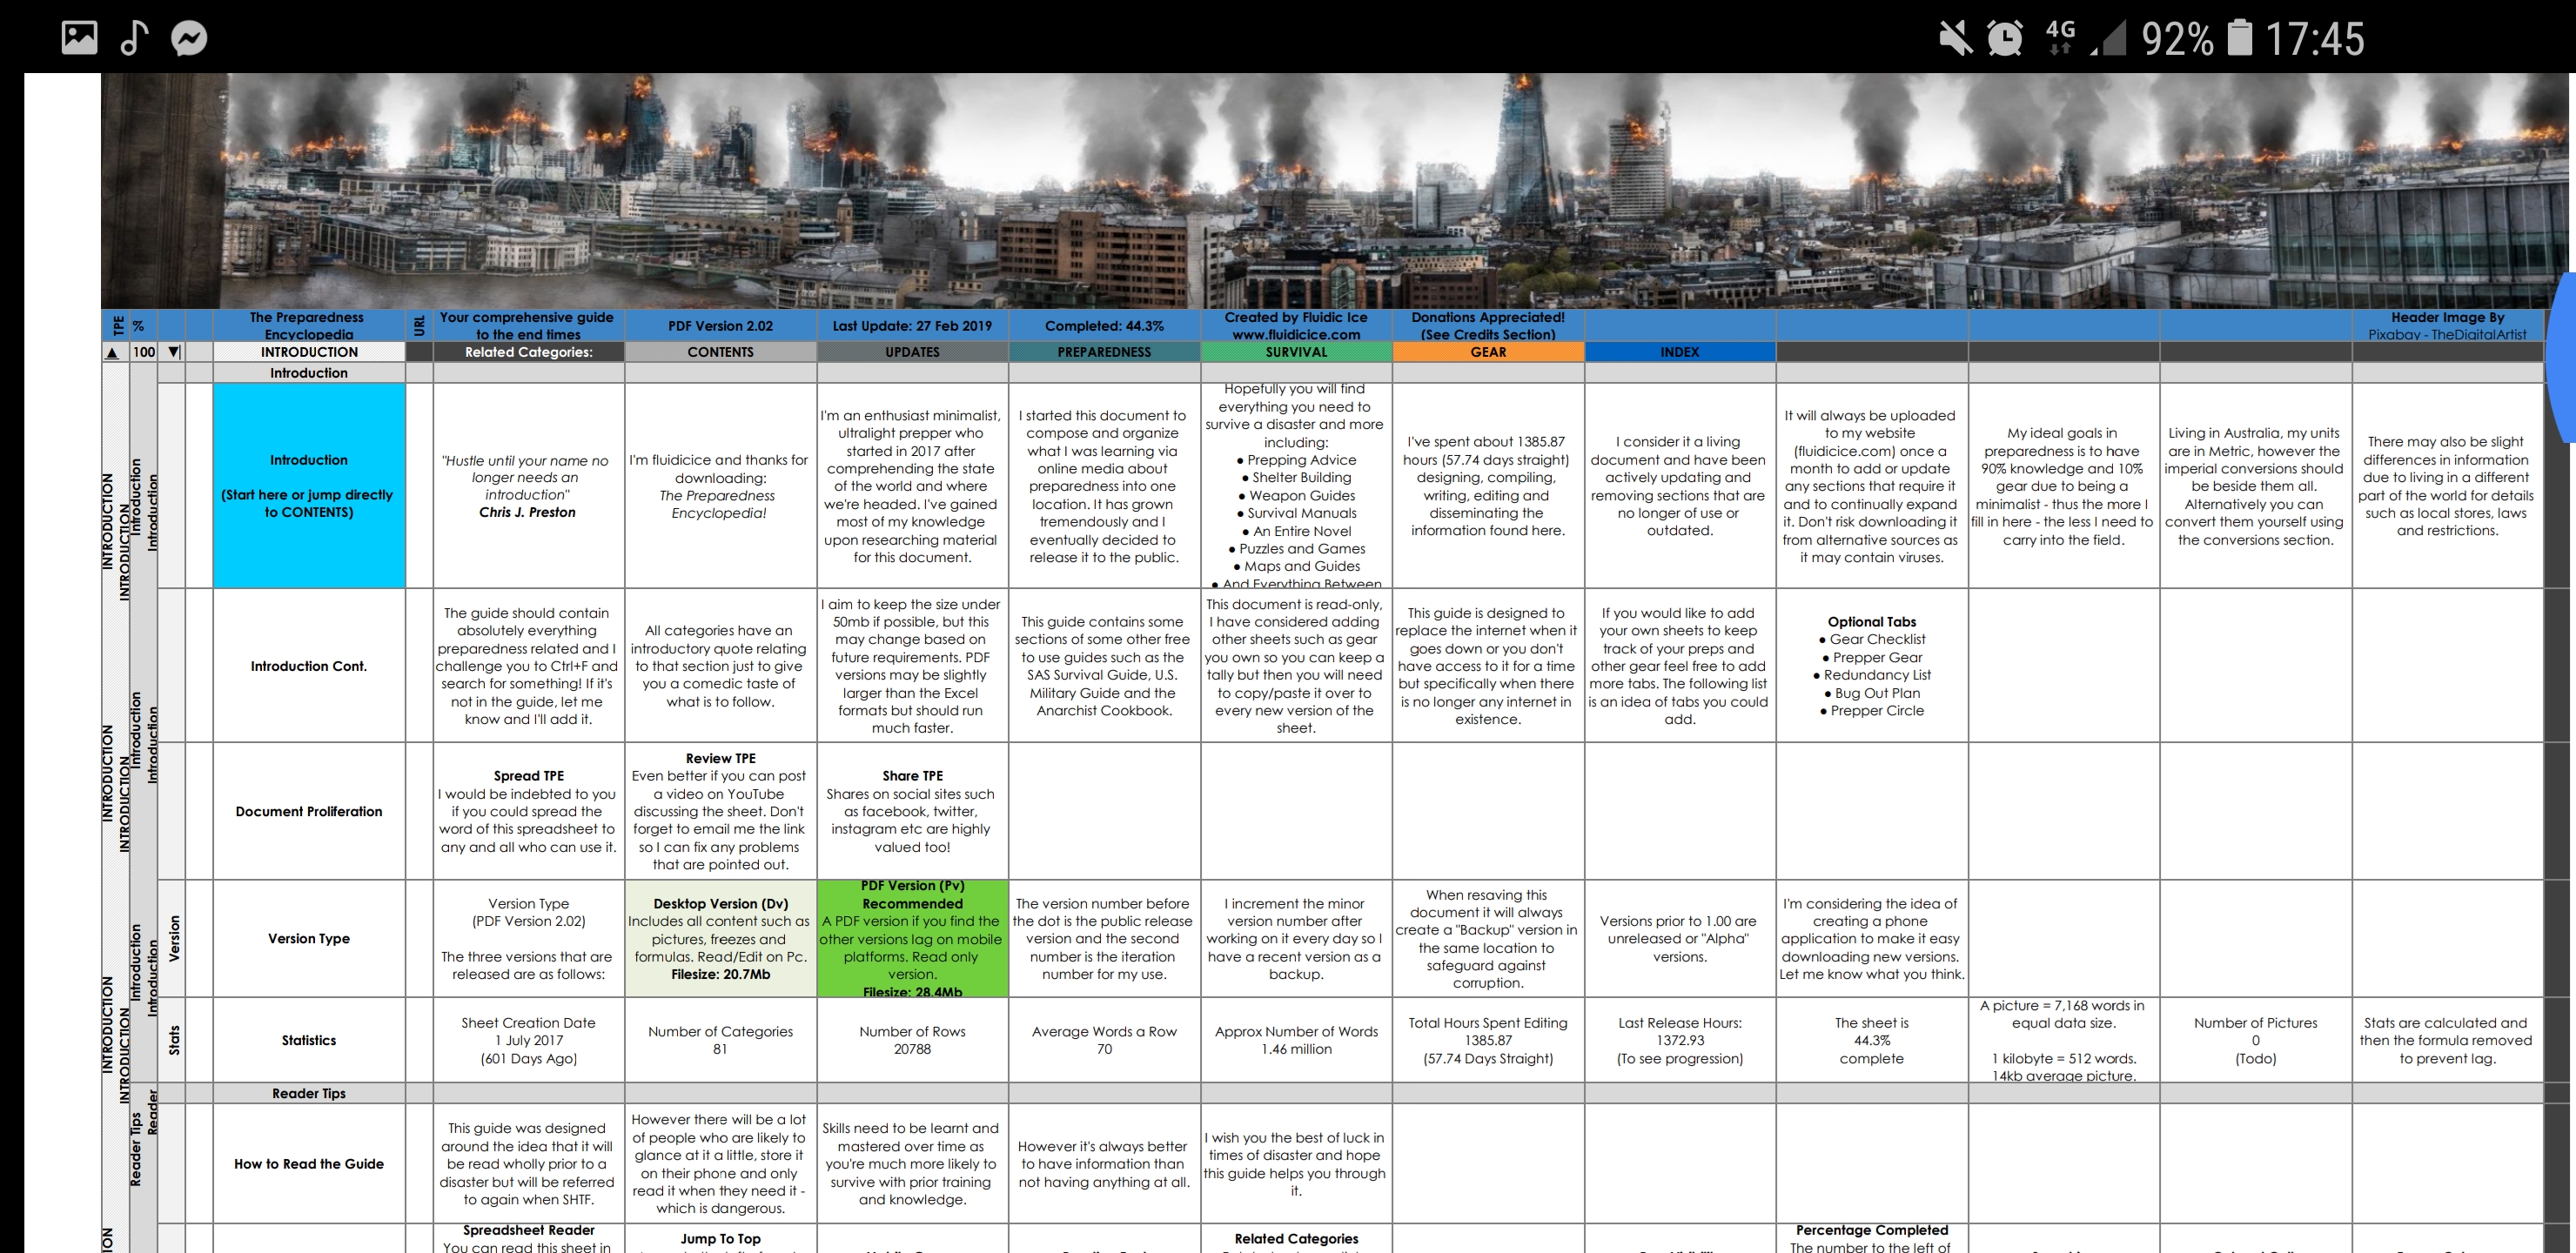
Fig1. – The PDF version of TPE on a smart phone.

That’s where TPE comes in. Giving you that vital knowledge to help you survive WHEN disaster strikes on basically every field related to preparedness or survivalism. This however is only the first step in being prepared, knowledge is about 10% of the battle and practise being the other 90%. So don’t think this guide will instantly give you all the skills needed to survive WW3 in the future, you have to start now.

TPE Picture
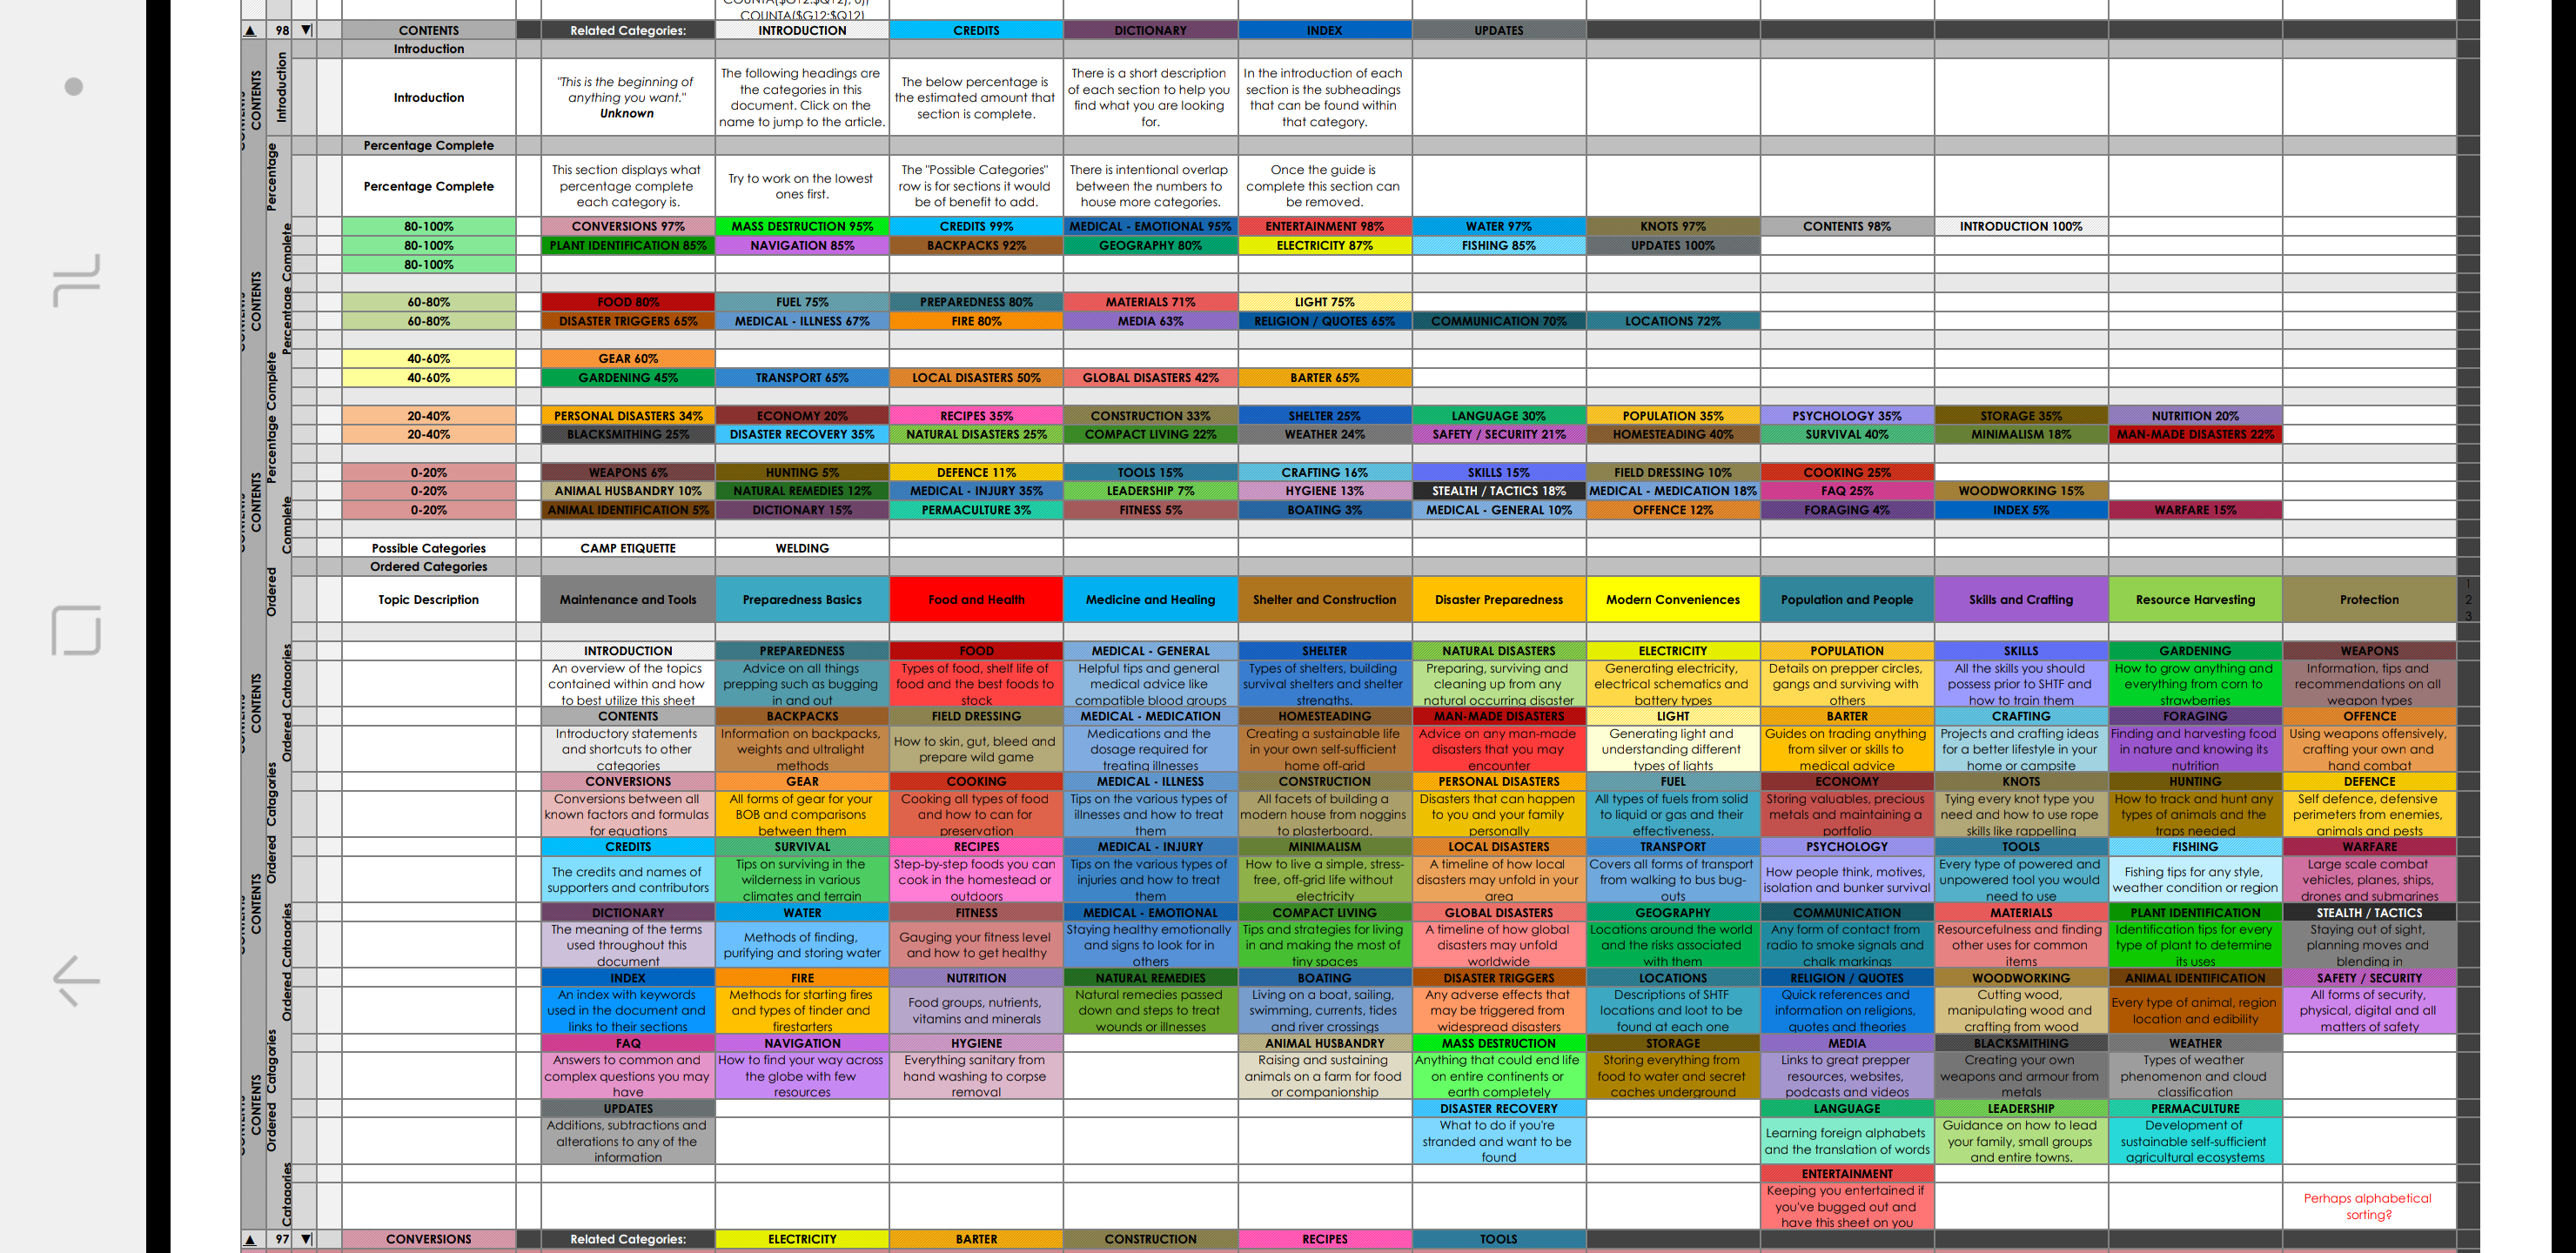
Fig2. – The categories found in the spreadsheet.

The official release of The Preparedness Encyclopedia which I started back in June 2017 is now open to the public. It contains vital information on every conceivable subject related to survival and preparedness which should be of use when the worst does happen whether it’s a local or global event. The guide currently comes in two different formats:

1. The first being the mobile/portable version which is designed to run as fast as possible on handheld devices. It’s a PDF file coming in at about 32mb at the moment.

2. The second type is the file I edit the guide with being the Excel file (.xlsx). It’s much slower than the PDF counterpart and it may lag, or not even open on mobile devices. However this version is editable and has hyperlinks to make it easy to transition between different sections.

(All images can be clicked on for the full size, and then zoomed in to even more)

TPE Picture
Fig3. – The start of the preparedness section.

Getting Started
To get started with TPE all you need is:
(For using the PDF version)
• The guide itself
• A smart phone/tablet/pc
• Any PDF reader app

All of these can be obtained free of charge assuming you have a phone already!
Although donations towards the meticulous crafting of the guide are welcome too, where how to instructions can be found under the contact page on my website.


Downloading
You can find TPE on my website by clicking “Main Website” up the top left of this page, and then using the navigation bar to find “TPE” under the “Resources” menu. From there you can download any of the versions I currently have.

Or Click Here


TPE
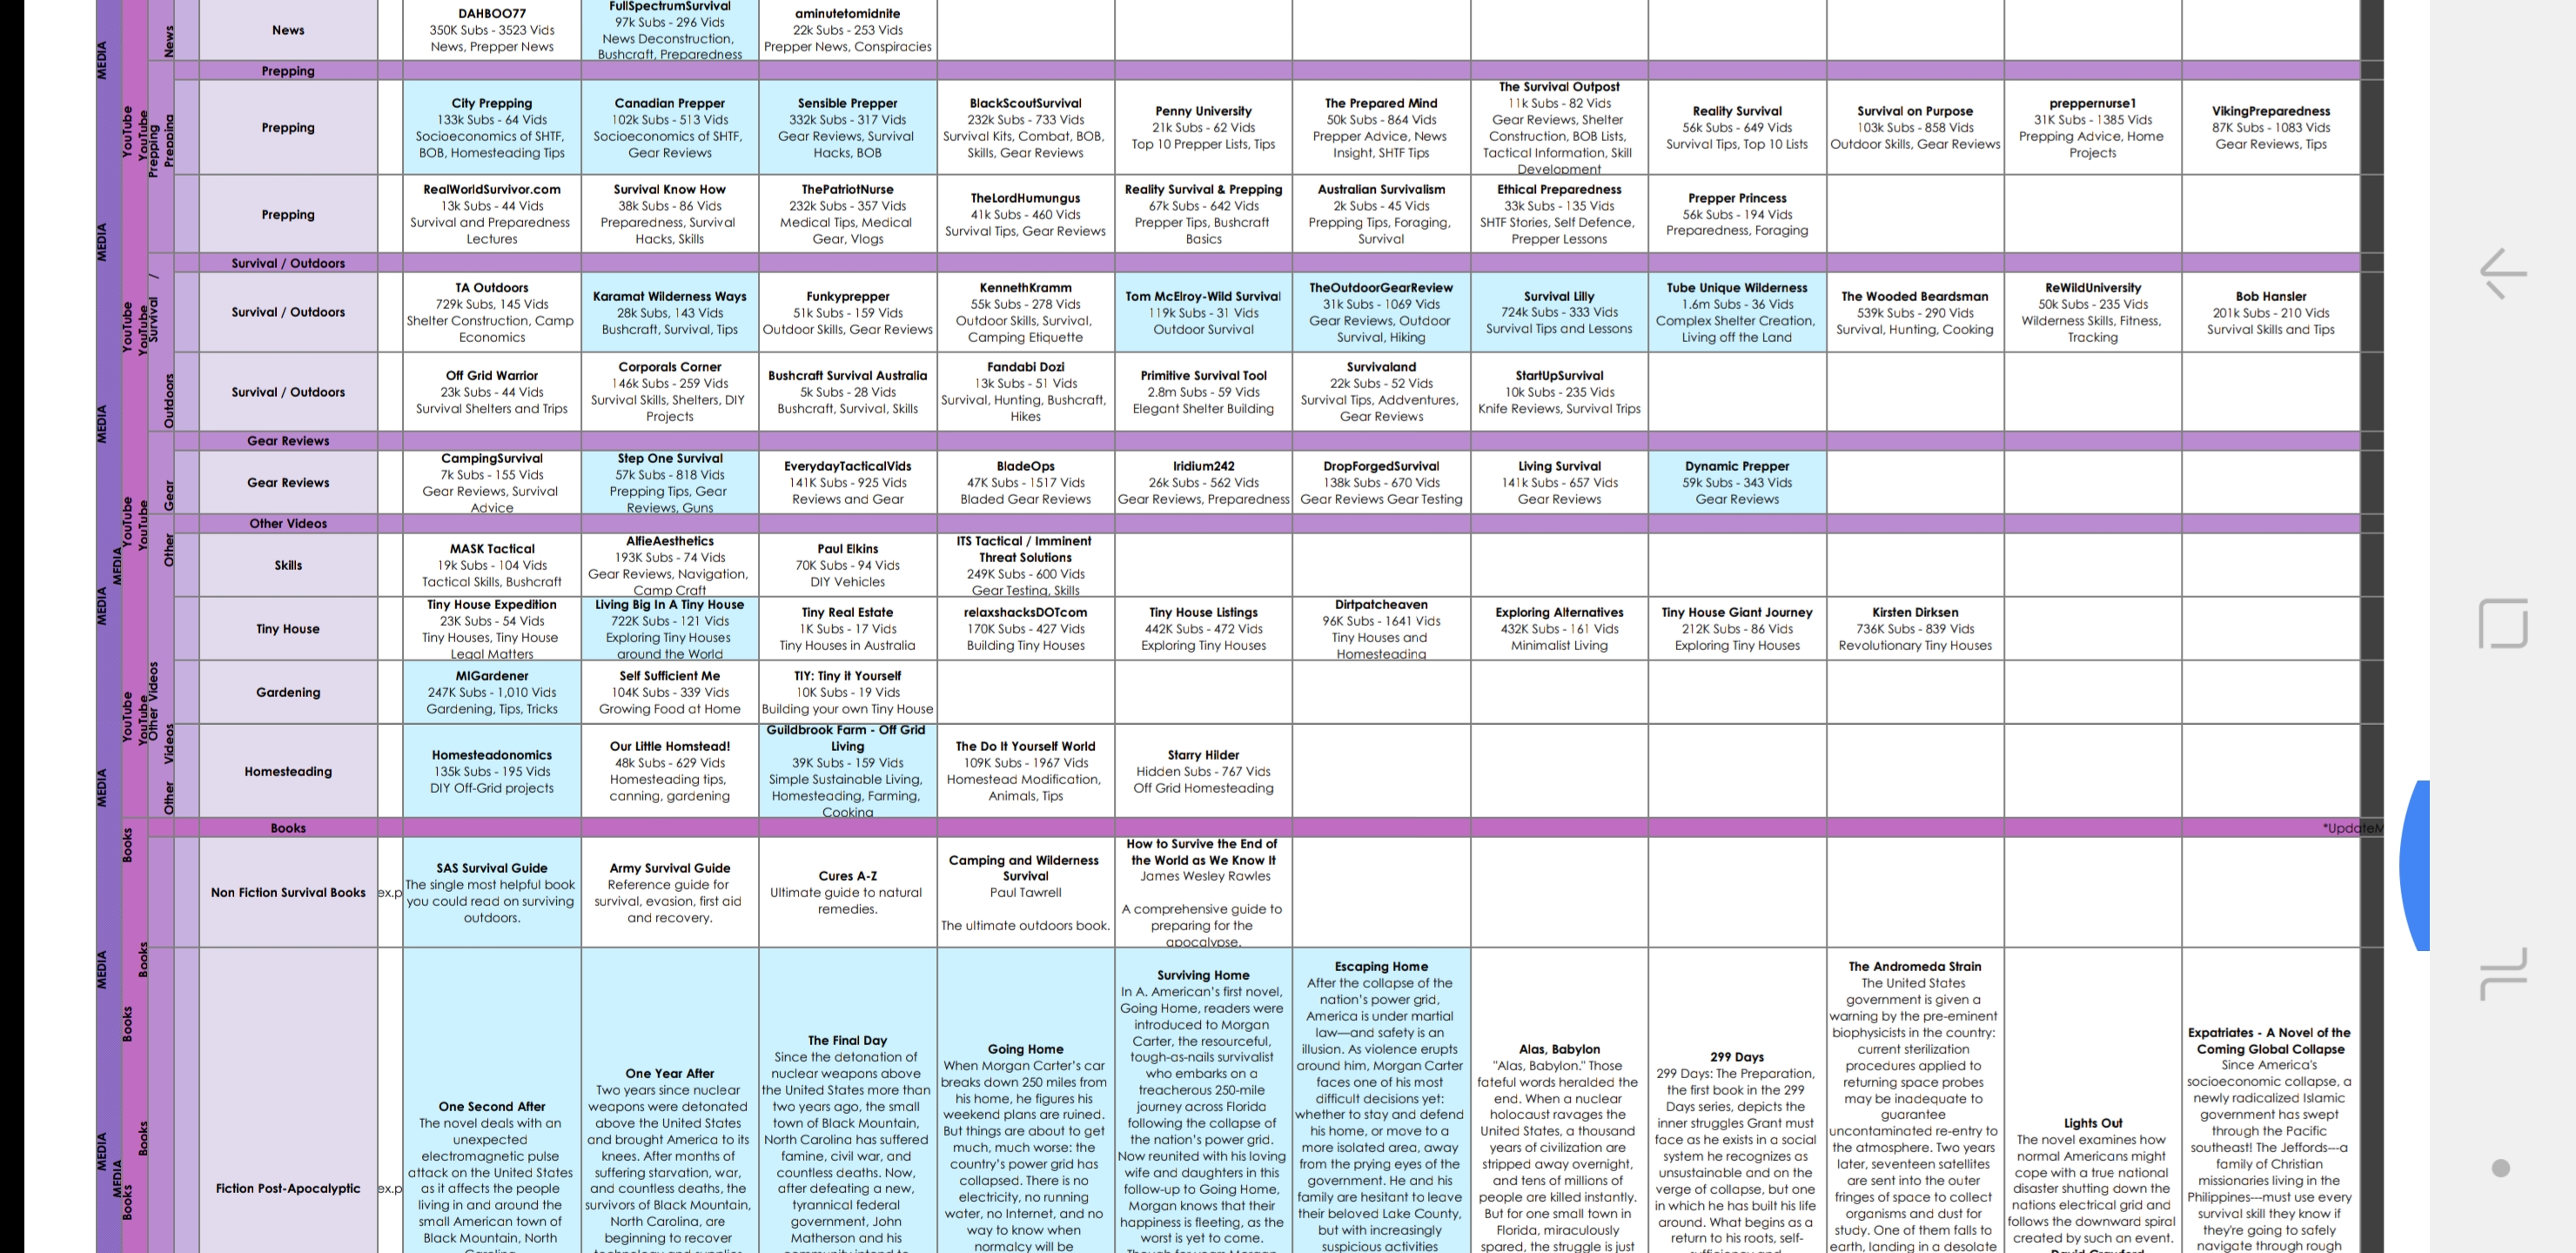
Fig4. – Some great preparedness resources can be found listed in the guide in the MEDIA section. Contact me if you’d like your resource to be added.

Categories
There’s 4 primary headings in the guide which can be seen on the far left of any of the images of TPE. Content is divided between these sections to make reading and navigation easier. The first column is the section type such as “MEDIA” in the image above. Then in the same example it goes into “YouTube” > “Other Videos” > Then for this example there’s a blank category because I didn’t need to go any deeper, however other sections make use of all the sections. You can think of these divisions as folders, so inside the “MEDIA” folder are the “YouTube” and “Books” folders, and inside the “YouTube” folder are the “Prepping”, “Survival / Outdoors”, “Gear Reviews” and “Other Videos” folders.

Image Detail
Below is a comparison of screenshots from my phone showing the detail in the map which could come handy in a wide array of opportunities if you don’t have access to internet.

TPETPETPE

Fig5-7. – A side by side comparison of the quality of imagery in TPE zooming in each shot.

Below are more images to help persuade you to give it a try:

TPE
Fig8. – A screenshot of the navigation section.

In the NAVIGATION section you will learn about using compasses, magnetic declination, navigation using the sun, stars and your watch, reading maps and more.

TPE
Fig9. – A screenshot of the entertainment section featuring crosswords and many other puzzles.

Lots of entertainment to help keep your mind occupied and in a sane state. If you’re worrying about everything that’s going on around you all the time you will adopt a very negative state of mind over time and that’s exactly what the entertainment section aims to counter, regardless if you’re bugging out alone or have your family with you – there’s something for every situation.

TPE
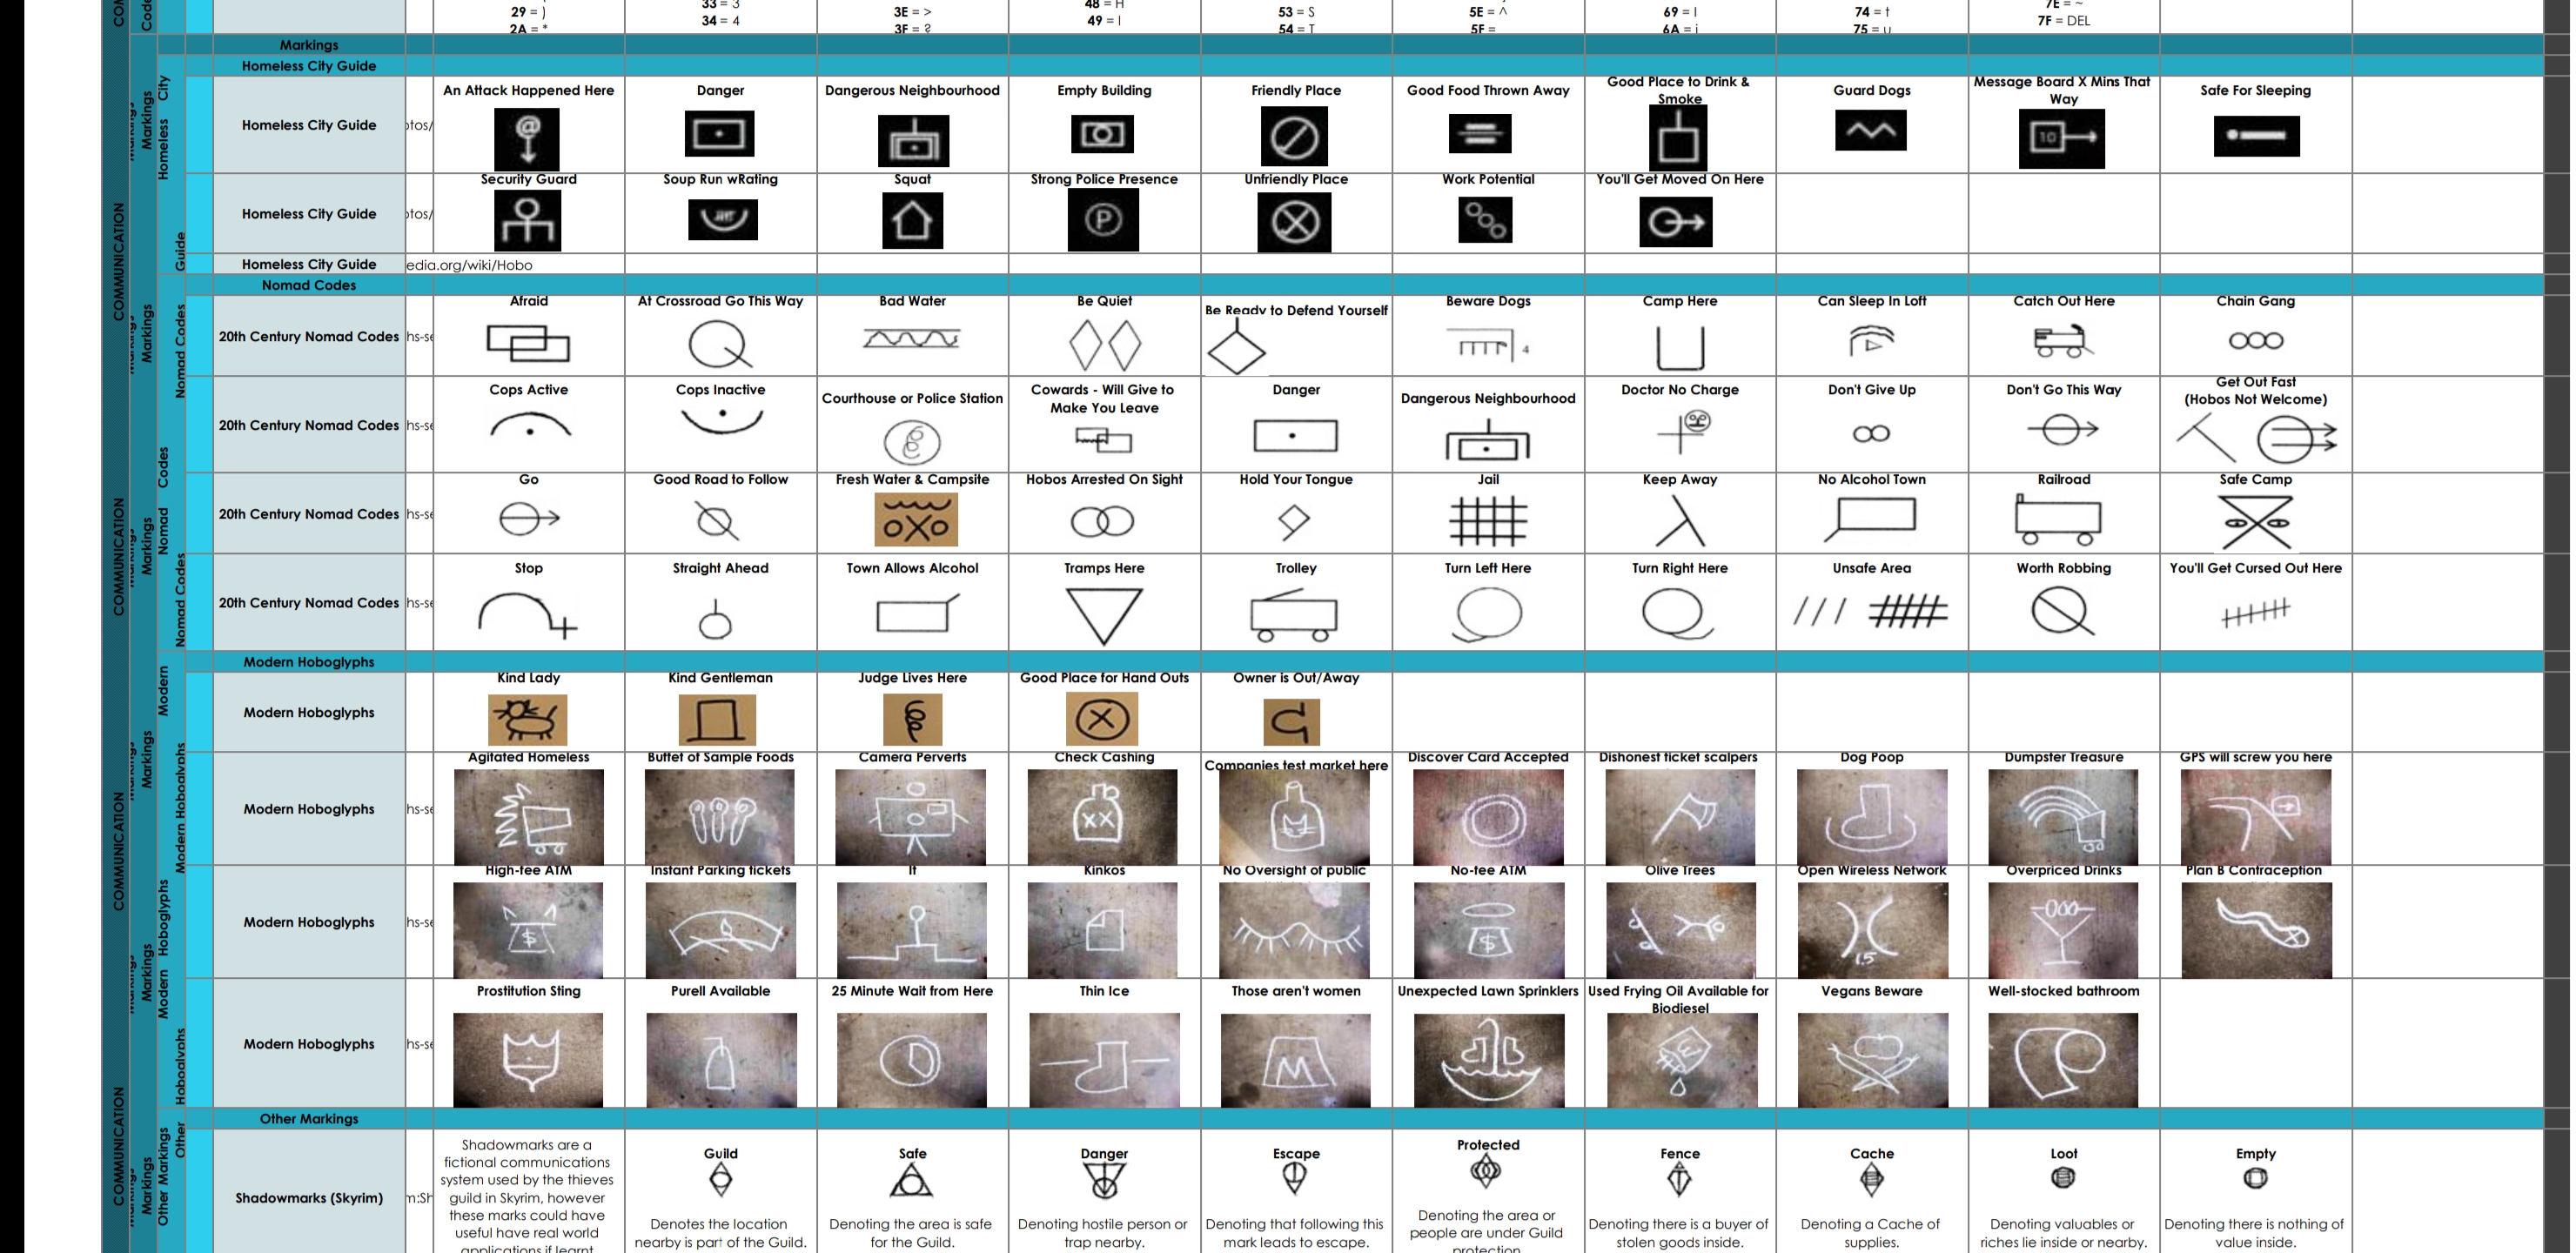
Fig10. – Codes and ciphers can be found in the COMMUNICATION section.

It may be of benefit to communicate in code sometimes so the government or others don’t understand your message and that’s where the COMMUNICATION section comes in handy. It can also be used to decipher codes of others if required and contains most of the commonly used codes today.

Are you convinced to download it yet? Follow the link below or keep scrolling until you are!
TPE

TPE
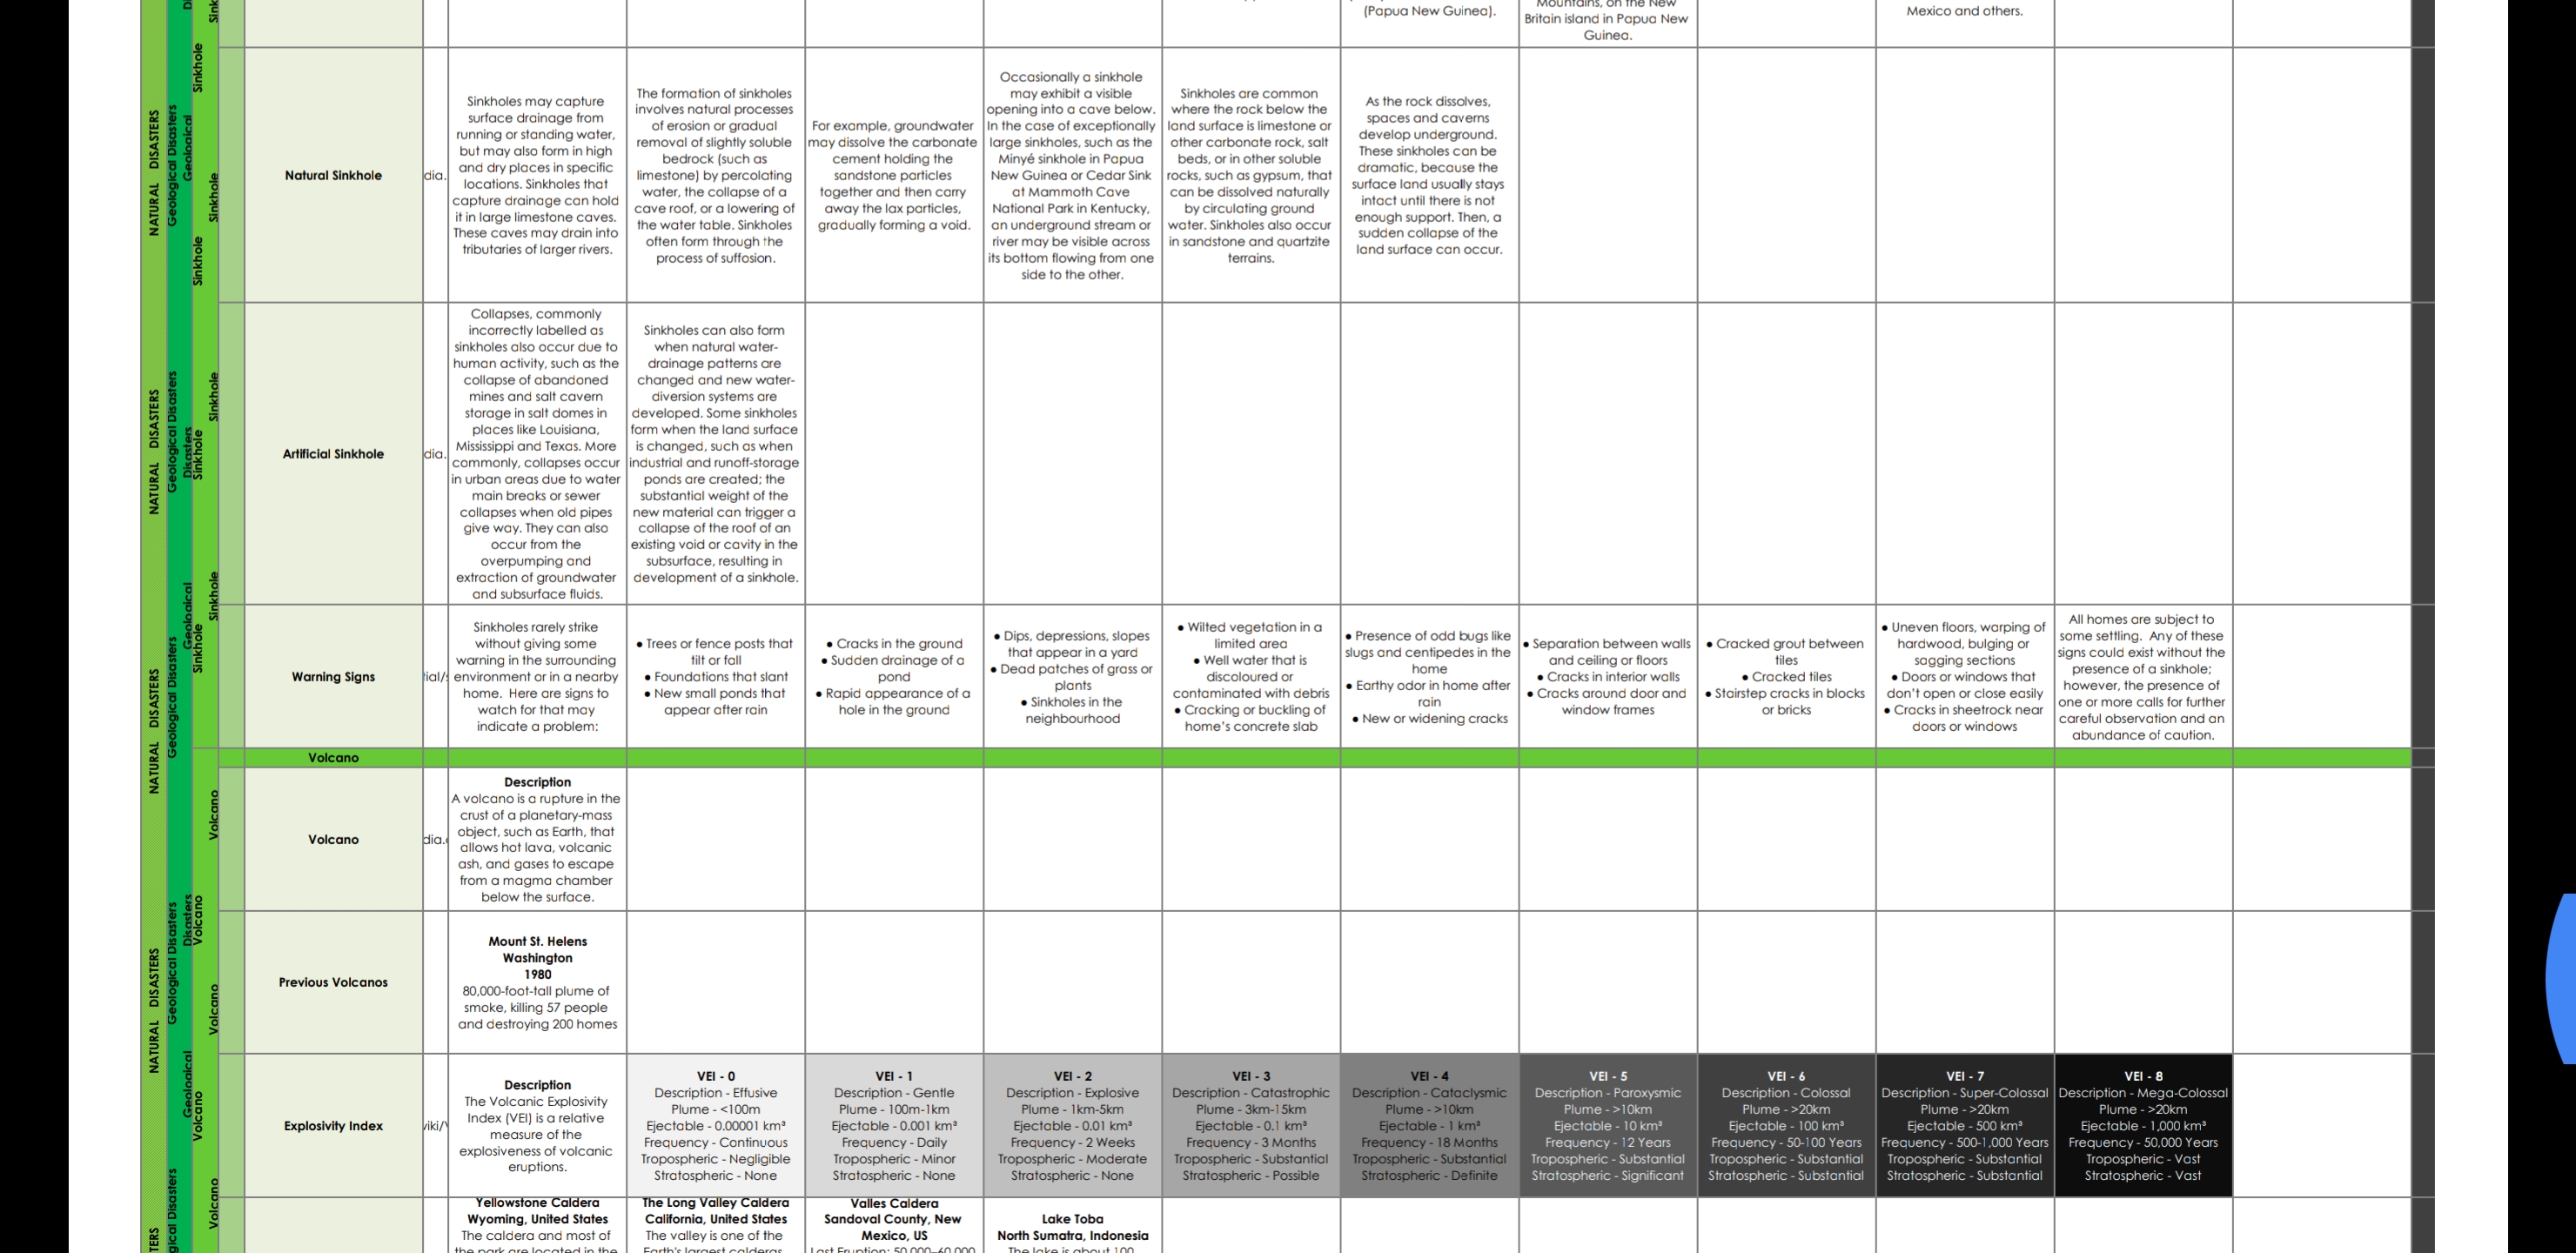
Fig11. – The natural disaster section detailing volcano explosivity indexes.

The Volcano subsection is housed within the NATURAL DISASTERS category of the guide. This section discusses any and all types of natural disasters from earthquakes to a tsunamis and how to prepare for them and what to do if they occur.

TPE
Fig12. – An excerpt from the fire lighting section found under FIRE. Note: “o” indicates that there’s no information in this cell yet.

The FIRE section is obviously about how to start fires with various methods, tools and equipment, how to extinguish fires and finding natural tinders in the environment. There’s also information on fire types, flame colours and their effects and what is required to start a fire.

TPE
Fig13. – Details about landform types and their advantages and disadvantages.

Looking for a location to set up camp or to bug out to may be a challenge when also faced with the overall intensity of a disaster, so this section is aimed at giving pros and cons of each environmental position as well as any hazards you may not realize prior to calling it home.

TPE
Fig14. – Signals for communicating with aircraft if you wish to be rescued.

For those times when you’re lost and you need to communicate with rescuers who are unable to land in your area. Also shown on the picture above is a list of ground signals which hikers and other trail-goers may leave for others to take note of, but these are generally used in situations where you want to be found.

TPE
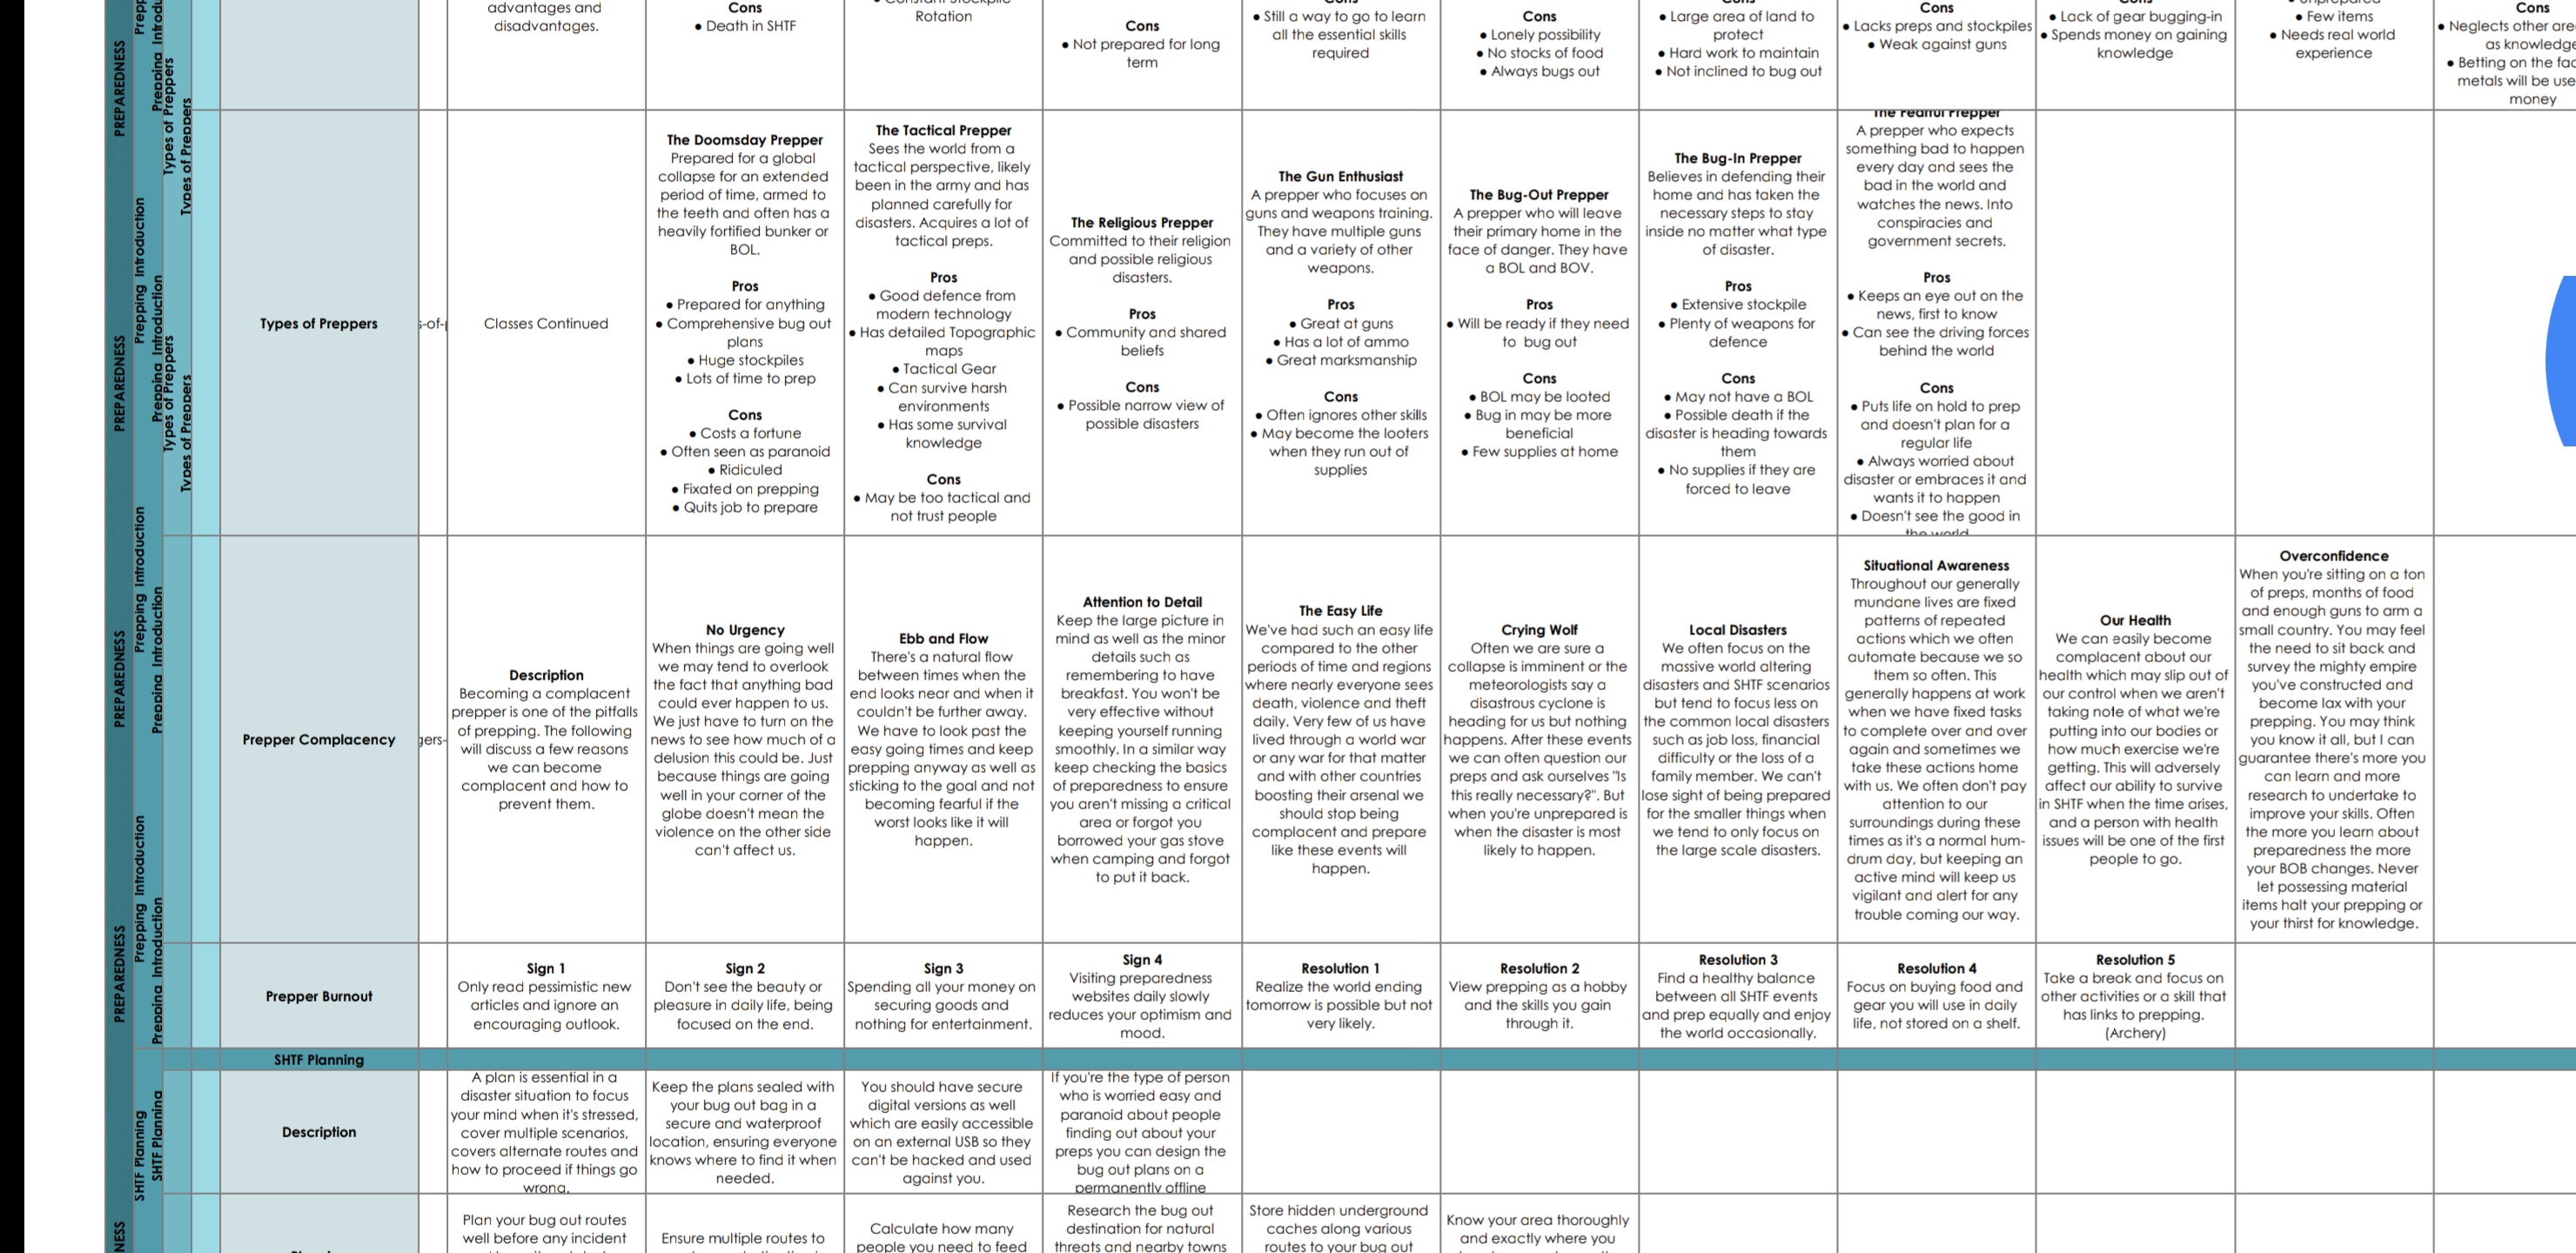
Fig15. – Details of types of preppers and their scale on the preparedness index.

An interesting little list which can be fun to try and place yourself on as a prepper as well as understanding the other levels of prepared people out there. Higher is not always better!

TPE
Fig16. – There’s an entire fictional novel also included.

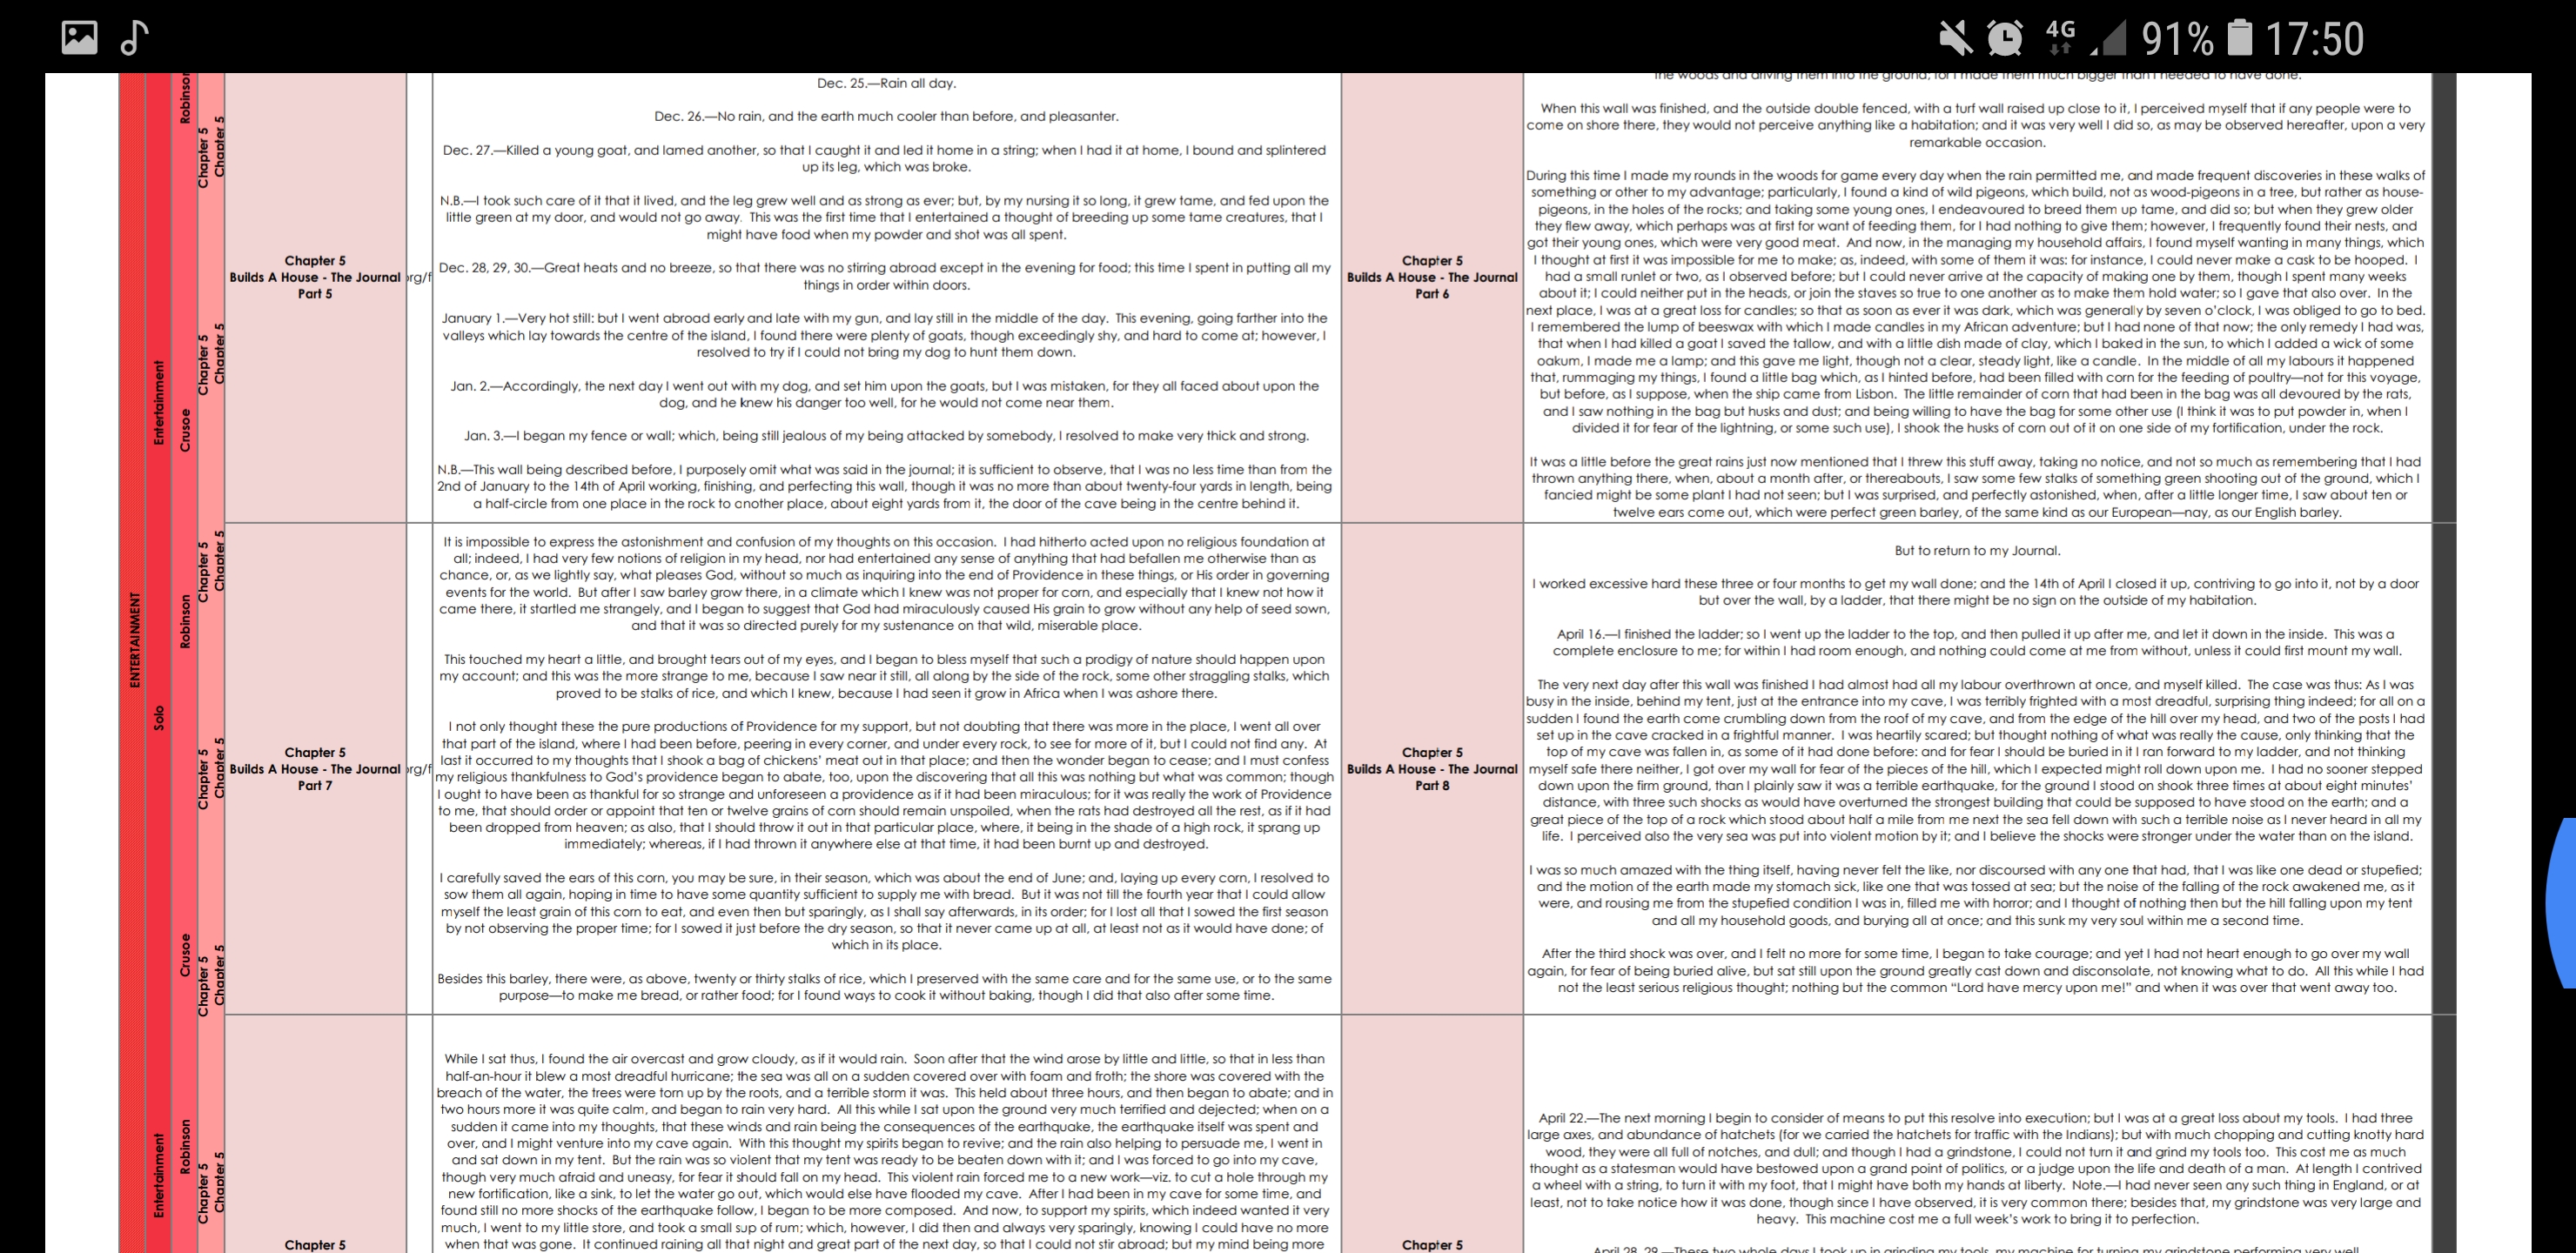
The entire novel of Robinson Crusoe is also included as a distraction from the disasters that may be going on around you to try to ease your mind. The entertainment section is arguably one of the most important sections as it can boost your, and your parties morale greatly in those hard times.

Hopefully by now you’ve decided to see what all the fuss is about and download TPE to your device as a “Just In Case” method to help safeguard your existence against end of the world. You will have much greater chance to survive a disaster if you read and hone your skills prior to any disaster happening, so start reading it today! One thing is fact, and that is that you never know when disaster is around the corner…

Tiny House Development

Since the start of 2018 I’ve been interested in tiny houses thanks to Bryce from Living Big in a Tiny House. If you haven’t seen his channel he often uploads amazing spaces in breathtaking locations and describes how they reached their goal throughout the episode. His channel can be found here: https://www.youtube.com/channel/UCoNTMWgGuXtGPLv9UeJZwBw.

Housing
This got me thinking about what I wanted to do with my life, did I really want to end up borrowing over $300,000 and have to pay back something close to $500,000 over 30+ years? Not if I could help it! So I got thinking about how I would go about following my dream of living a life without debt, strings or paperwork and ended up at a tiny house on wheels to start me off. The alternatives were to rent forever which would be just as costly as borrowing, fitting out a small van with a bed much like this http://sean.cm/i/van-build/, or building a small house on a foundation.

The van idea was very enticing as you don’t need a hefty truck or ute to pull an entire house with which would cost a fair bit more. Also it’s much stealthier so you’re able to park basically anywhere and get away with it overnight as long as you don’t stay in the same place too long or people may start to ask – who’s that guy parked over the road, and what are they doing? Once the police know your number plate and what you’re doing in the van the game is pretty much over and they will keep an eye out for you.

So this brings me to a tiny house on wheels. I realized it would take quite a substantial amount of research, skills and equipment to get the house built so I set out to firstly understand what is required in a house. I watched every one of Bryce’s early videos on his channel where he develops his own house and gives a lot of vital information on design techniques, framing, sheeting, sheathing etc. There were a lot of other channels I took advice from such as Tiny Real Estate which is an Australian based channel which helped me understand the local laws and building requirements.

The next step I proceeded with was drawing up some plans of where I wanted rooms and storage. My preferred drawing program is Autocad as I have experience from using it back in school when learning Graphics. 3DS Max is also my preferred 3D program which I’ll model the house in to get a feel for how it will look and make adjustments to both the 2D and 3D versions from there to keep them both updated.

Tiny House
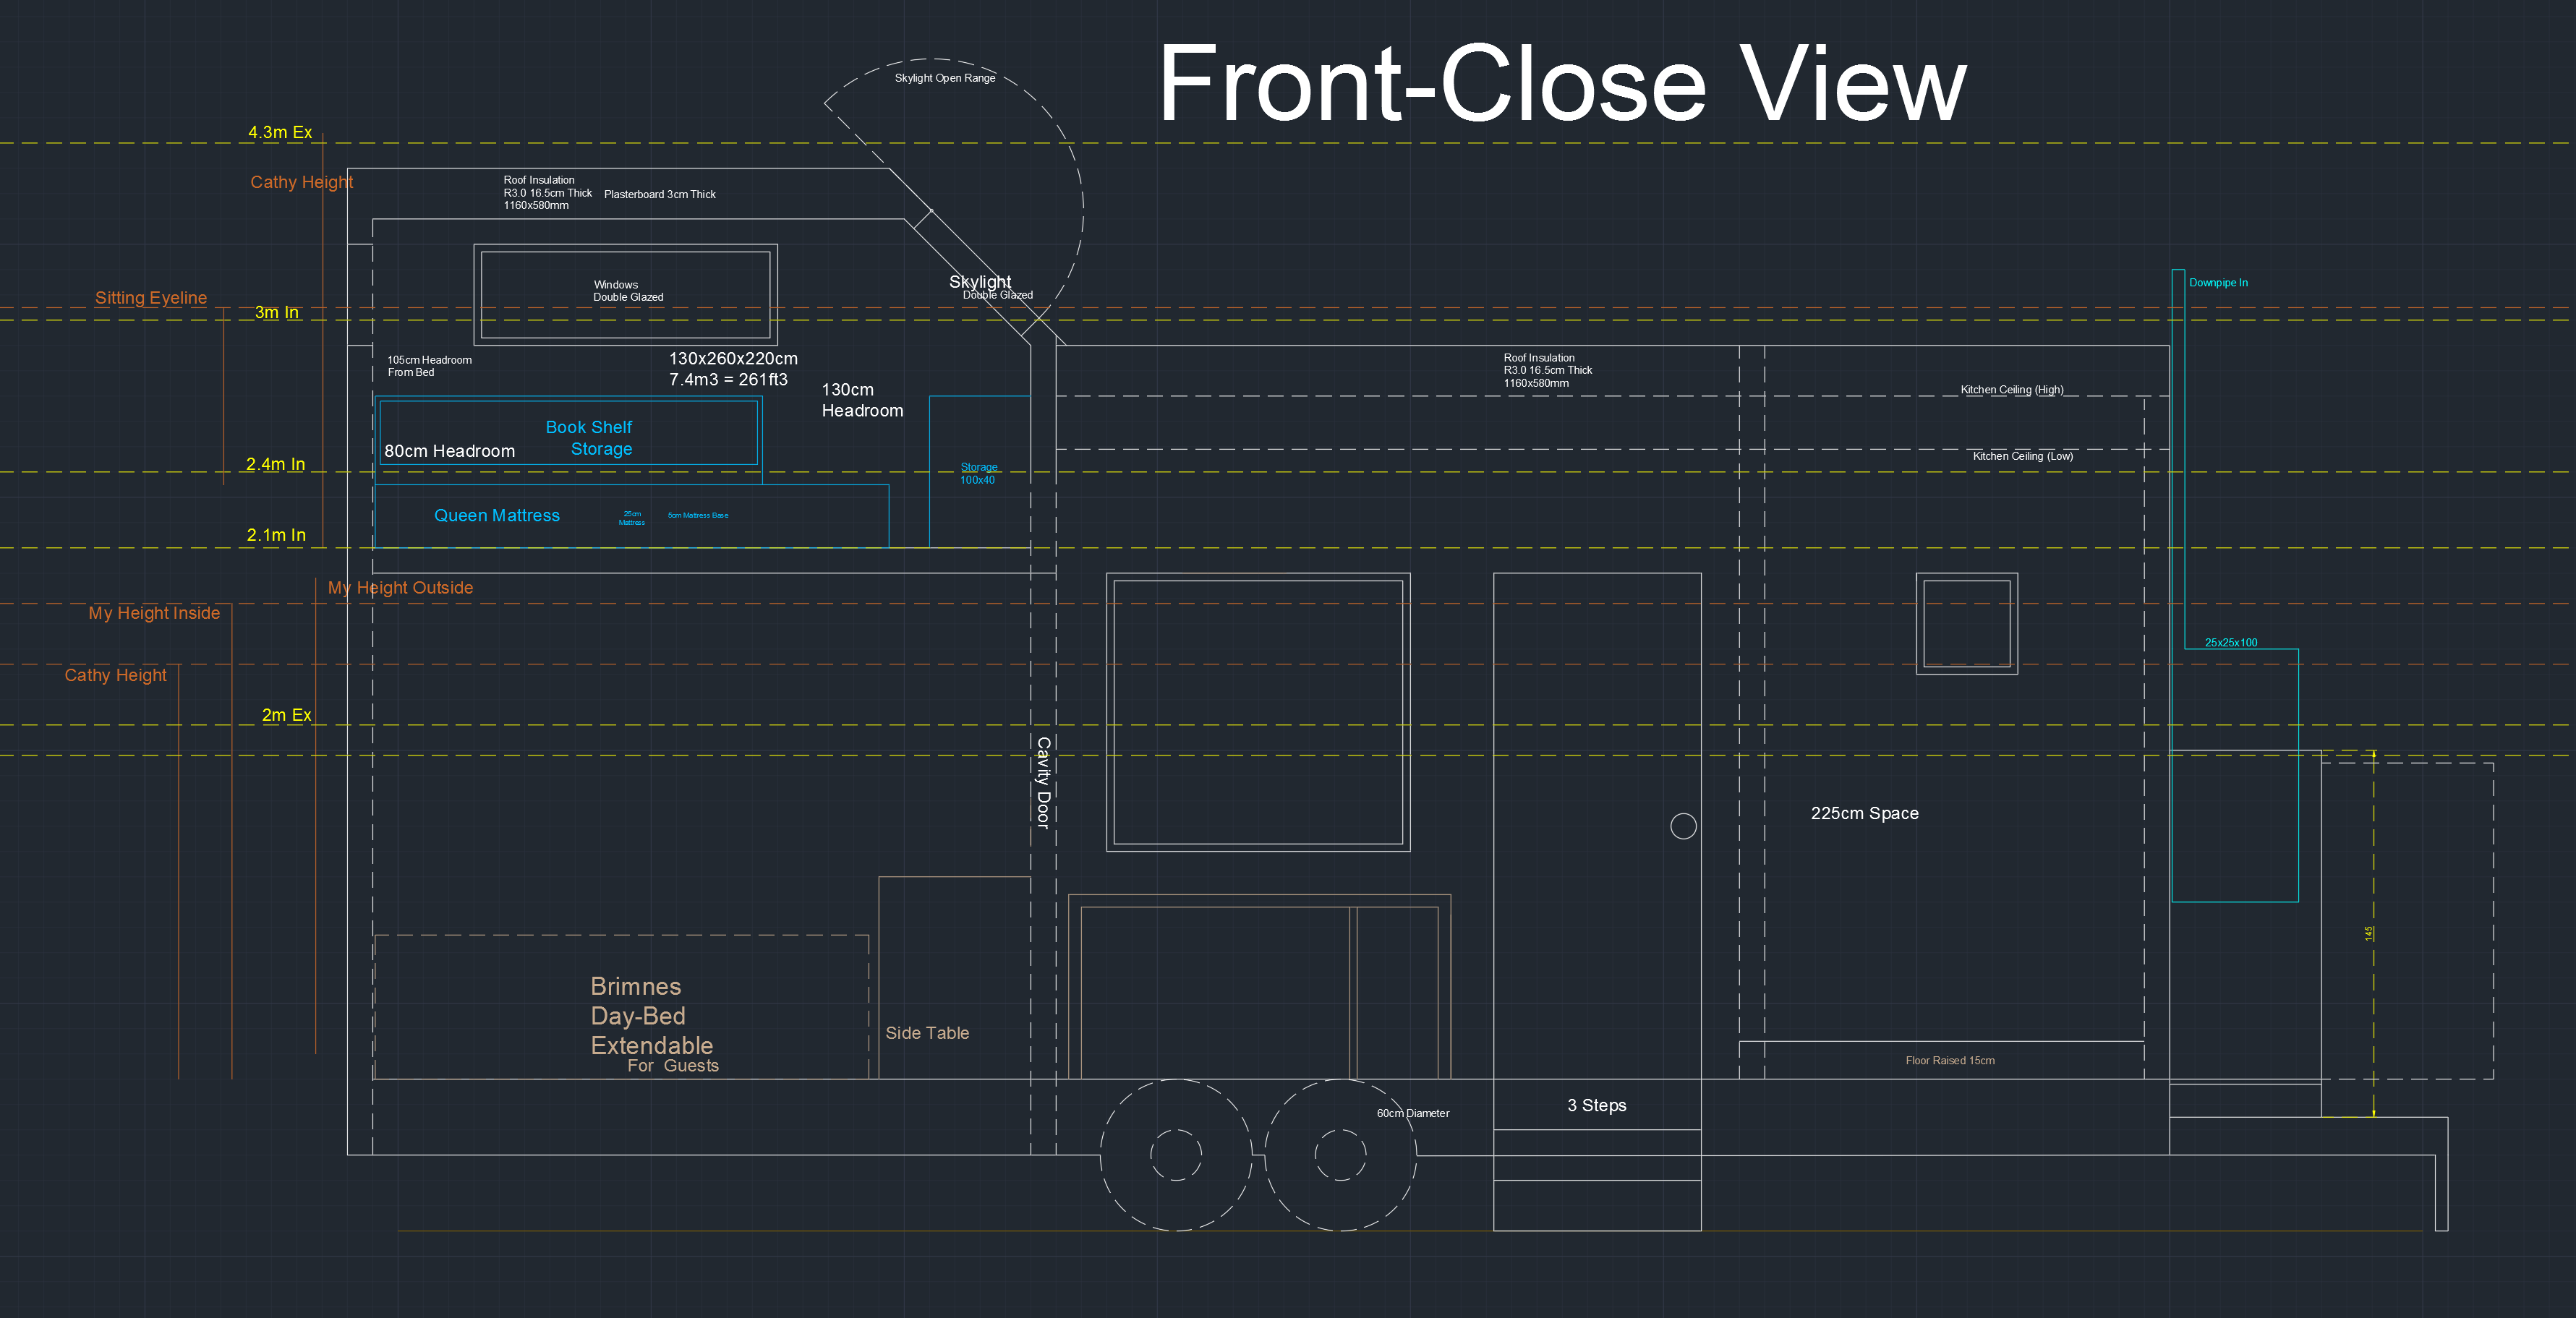
Fig1. – The Front Close View.

Size/Space

It has been difficult deciding how big I want the house keeping in mind towing requirements and how big a vehicle you need to tow it. At first I had a loft and a 6m house, then I changed it to having no loft to save space and maximum height requirements and then I added 1.2m to make it 7.2m total for a more spacious feel.

There was some trouble figuring out if I wanted a ladder or staircase to the loft and whether the loft should be entirely enclosed or just a higher platform above a room. The air conditioning will be confined to a space if there’s a ladder but I also didn’t want to have to climb a ladder if I was injured or sick every time I wanted to reach my bed. Finally I settled on a small staircase next to the kitchen which can also be used for storage as well as making it much easier to reach.

The size of the furniture was another point of angst as the IKEA furniture I had in mind had set dimensions and it’s difficult to fit in a tiny house unless that space is designed for it. This was the problem with my computer desk (IKEA – MALM) – as spacious as it is it would be difficult to maximise the corner space of the room, so I’m more leaning to a desk that can be flipped up or down and have fixed monitors to the wall.

Tiny House
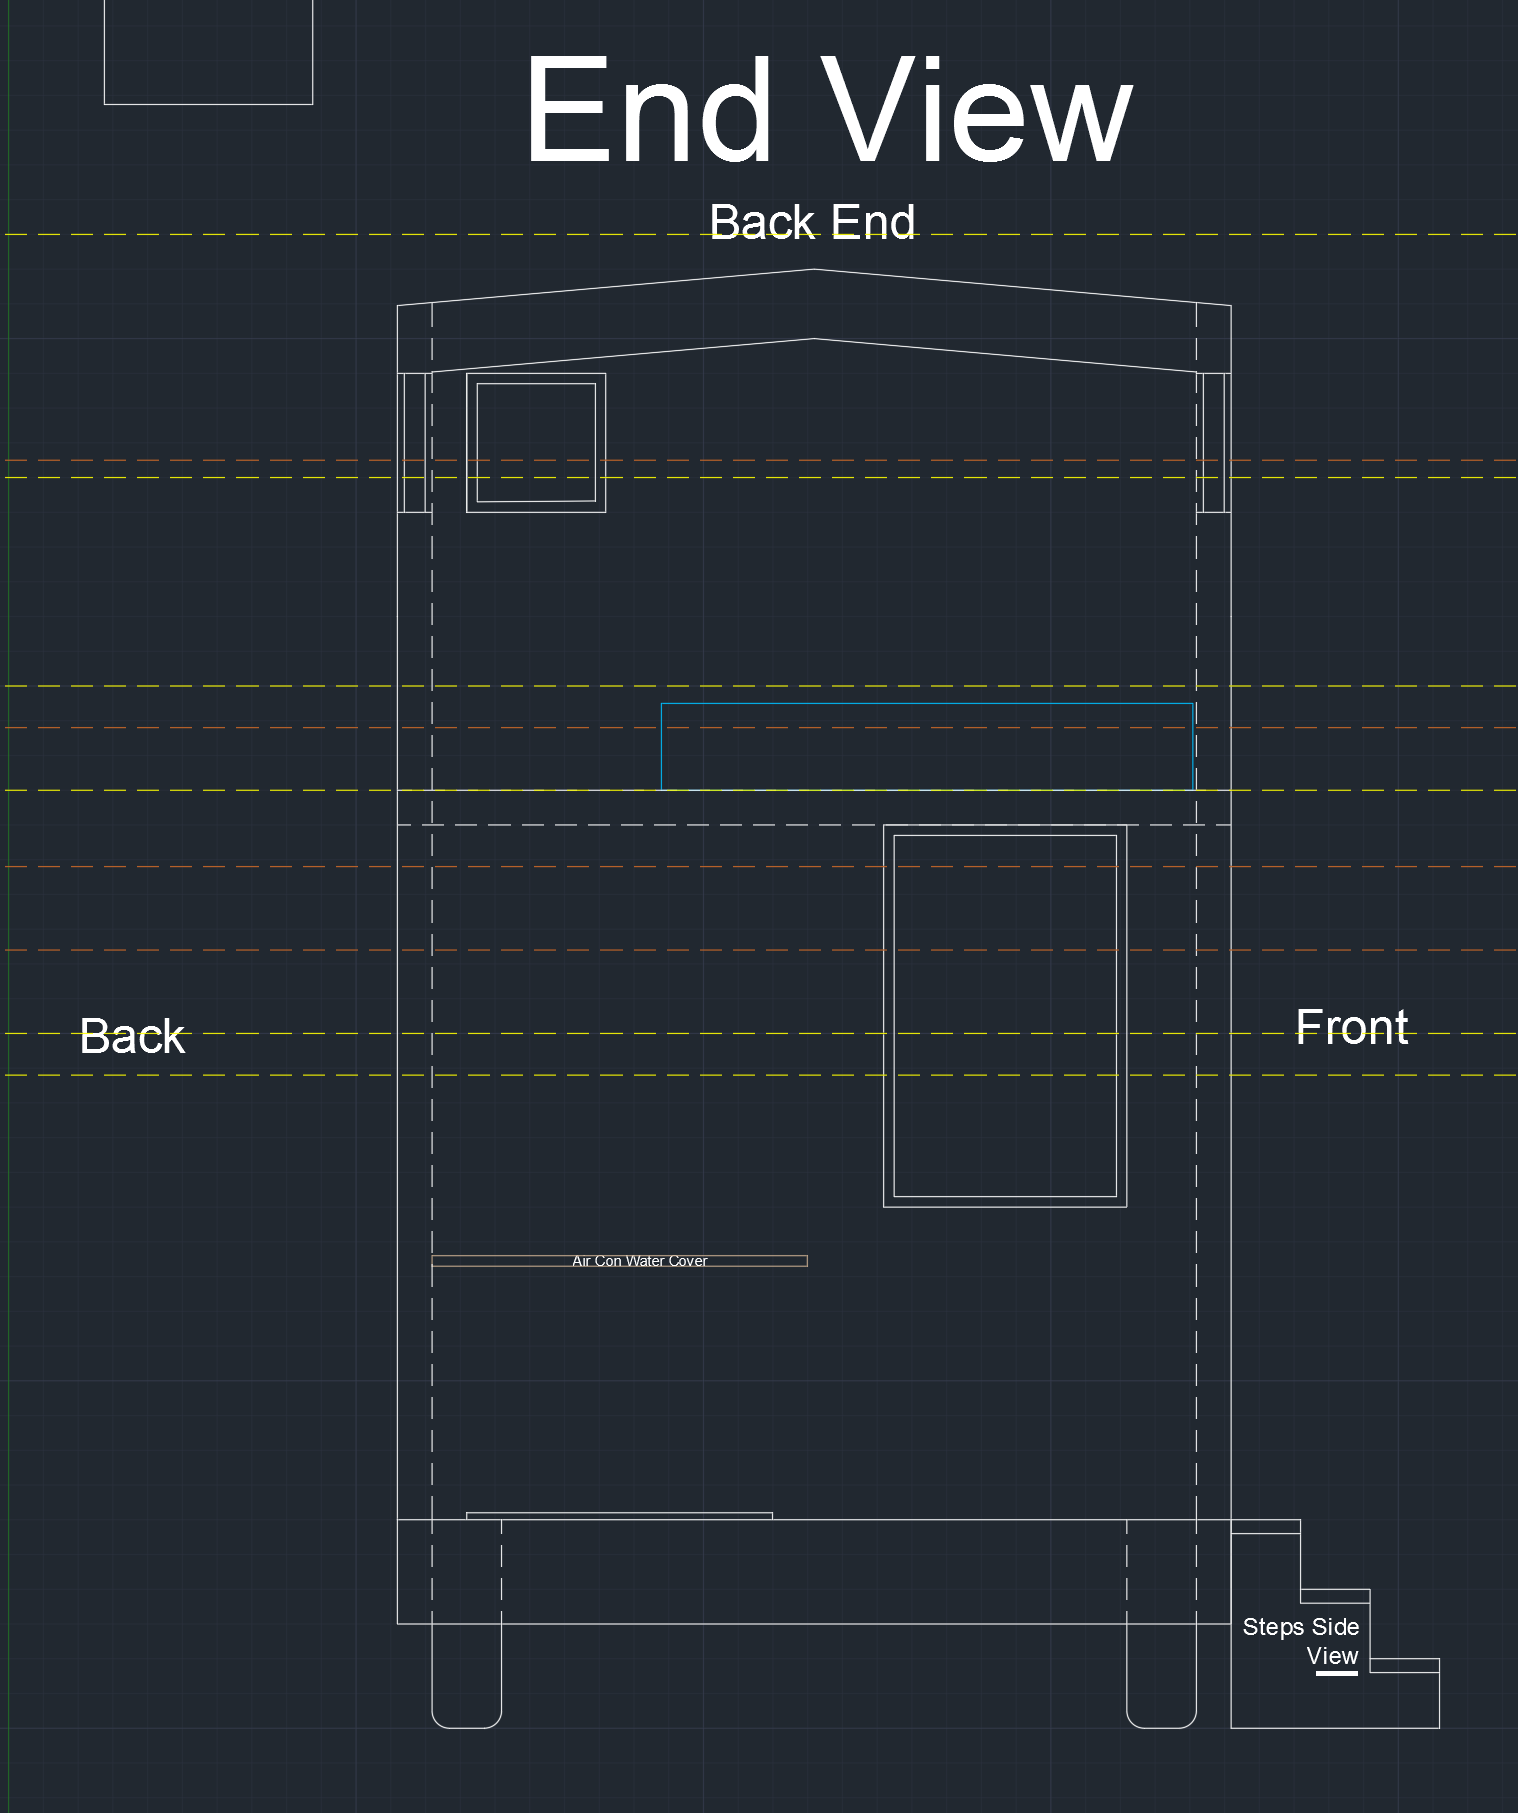
Fig2. – The End View.

Design

I wanted rooms which could be sealed off for multiple reasons: 1. To keep the cold/warm air within that room when using heating or cooling. 2. To use as a private space to get away from my significant other if the desire arises (or vice versa). 3. To keep noise somewhat minimised between rooms.

This came with a few downsides: 1. The space doesn’t feel as open as conventional tiny houses which have a kitchen in the same space as the bedroom and loft. 2. It takes additional space from the house (12cm). 3. It has additional costs.

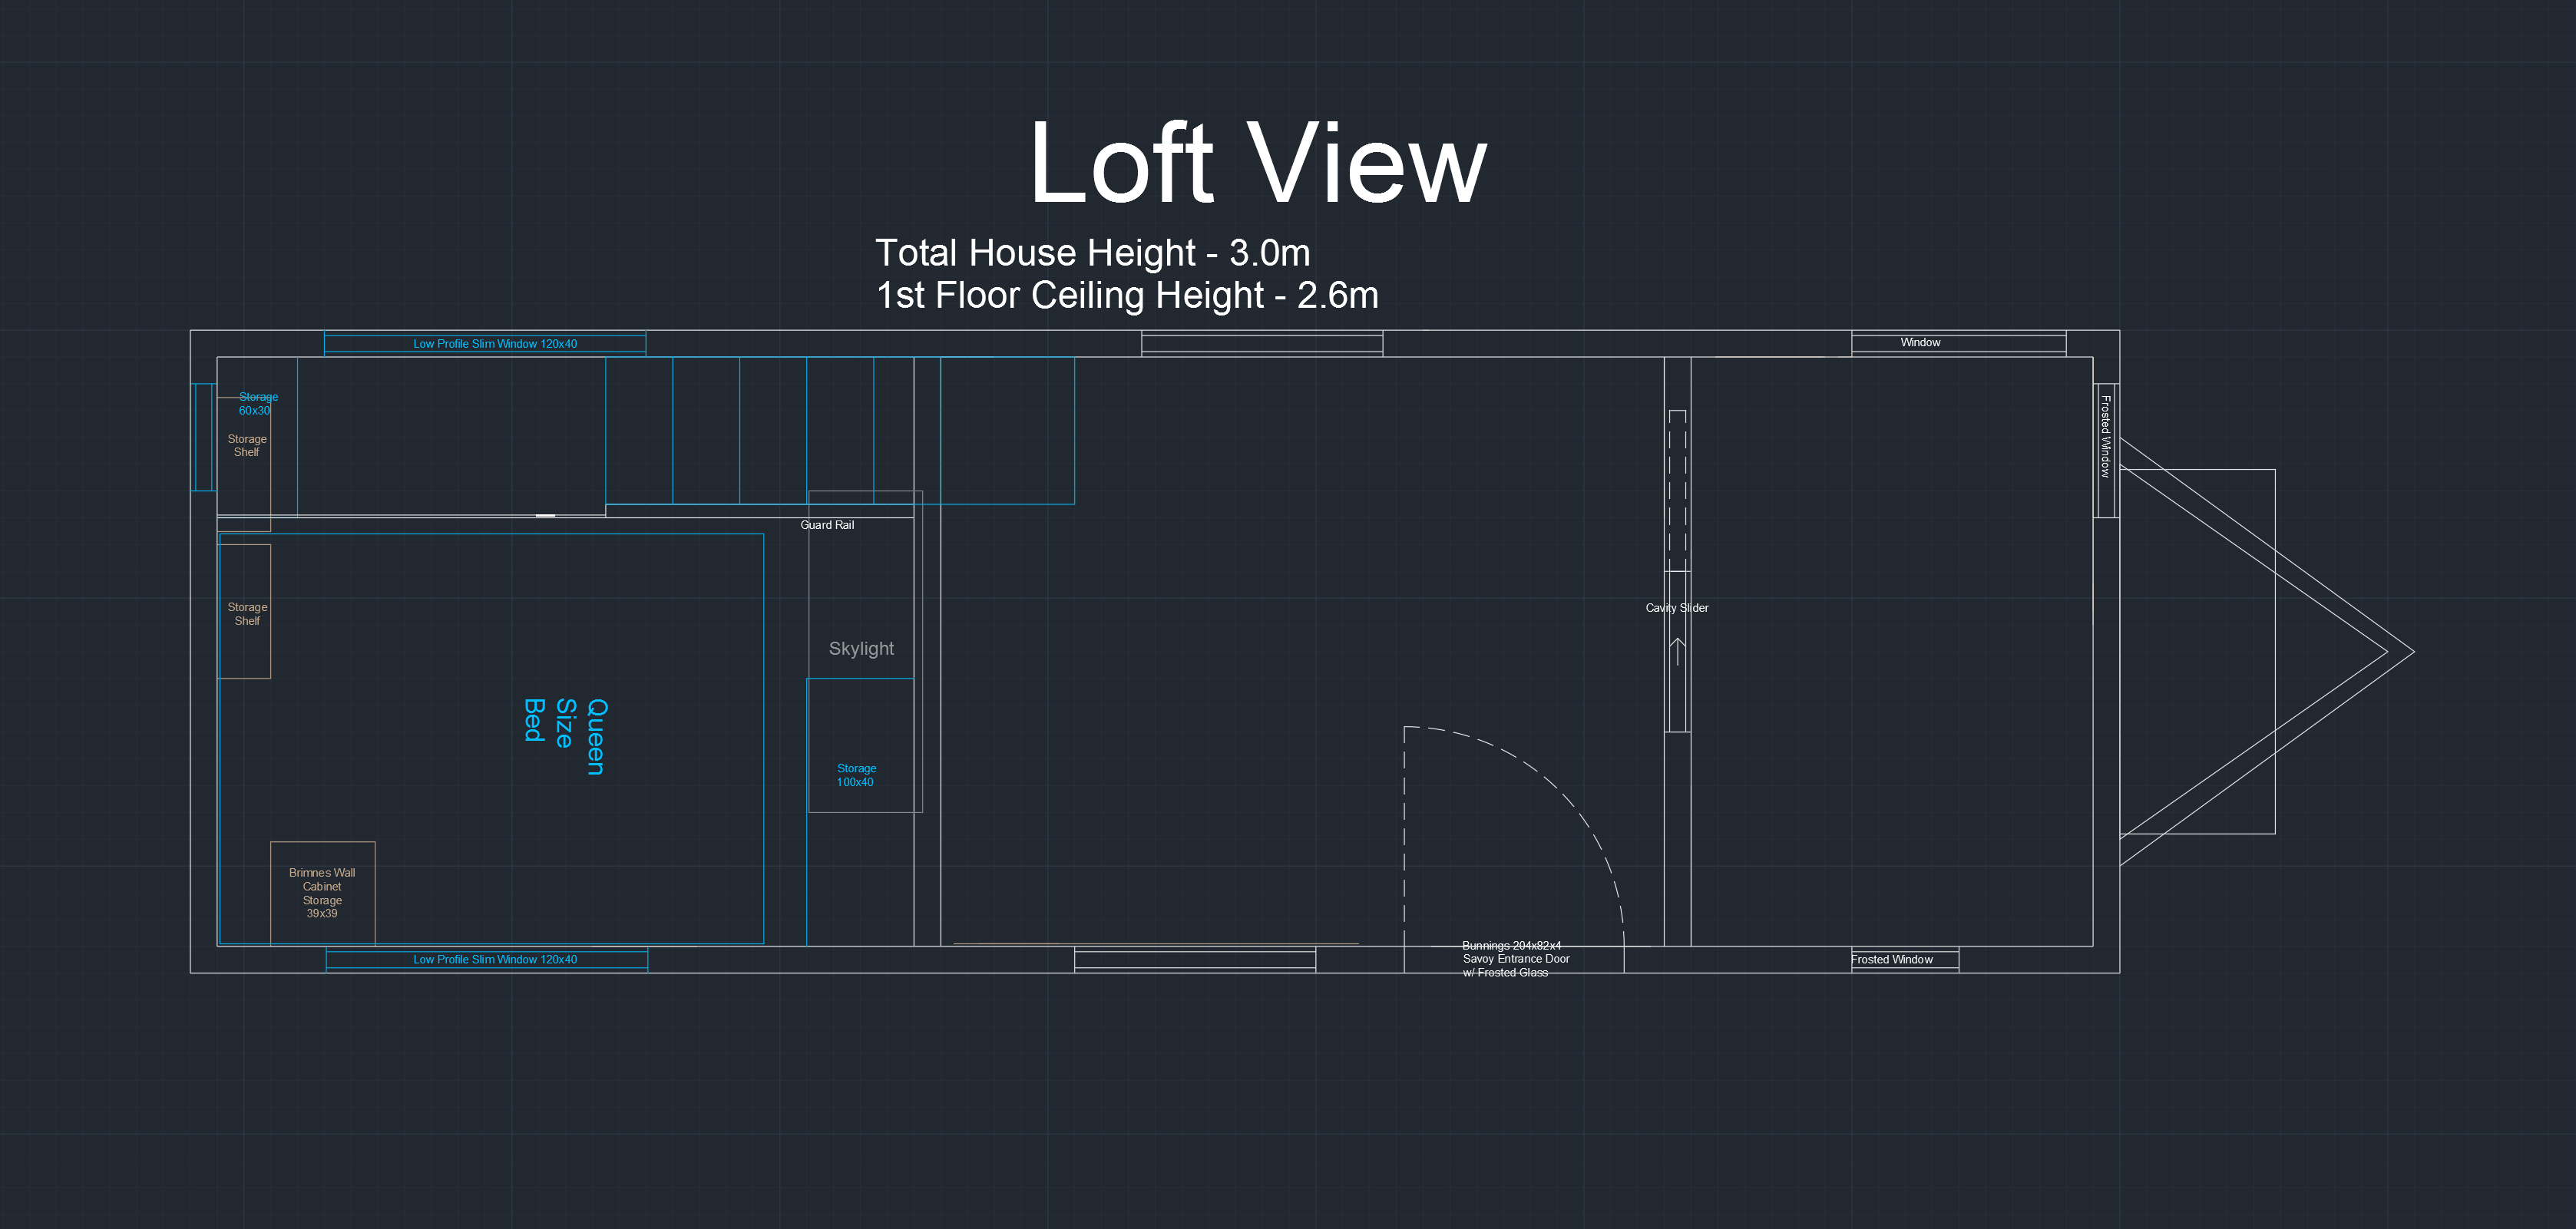
Because I added a staircase instead of a ladder to the loft there’s the problem of the loft not being sealed off. The loft has the main air conditioner mounted to the wall, it also will bear much of the heat from the sun through the roof in addition to being the highest point in the house where heat will accumulate. Therefore I’ve decided to add wooden flip-up flooring to the staircase to seal the room up at night which will slide out from the lofts floor framing just like a cavity door but horizontal.

The loft also has a double glazed skylight to watch the rain from and to give some extra lighting if you want to read a book up there. It will also give access to the roof to clean the solar panels and a point to stand up if desired. When I don’t want light coming in (at all) I thought of adding a scrolling blackout curtain which can be hooked and unhooked with ease to block 100% of the light.

Tiny House
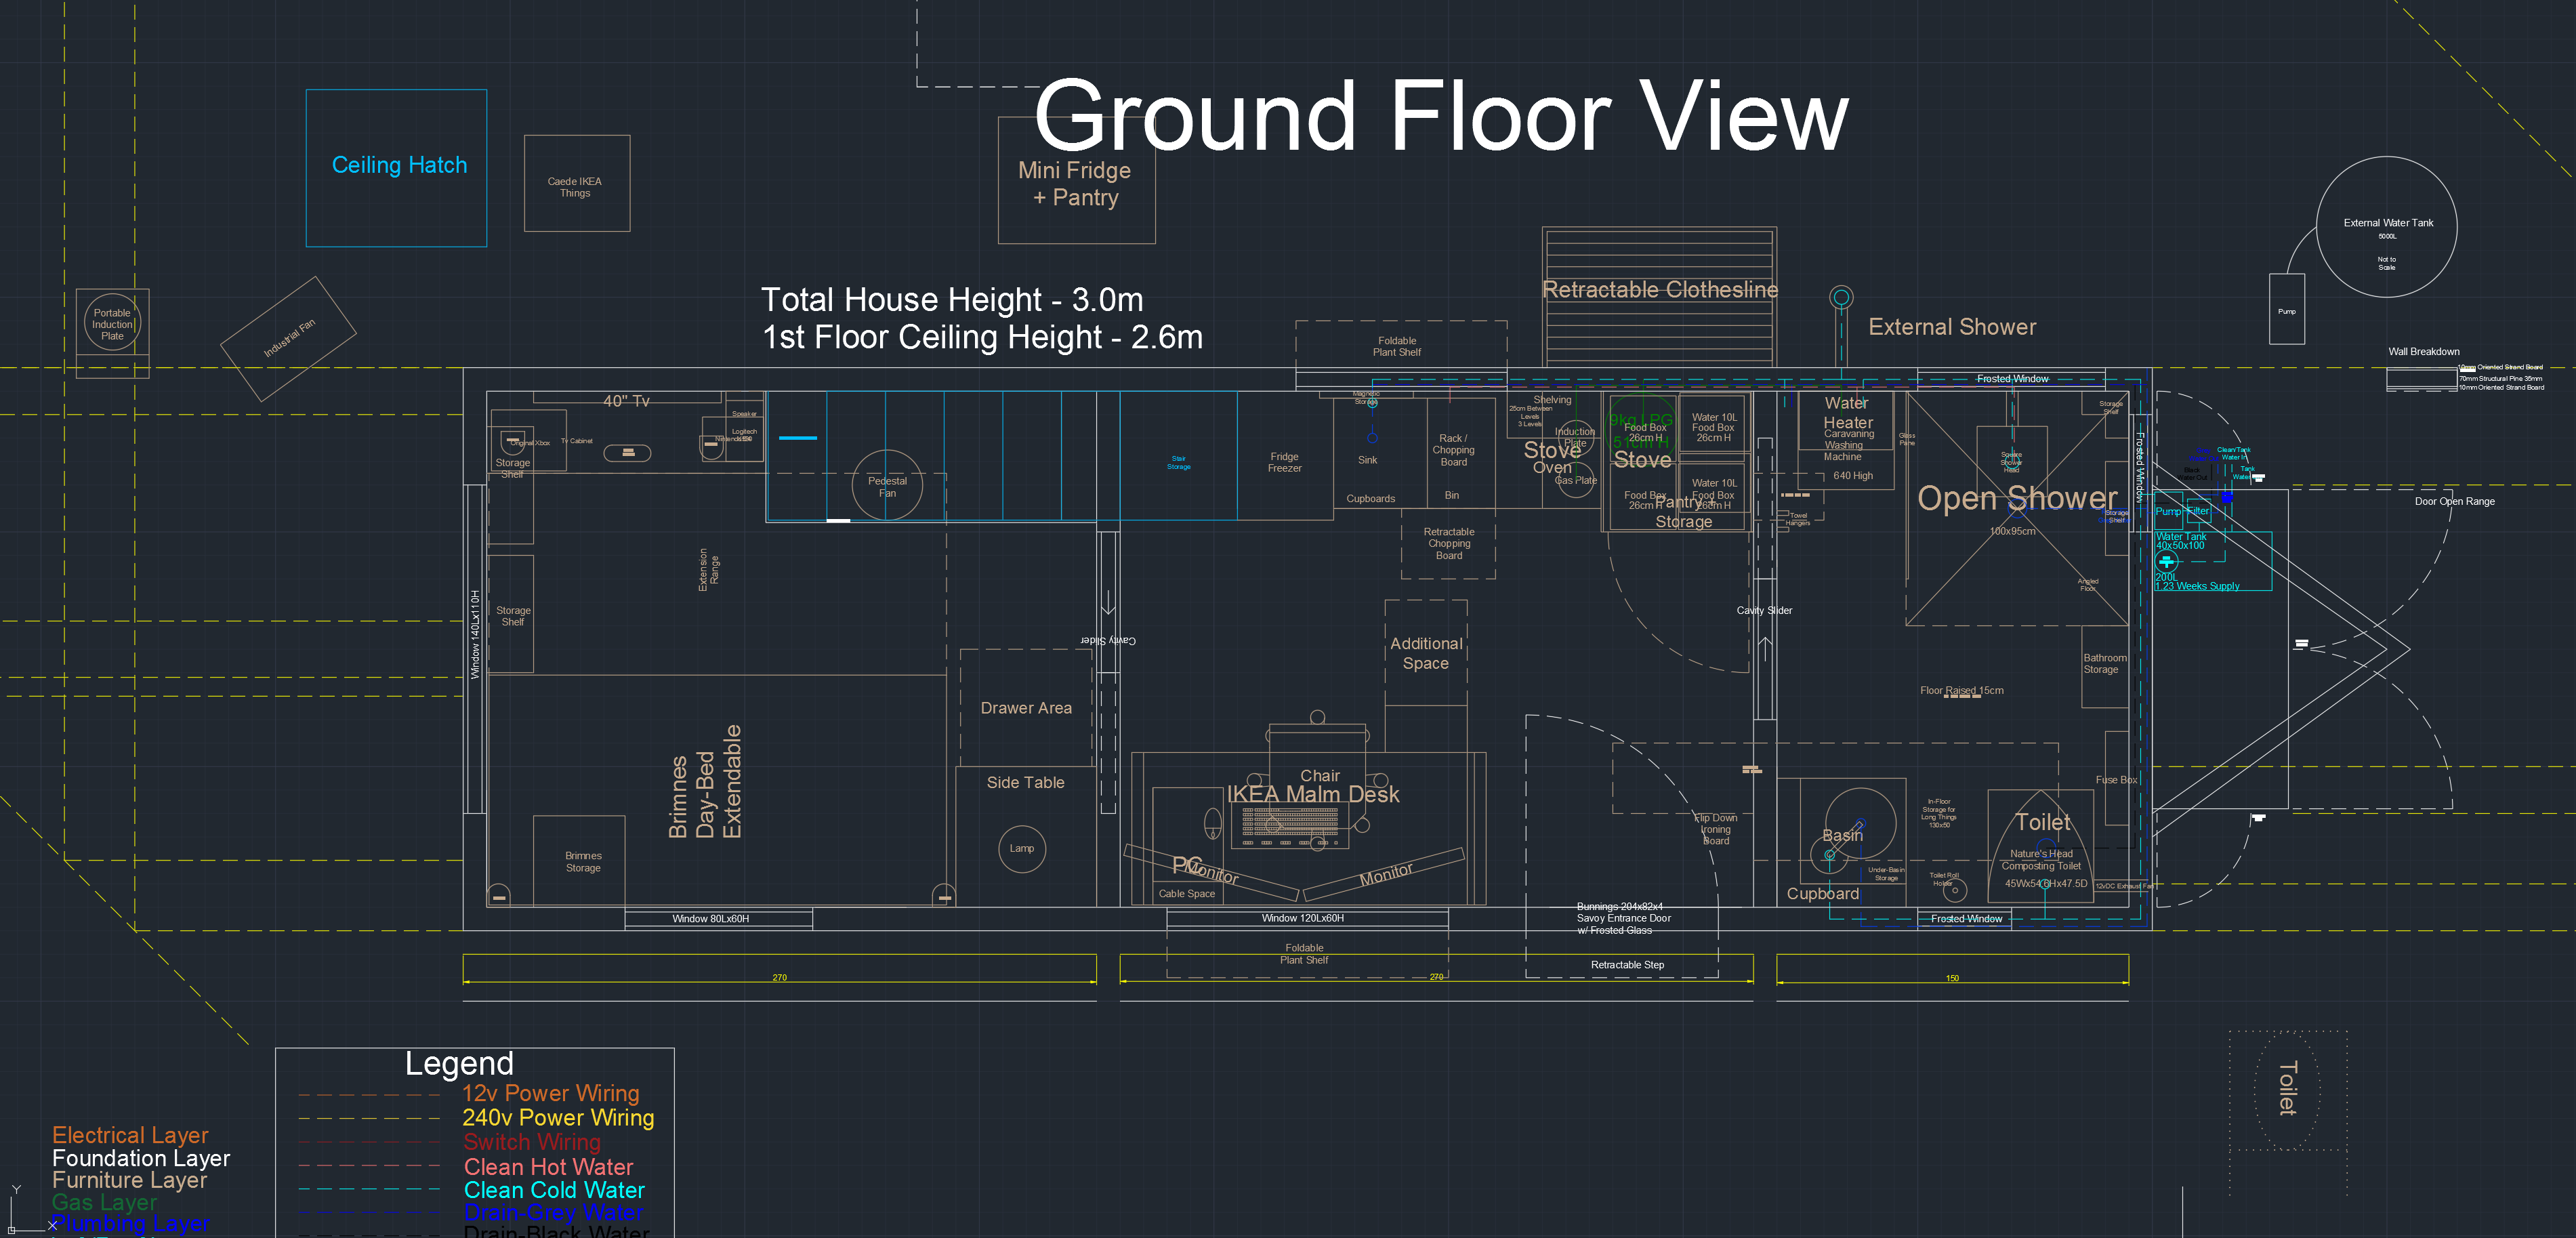
Fig3. – The Ground Floor View.

Hobbies

It’s important to design your future home with your CURRENT hobbies in mind. It’s pointless to design a house saying you won’t need room for quilting because you’ll give it up when you build it. That’s just asking for trouble because at some point you will want a nice big floor space to be able to spread everything out on.

The hobbies I currently spend the most time on and which I will have in mind when building are:

1. Computing – Whether designing, music making, programming or gaming. Due to this I’m wanting to keep a similar setup to what I have now which consists of a small pc, 2 monitors a surround speaker setup and camera. This will mean I have a slightly larger and comfier pc space preferably with a view of outside from the screens and the option to close the curtains and remove glare in necessary. There’s also room for a wireless network to support using the internet from a laptop in the loft if desired.

2. Photography – Most of this is done outdoors in the serenity of nature which means it only requires the space for camera storage as I already have a designated location for editing photos at a computer. I could also use my laptop in the loft if my significant other has work to do on the desktop. Super macro photography is something I enjoy as well but which is generally done indoors under strong lights, so I may have to keep thinking about where I will do that.

3. Entertaining – This isn’t generally done in a tiny house due to the home being built for you to live in. But kudos to the guy who loved spa baths so much he built an outdoor one onto his tiny house’s back porch. You can add anything you want to a tiny house as long as you can make it fit. So I’ve added a room with surround sound, 40 inch tv and an additional fold out bed for use by guests if they want to stay the night. I want to be sure that it will get the use from it before adding it to the house however.

4. Poi Spinning – This requires a lot of space so outside is the obvious choice and no alterations need to be made in the house. It’s basically spinning LEDs or fire around your body in patterns.

Remember that even outdoor hobbies can affect the layout of the home. An example being surfing because you still need somewhere to store your board when not in use, unless you want it rained on.

Tiny House
Fig4. – The Loft View.

Power

Due to all the electronics in the house and my desire to be off grid it’s essential to have enough to last me about 5 hours computing time (in addition to all other power requirements) each day. I went around and measured the power usage of all my commonly used appliances to see how much they drew and then calculated how much power I would need if I ran them for the typical time I used them during a day.

The results were rather surprising, a few items used MUCH more power than I thought they would such as my sandwich press coming in at about 1000w and some were far under what I expected such as my Nintendo 64 at 5w. Doing this helped me understand my power requirements day-to-day and what I will need to fill and surpass those requirements. Noting that the sun isn’t always out I had to calculate a fair excess of solar for what my needs would be for those overcast days. Luckily sun is ample here in Queensland also known as the Sunshine State.

I probably couldn’t get away with running my electronics as much as I wanted, so depending on how things go I may have to add another batch of solar panels on the ground somewhere. My aim is to use 12v DC where I can in the house particularly for lighting and fans and an inverter for 240v for everything else like the air conditioner. I had a look at solar powered air conditioners and am still deciding if they are right for my build.

Tiny House
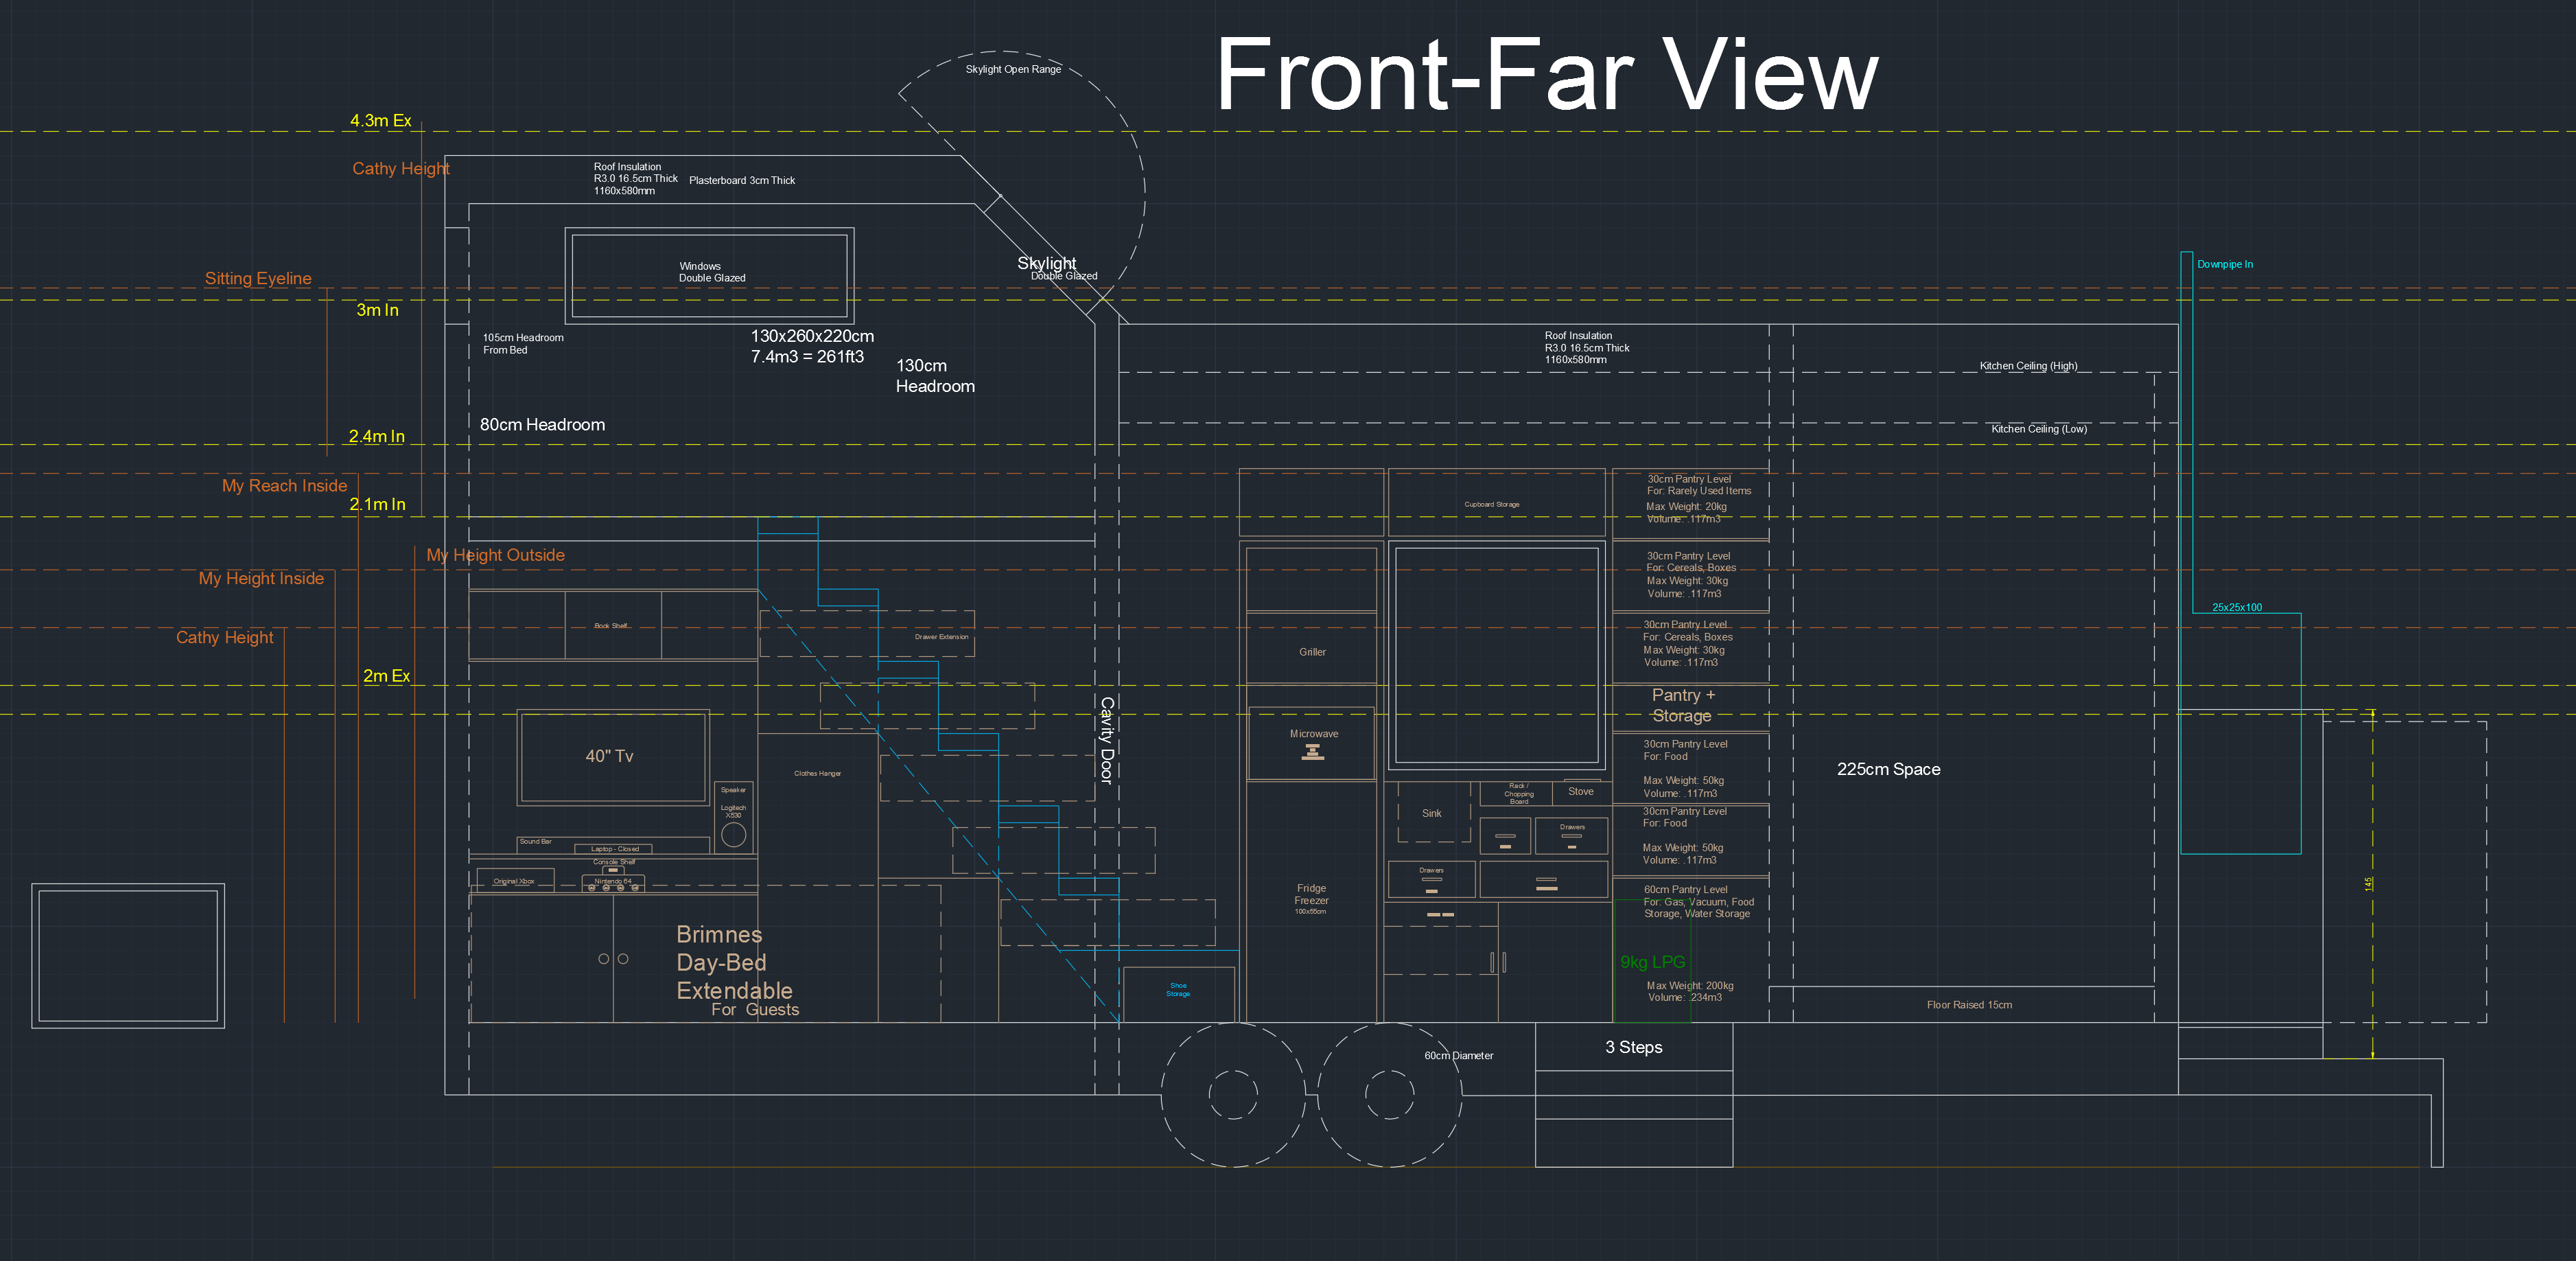
Fig5. – The Front Far View.

That’s about all for this post, I’ll keep you updated when it’s progressed a fair amount.

Tiny House
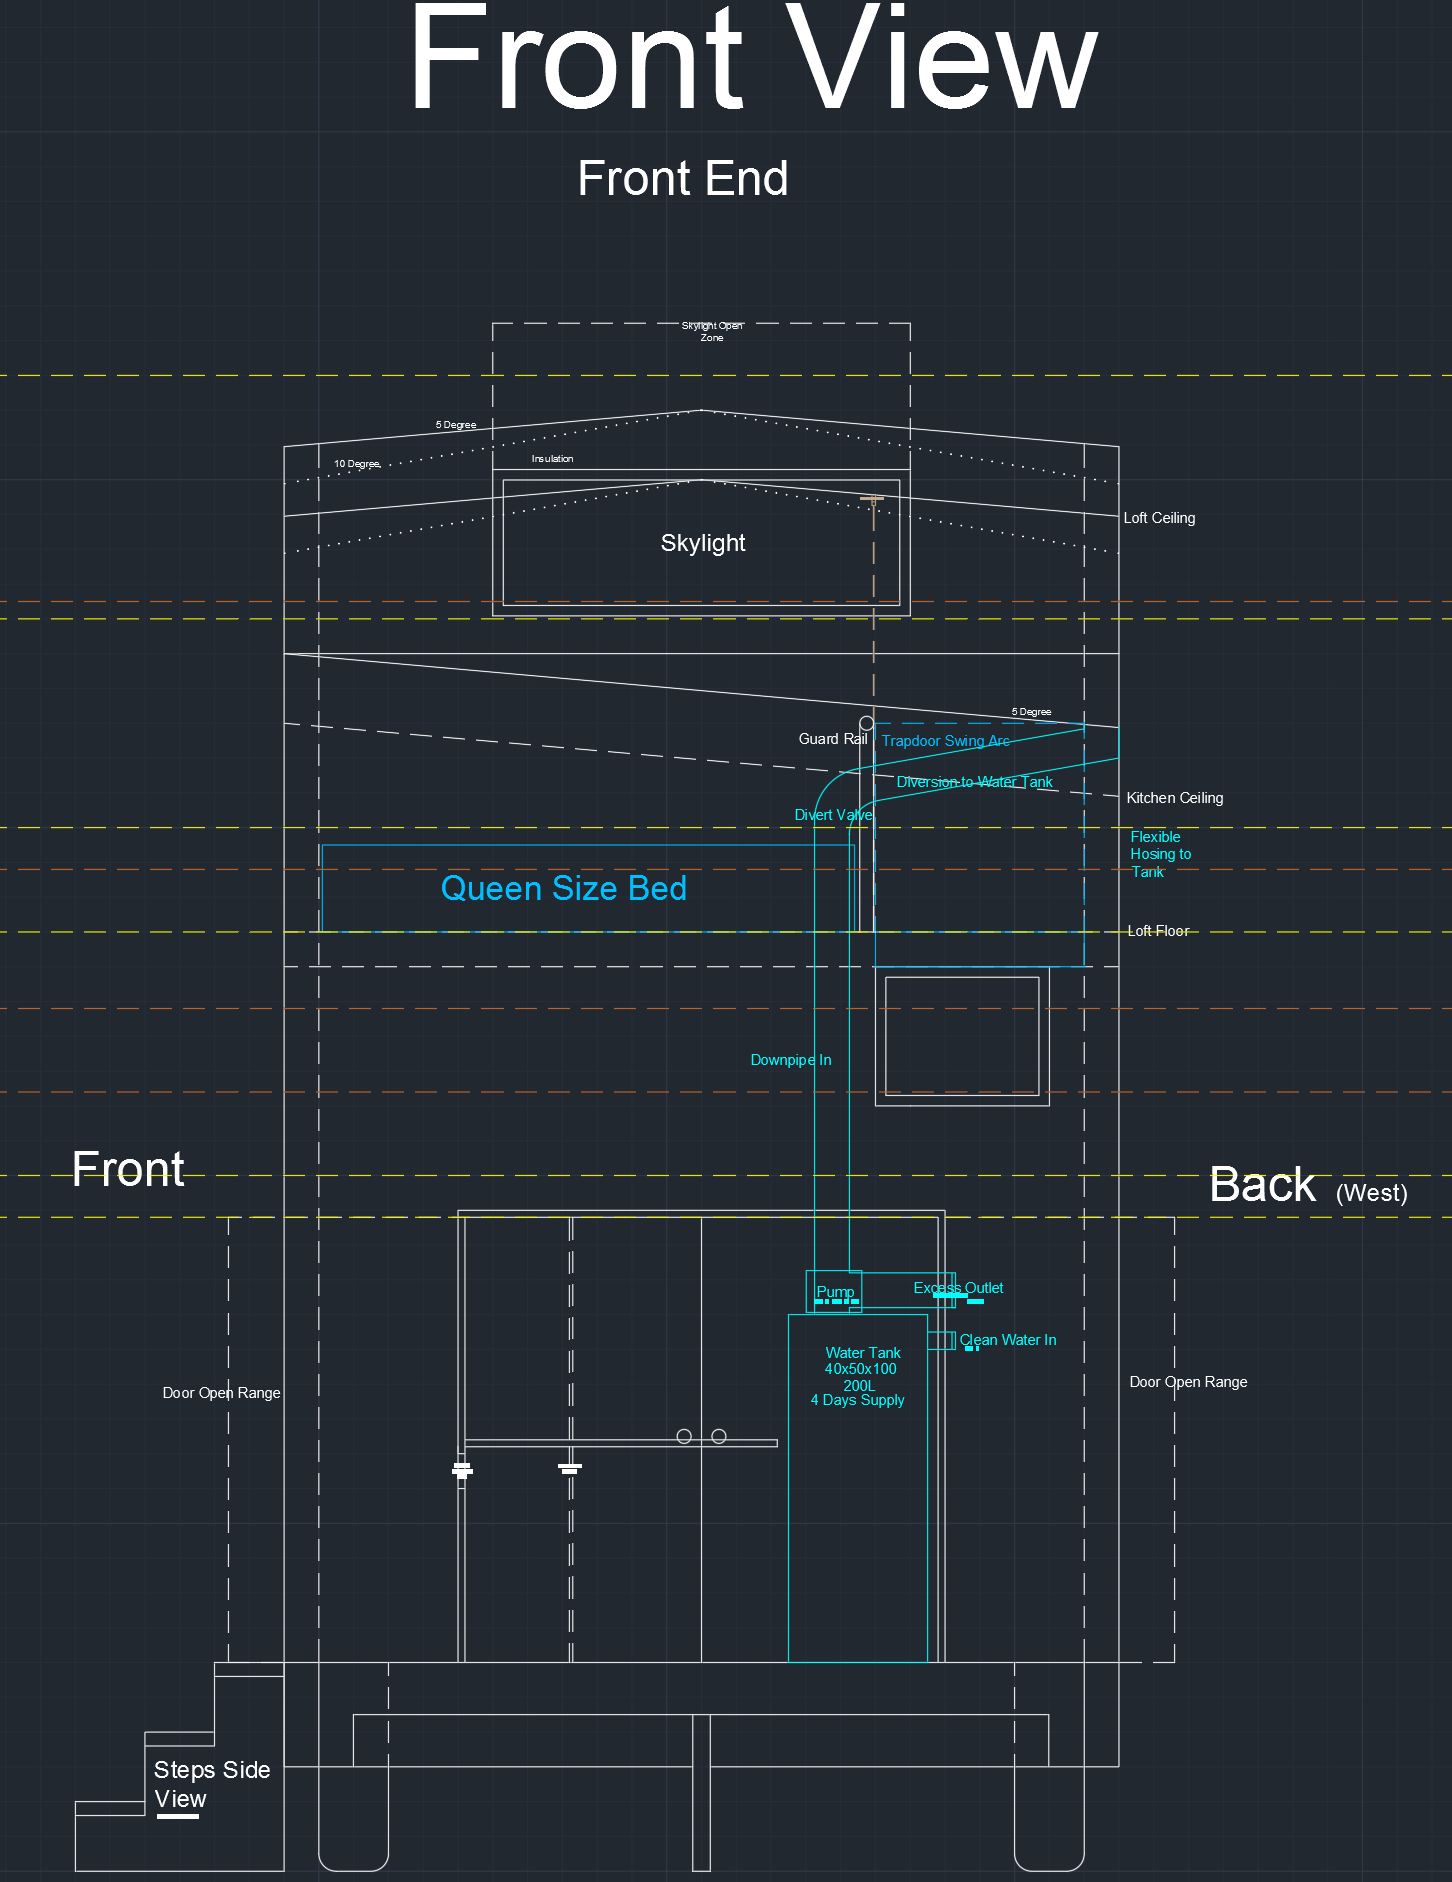
Fig6. – The Front View.

The Conflict Between Preparedness and Minimalism

Is it possible to be both a prepper and a minimalist? At first glance it doesn’t seem like it. Preppers often stockpile mountains of food, water, barter items and supplies which they believe will be required in a time of disaster. This flies directly in the face of minimalism where people try to have as few possessions as possible – typically under 100 items or a single backpack of gear.

Minimalism is about leaving behind a materialistic lifestyle where we live pay-check to pay-check irrelevant of the amount we’re making. Because we’re making more money on promotion we take this new found financial opportunity and stability to upgrade our household items faster, getting that new TV we’ve been waiting to buy and storing the other in another room for the kids. Eventually over a few years of this most families end up with countless electronics, furniture, heirlooms and toys and this is where the minimalism lifestyle comes in.

It seems like two incompatible lifestyles, but I’m giving it a try anyway and logging my findings over multiple posts as I learn more via experience. My theory is that if I have a single backpack of preparedness products I can count that as a single minimalist item, especially if stored out of sight and mind but still easy to reach.

This is where things get a bit difficult as a few of the items included in the BOB may have some overlap between daily use ones such as cutlery, portable stoves and utensils. You’re trying not to double up on items you own, but you also want everything in one backpack which is quick to grab in the event a catastrophic disaster arises. It’s a real pain to take items from the bag, use them, wash and dry them then return them to the bag every use, not to mention that you may have to do some digging to find them in the first place. Due to this I’ve chosen to keep a duplicate item in the backpack so I can just grab it and go if needed and not waste precious moments looking for what I’ve taken out – which could be the difference between life and death.


The ultimate aim of minimalism is to spend less and have the freedom to travel more without being weighed down by all your “stuff”. Therefore if you own something but aren’t attached to it and are prepared to give it up at the drop of a hat you can just abandon it and re-purchase a new one when you’re at your new location. This is the loophole I’m going to use, and as long as they’re neatly stored away they shouldn’t be included in the minimalism item count. Out of sight, out of mind.

Currently it’s only me living alone so I’ll only need enough food for myself to last about 2 months – which is 8x 12.5L decor storage containers. Each of these has on average 18 cans of food in them coming out to about 2.5 cans a day. In a tiny house this will be fairly easy to conceal within a pantry. Having a farm can drastically reduce the amount of food you require if your house is your Bug Out Location (BOL), just be sure to have enough stored for the harsher months.

Water is a little easier especially if you have a quality water filter which has a long lifespan and a river or lake nearby. There should be at least a week of drinking water on hand or a large water tank nearby.

Nothing can replace knowledge in a disaster and knowing how to acquire food and water during a disaster is vital to keeping your item count to a minimum. More Knowledge = Less Things.

There will have to be some form of compromise between prepping and minimalism. You can’t have that huge underground pantry with every type of food imaginable, not only is it more vulnerable to theft and disasters but you become attached to it and won’t want to leave if the situation demands. At least with a few storage boxes of food and portable water you can load up your vehicle and get out within 15 minutes. You can’t just grab a pantry shelf and throw it in the car, you’d have to put everything into boxes first and then load the car.


Preppers can also have a BOL in another part of the country stocked with food and other resources which they flee to in a disaster. This is another plausible idea which demands less carried survival items on you all the time. You just need to have enough food, water and fuel for 3 days to get you to your shelter – as you can get almost anywhere in a country (by car) in 3 days if you’re determined.

A final solution similar to the BOL would be storing smaller caches underground at various locations around the country with about a weeks worth of food and water inside. Or perhaps you could hire storage locations and fill them with supplies. Even if they are broken into pre-disaster, who would want to steal 1,000 cans of food and water? You could also offer your family / friends some money to keep some supplies in a corner of their house for you, you don’t even have to tell them what you’re storing if you wish – as long as you express it’s not illegal substances and that the items aren’t worth much.

Being prepared doesn’t mean “having a lot of stuff” stored for use in a disaster, that’s only a small part of the equation. The other parts of preparedness is preparing mentally, preparing physically, having contacts and like-minded people, gaining skills, gaining knowledge and gaining experience. It’s a culmination of these things that creates the ultimate prepper. The unskilled, unintelligent and ill-prepared people who need spoon feeding from pre-stocked cans of food, the real preppers can acquire all these from the wild foraging, farming and hunting.

The Path to Minimalism

Lately I’ve been binge watching everything I could find on YouTube about the minimalism lifestyle after my girlfriend mentioned my – let’s just say “untidy habits” and the collections of stuff and preps that I have in my rooms.

Let’s be clear, I don’t own a house and am currently renting 2 bedrooms where I keep everything from my stove, fridge, bed, computer system, cutlery, BOB’s and my stocks of food and water for disasters. It’s quite the collection if I’m honest, however the “stuff” on the floor was kind of getting old. There was a point where I couldn’t even see the floor – but not because of a lack of tidiness but moreso the lack of storage options and furniture.

I’m not even an untidy person, being an OCD clean freak it’s a strange kind of “untidy”. I know where everything is but due to a lack of storage all the gear I own is in it’s own storage location – on the floor.

Over the weekend I have been busy head down in my rooms picking up one item at a time and deciding:

Decisions
• Do I need this to survive?
• Do I have an emotional attachment to this item?
• When have I last used this item?
• Is it a tool?
• Is it worth selling?

Then I put it into a pile based on what I wanted to do with it, those piles are as follows:

The Seven Piles
• A keep pile
• A rubbish pile
• A sell pile
• A give away pile
• A take to work pile (or other location)
• A decide later pile
• A “to digitize” pile

The keep pile is for all the items I have strong attachments to, currently use weekly or that I will use in the future for sure – such as my preps. (Debatable that that will be used, but still…)

The rubbish pile is for items that I don’t need and is just considered clutter or those items that haven’t been used in months.

The sell pile contains items that are worth some money that I wish to get rid of and make a little back on. Remember that if you can’t sell them after trying you should just give them away or throw them out and not just believe you’ll try again at some point in the future.

And the give away piles are for items in decent quality that someone else might like to own. It also feels good to donate items to people in need and you know that the item will have another life away from home.

The take to work pile means I store the items at work – these generally include items which I have to keep for 7 years such as travel receipts, medical certificates, excess food I can eat at work and a few other small items.

The decide later pile is for complex items which requires more thought as I try to go through the pile of items as fast as possible so I don’t well up feelings and attachment for them again.

The “to digitize” pile is for cards, documents, certificates or nostalgic items from past events which I want to remember but I don’t need the physical item, therefore I take a picture of it and discard the item.


Sorting
While going through my items I found there were a lot of tough decisions and I found myself picking up the same item multiple times because I couldn’t decide on it. My mistake was having a “decide later” pile which I had to keep going through to whittle it down to nothing again, but unfortunately most of that pile ended up as keep… for now.

The most difficult item to get rid of is my Obutto R3volution gaming desktop which is tremendously heavy, large and hard to dismantle. Not only that but my screens and pc are extremely embedded with it with cables intertwined around it and the screens screwed to the stand. I hope I can sell it as the buttkickers (which add a level of vibration to the seat and footrest) are probably worth a fair $500.

Over the time I have been cleaning up I feel the weight literally fall off as I throw each additional bag in the bin and sigh with relief. It gets much easier the more you clean and feel like you’re making a dent in all your possessions, and it inspires you to continue and become more critical with your decision making.

Just a note – buy the extra heavy duty garbage bags so they don’t break open when you lift them. I’m so glad I bought these as my other bags were getting holes in them and were beginning to split open before I bagged them in the heavy duty ones, because I own a lot of sharp electronics.

At the end of the weekend I ended up with 4 bags of items I could throw out – some were even electronics that I had never used such as a 4 port switch. Fortunately for me I don’t have any really strong attachments to most of my items except a few of my electronics due to their multifunction nature such as my phone – which I would never throw away unless I had a replacement anyway.

Aim
My aim is to have two backpacks worth of camping / preparedness gear, one suitcase worth of clothing / electronics, one storage container of misc gaer such as power tools (to build my tiny house with), cables for my pc, pens, paper and books and finally 8 or so food storage containers which contain a weeks worth of food for 1 person each which I will be storing in my tiny house when it’s complete.

I also have a few large items such as a typical king size bed, a folding camping bed, a tent, a swag, two fans, an air conditioner and a few small pieces of portable furniture. I hope to remove the small pieces of furniture when I’m near the end of my cleaning but there’s a lot of items I can’t really make a decision on due to it being preparedness based such as my camo net.

My absolute aim is to have one “Mazda 2” sized car load of stuff I own and nothing more – which will require me to cut out a large amount of the furniture and remove the bed entirely. Another motive for reducing the amount of things I have is simplicity, happiness and being able to fit it all into my tiny house, as well as not being fixed to one location and I can pick up and go within 1 hour if required in an emergency.

I will be blogging a more detailed article on how one can be both a prepper and a minimalist at the same time even though upon first glance they may appear to be complete opposites. Preparedness is about stocking up on everything you will need in the future and minimalism is about having only what you need at the current point in time and nothing more.

Choosing a BOB/Camping Cookware Set

It’s an arduous task to decide on a cookware set for your bug out bag which is minimalist, lightweight and easy to clean. There are so many options today that it’s easy to get carried away and bring too much gear you won’t even use.

I don’t know about you but I buying love a nice new shiny pot which I aim to take everywhere and use as my primary cooking pot on every trip. But often it’s used once and pushed to the back of the cupboard in anticipation of new cookware. If you stick with one piece of gear it becomes part of you and the more you use it the more skill you have with it and over time it shows its age and develops character. If you own a collection of pots as I do it becomes a problem of which one to take, how many you should pack in your bag before it becomes overkill and how well they stack.

Below is a simple guide for choosing an encompassing set of cookware for every need, because every person is different so your gear will differ.

Cookware Uses
The first question you come across is what will you be using the pot(s) for? It’s essential that you have at least one form of steel pot in the wild to complete the various tasks over the fire you’ll need to accomplish. Every scenario is different and you may need to cook larger chunks of meat which is difficult to complete without a large frying pan. Generally however you will have canned or freeze-dried meals which should easily fit into any modern steel cookware unit.

Requirements
• Food Cooking – Something to eat from and cook on
• Water Boiling – Something to drink from and boil water on
• Cooking Pan – A pan to cook larger meats or hunted game on
• Cup – An (insulated) cup to drink from

Food Cooking
The eating and cooking one is obvious as you will definitely need a way to warm up and cook food, and you can eat out of the same pot to save weight. Freeze dried meals require water to be boiled beforehand which you could then add the food to the water or add the water to the package and still only use one pot.

Titanium pots have a tendency to get hot in one area and spread the heat less effectively than aluminium or steel but are very lightweight and the same strength as stainless steel. Cast iron is extremely heavy and is not recommended for your BOB, but they are handy if you’re just camping as long as they are seasoned properly. Aluminium has a low melting pot and could melt if left directly on a fire for too long so I don’t recommend it, however it does cook foods evenly. Stainless steel is my preferred option of pot due to even cooking of foods, a solid feel to it and it won’t rust, but it’s moderately heavy depending on how thick it is. It should last the longest out of all of the other metals as well.

Do not pick ordinary kitchen cookware as flames melt anything that’s not metal on them and basically renders them unusable. This has happened to a friend of mine while camping where even the top of the billy’s lid which was plastic melted away in a fire.

Your cooking pot should be small enough for a 1 serve meal with not much space left over as the efficiency of heat will drop sharply as the pot gets bigger. This occurred to friends of mine while we were camping who brought a 10L pot aimed at cooking both their meals at once. They filled it with water and rice and tried to cook it over a canister gas flame in 5 degree Celsius temperatures. I even grabbed my flambé torch, attached it to another gas canister and tried to heat it up at the same time… but to little effect. Basically the water got warm and never boiled so they had to eat undercooked rice.

There’s a lot of “done it for you” cookware sets out there which are aimed at campers and picnic’ers which often include everything including the kitchen sink. These types of sets often have many items that are overly heavy for their purpose or that come in sets designed for X amount of people, half of which you may never use. I once bought a Stanley cookware set which came with two green insulated cups inside which fitted quite snugly and allowed no space for anything else. However when removed I could fit a gas cylinder, gas stove, cleaning brush and a spork inside which is much more useful then two cups.

Water Boiling
You’ll likely need to boil water throughout your trip at one point or another and a container that can withstand the temperature and hold enough water is vital. After boiling you’ll generally pour the water into your bottle after it had cooled a little for drinking at another time, as well as for preventing the transferral of remaining bacteria from the outside of the pot to your stomach if you used the same pot to obtain the water.

I highly recommend a pot with both handles on the side and one on top so you can pick it up with both a stick and your hands to drink from it normally. What I’ve found while camping is that it’s certainly a pain to try and pour the boiling water into another container without touching it with your hands, and a top handle with a small spout on the side is very helpful to prevent spilling the precious liquid.

Having a 1L pot will keep boiling times fairly low and provide you with enough water to top up most plastic bottles, you can also disinfect water easier in a 1L pot using tablets then having to measure it out or estimate 1 litre. Water boiling requires the steam to escape unless you want an epic explosion, so be sure to have a vent of some kind on your container otherwise the lid may pop off and fall into the fire.

Cooking Pan
A pan would be recommended if your bug out plan consists of hunting your own game and preparing it for consumption. A pot simply won’t be large enough and won’t cook very evenly unless it’s cut up into small pieces and stirred often. It’s also easier to reach into a pan and cooking things like eggs and sausages also becomes difficult if you have to reach into a tall container with a spork – believe me I’ve tried it. Look for a pan with a long handle and if possible a metal loop over the top to make it easier to grab when in a fire. You could add a metal handle yourself with a simple drill if it doesn’t come with one.

Cup
A metal cup could be useful in your BOB if it fits snugly inside or around another item to save maximum space. I personally have an Olicamp cup which fits around my plastic 1L Nalgene bottle that I use often, sometimes to cook on as a backup as it fits about 600ml. Mine has folding handles to save a bit more space and weight.

Combinations
It’s possible to combine some of the cookware together like as the eating and water boiling pot but this could lead to difficulties later and will require cleaning after every use, not to mention you won’t be able to have a cup of coffee while you are enjoying a hot meal without another form of cup or pot. But if minimalism and a light backpack is what you’re aiming for then this could work.

Stacking containers such as canteens which combine a pot with a bottle are commonplace for the army as they can easily be put together to save a lot of space. The downside is that you aren’t able to fit a gas stove, gas canisters, spork and the cleaning brush inside of it so they are better used for open fires.

If you’ll be cooking on gas, ideally the cookware container should be large enough to fit:
• Gas Stove
• Gas Canister
• Cleaning Cloth/Brush
• Eating Utensil

Doing so will save a little more space in your bag but not as much as an open fire cooking situation.

Special Requirements
Are you a gourmand which absolutely must have an array of pots and pans for every situation? You may be able to take a lot of cookware in your BOB but is it really worth the effort? Bugging out is very different to camping. You can basically take as much gear as you can fit into your car and it’s a recreational activity which is meant to be enjoyed. The other is meant to be a life or death situation and it will really put a “damper” on things if you’re lugging around 2kg of cookware gear. I find it so hard to leave behind my cookware as well, but it’s all for the greater good in the end.

Summary
In the end I decided I’m going to carry two primary cookware pots with what I can stack around and in them as a bonus. I’ll also have a Nalgene stackable cup which will essentially take up no extra space and give me a nice cup to drink from as well as an emergency cooking pot if necessary.

My Cookware:
• 1 stainless steel kidney shape canteen
• 1 stainless steel kidney shape pot which stacks on the canteen. Some come with a lid.
• 1 stainless steel billy-style pot 900ml (30.4oz) containing cooking gear, stove etc. Comes with a lid.
• 1 Olicamp Cup which fits snugly around my nalgene bottle

The canteen cup will be my primary bowl and fits nicely over the base of the canteen. Some brands come with an extra lid for the cup to keep in the steam and cook food faster which is a great option if you need it.

This setup lets me boil a nice amount of water in the kettle and doubles as an eating container and is very effective over a fire due to the extra hanging handle on top. I only wish it was a full 1L to fill my 1L nalgene bottle in one boil. Although generally the manufacturer underestimates the full capacity of these things so they can’t be sued so it’s probably closer to 1L.

The final component is my cup which I use for scooping water as well as filtering water into and the obvious uses such as drinking tea and coffee. I’ve used it for cooking Frankfurts before but it was difficult due to the height of the cup.

I hope this has helped you make an informed decision on selecting your cookware for bug out situations, or even when camping.
Leave a message if you have a question about anything.
Concealed Storage

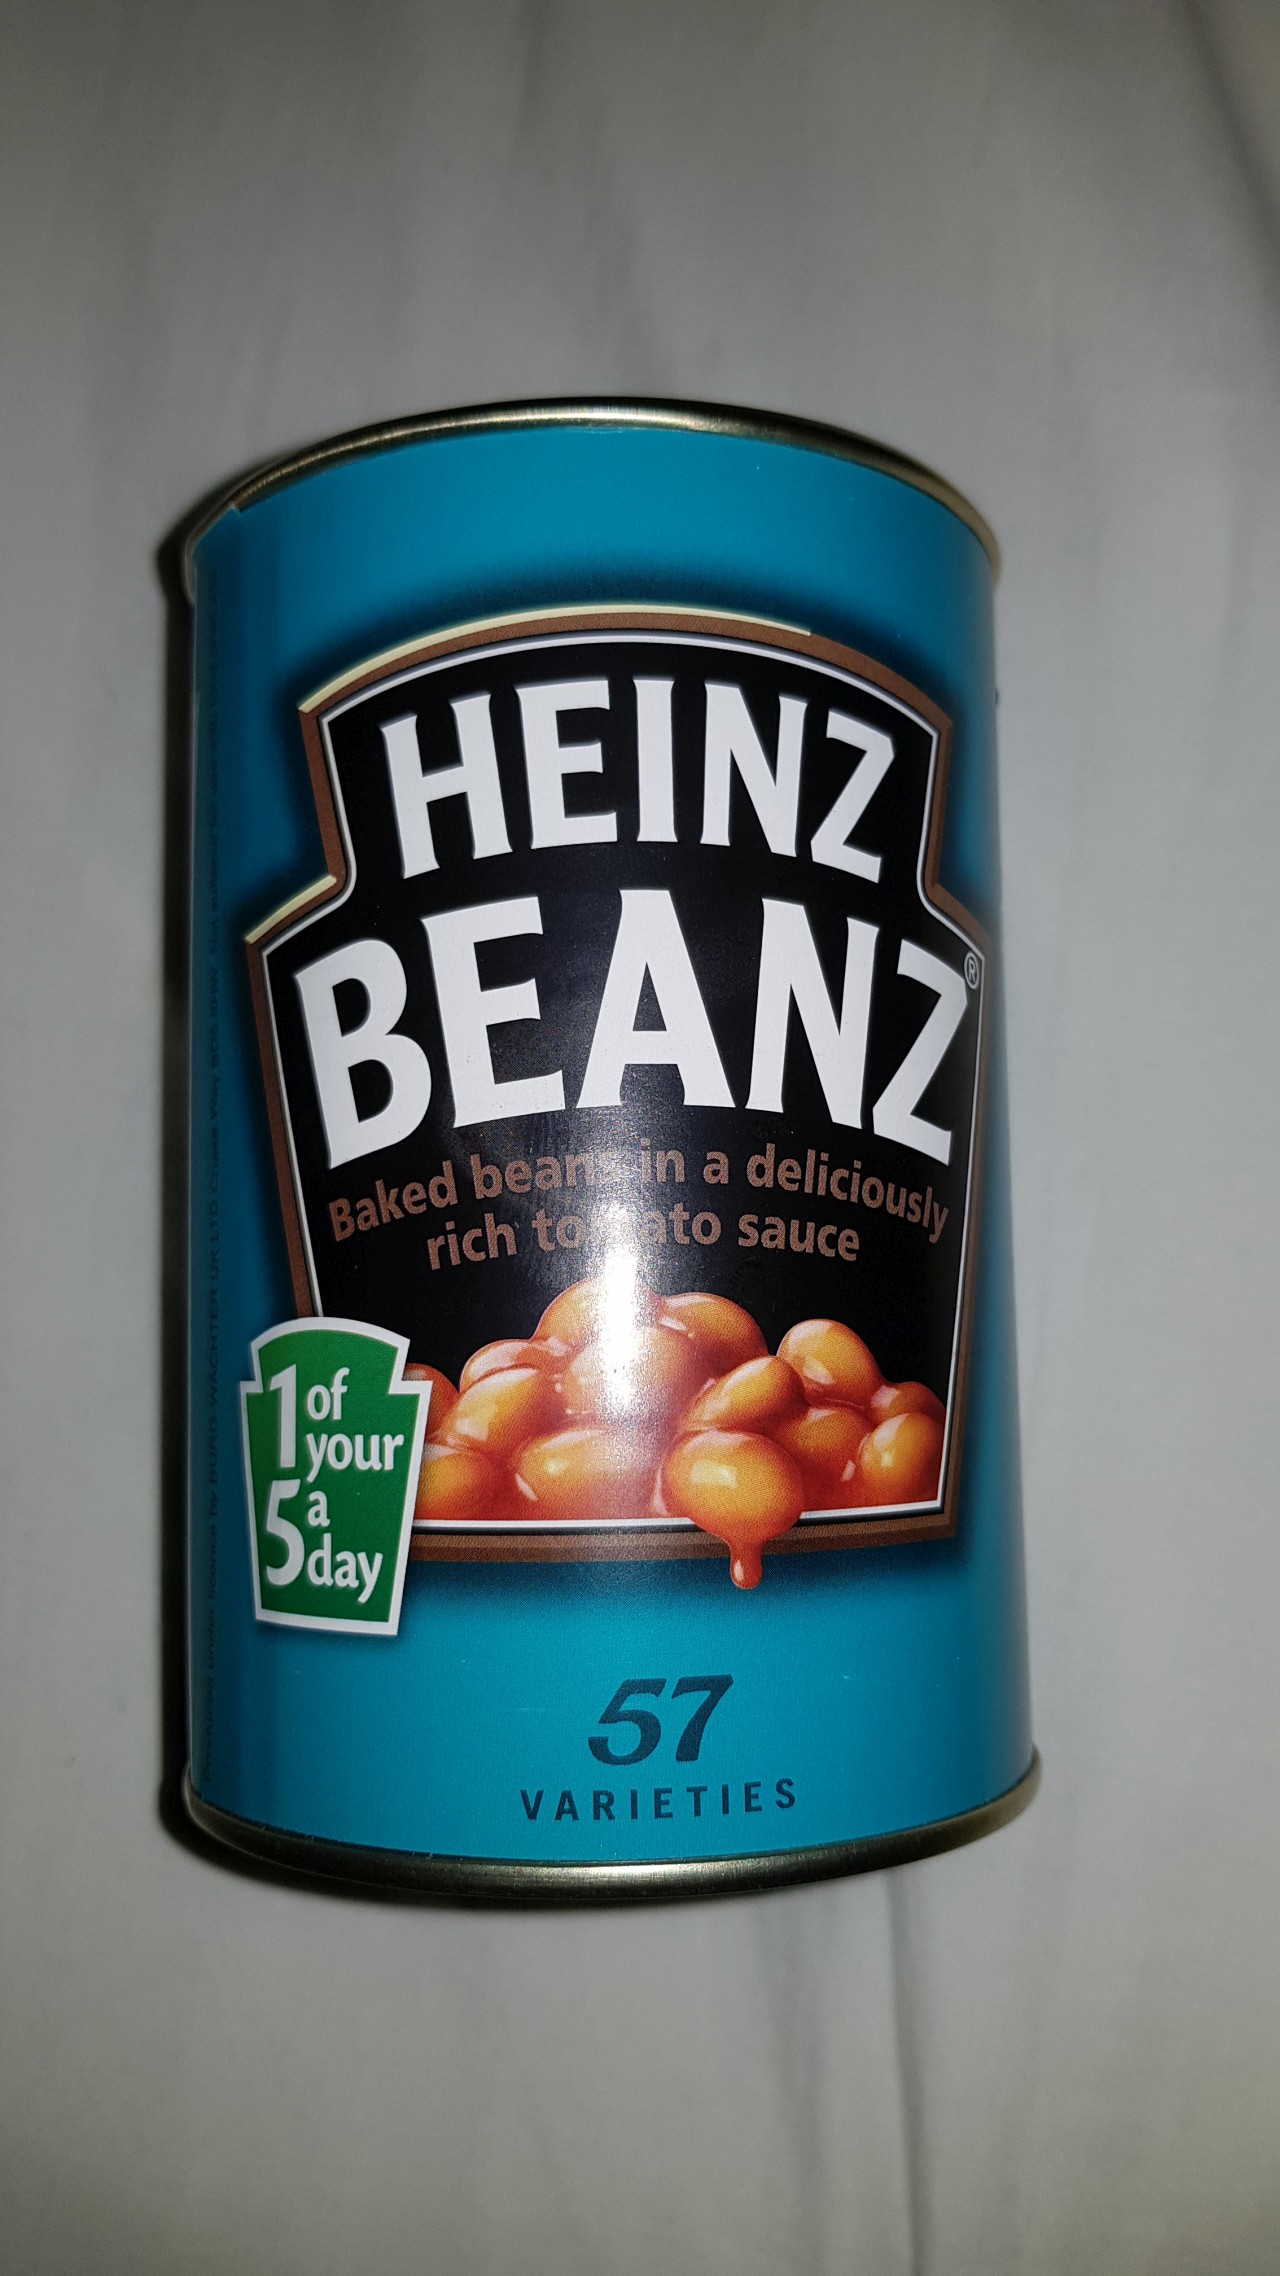
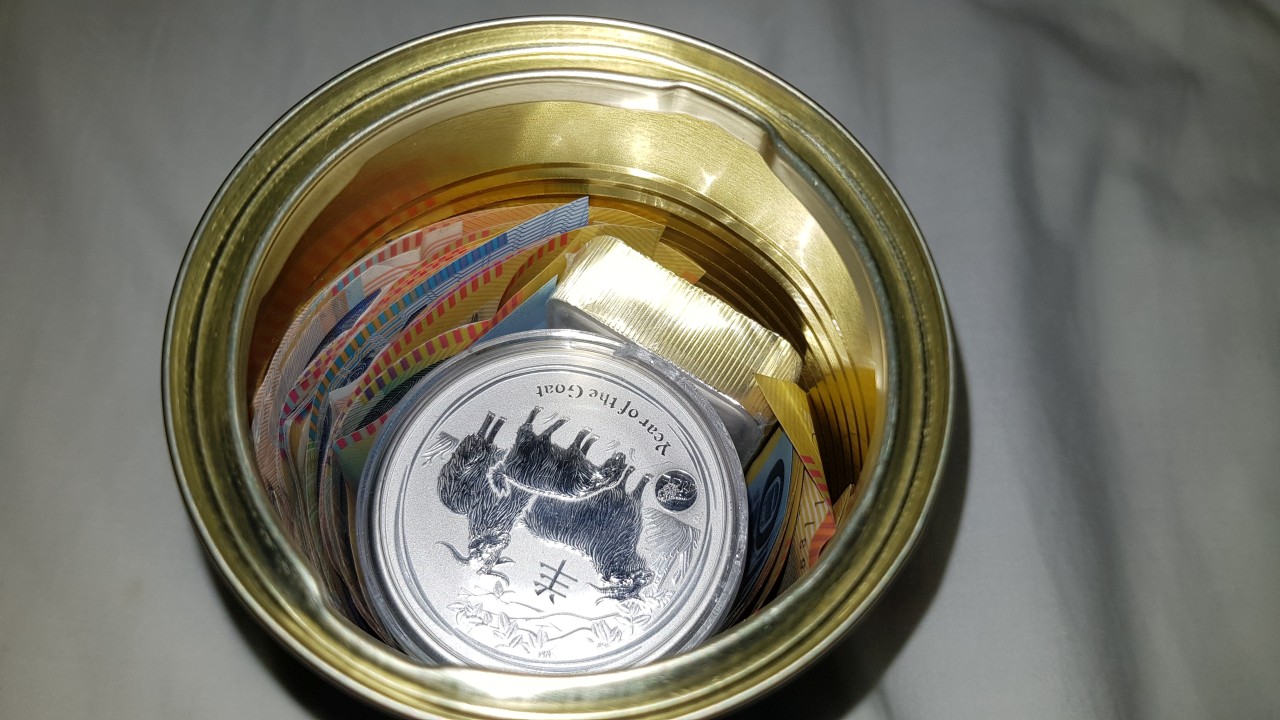
When you’ve accumulated a lot of valuables in your house such as spare cash or precious metals you begin to run into the problem of where to store it, the most common way to store them would be in a safe or small vault of some kind. These are quite hard to break into if made of solid metal, however it’s extremely obvious to any criminal. I looked into storing my valuables inside disguised products such as the below Heinz Can of beans, it’s inconspicuous on the outside but has quite a nice amount of space inside for about 30 oz of silver and a lot of paper notes as well to prevent rubbing on the inside.
Heinz Beanz Tin
Fig1. – The Heinz Beanz Tin.

But open up the bottom…

Heinz Beanz Tin Interior
Fig2. – The inside of the Tin.

There’s quite a lot of different designs you can buy, I purchased mine off Ebay from Britian and noticed a tomato soup can, spaghetti can, a dictionary, coke can, a fake candle and even a fake rock for storing things outside which is probably more fitting for a key. It costed me $30 AUD and you could make your own for cheaper quite easily by hollowing out any common object.

It would be best to also have a safe in your cupboard with semi-valuable items in it to trick criminals into believing they have the best loot.

Silver Coin Stockpile

Lately I’ve been slowly adding to my silver stockpile due to the low (relative) prices this year. Currently it’s at $16.16 USD on the 27th June 2018 and dropping which is quite below its mean of $16.50 but not by much.

Some of the uses of silver include:
• Bartering
• Water Purification (Kind of)
• Colloidal Silver (For Health Issues)
• Antibacterial

Remember that either way you look at it, silver will always be an investment and you can sell it later on for almost the same amount if you need some quick cash.

Gold is useful as well to store large amounts of cash, but there’s not a lot you can buy with that much money in a SHTF scenario. Most of your transactions will be small change for cans of food, water and survival gear – which you should already have stocked. Currently Gold is at $1253.74 USD which is a little lower than average but then again gold has fewer uses than silver in a survival situation. However it is worth it to have at least one oz of gold handy.

Cash on the other hand will depreciate very quickly in a disaster, people will soon realize this piece of paper isn’t worth the value written on it by the Federal Reserve and value will shift back into valuable metals which can’t simply be printed into existence. When this occurs the three most valuable entities in the world will be Materials/Possessions, Precious Metals/Gems and Skills/Experience.

Don’t forget to keep your valuables safe and secure in a hidden location either in a safe, under floorboards, at the back of a wardrobe or buried in the back yard. You could perhaps find some extremely strange places to store valuables too, such as inside a hot water tank where it will not only stay safe but slowly purify your water. The only problem with that is getting them in and out but at least you won’t be inclined to spend them.

Nalgene Sipper Lid

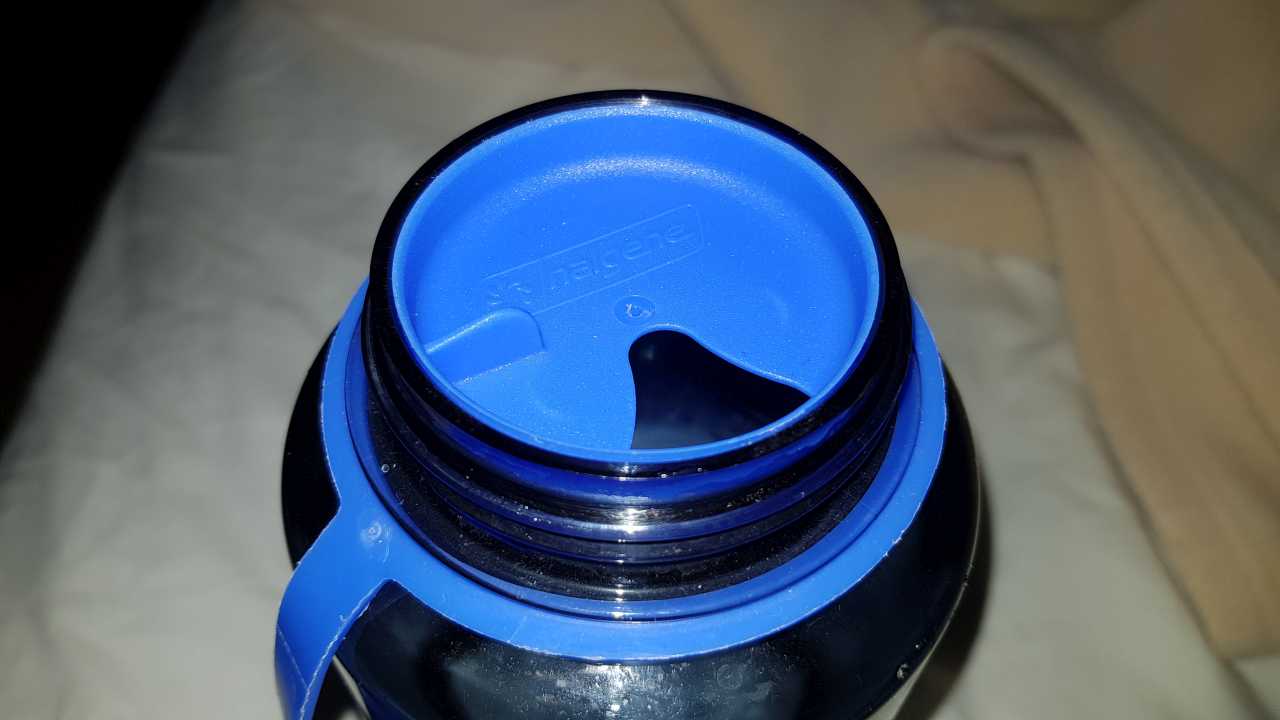
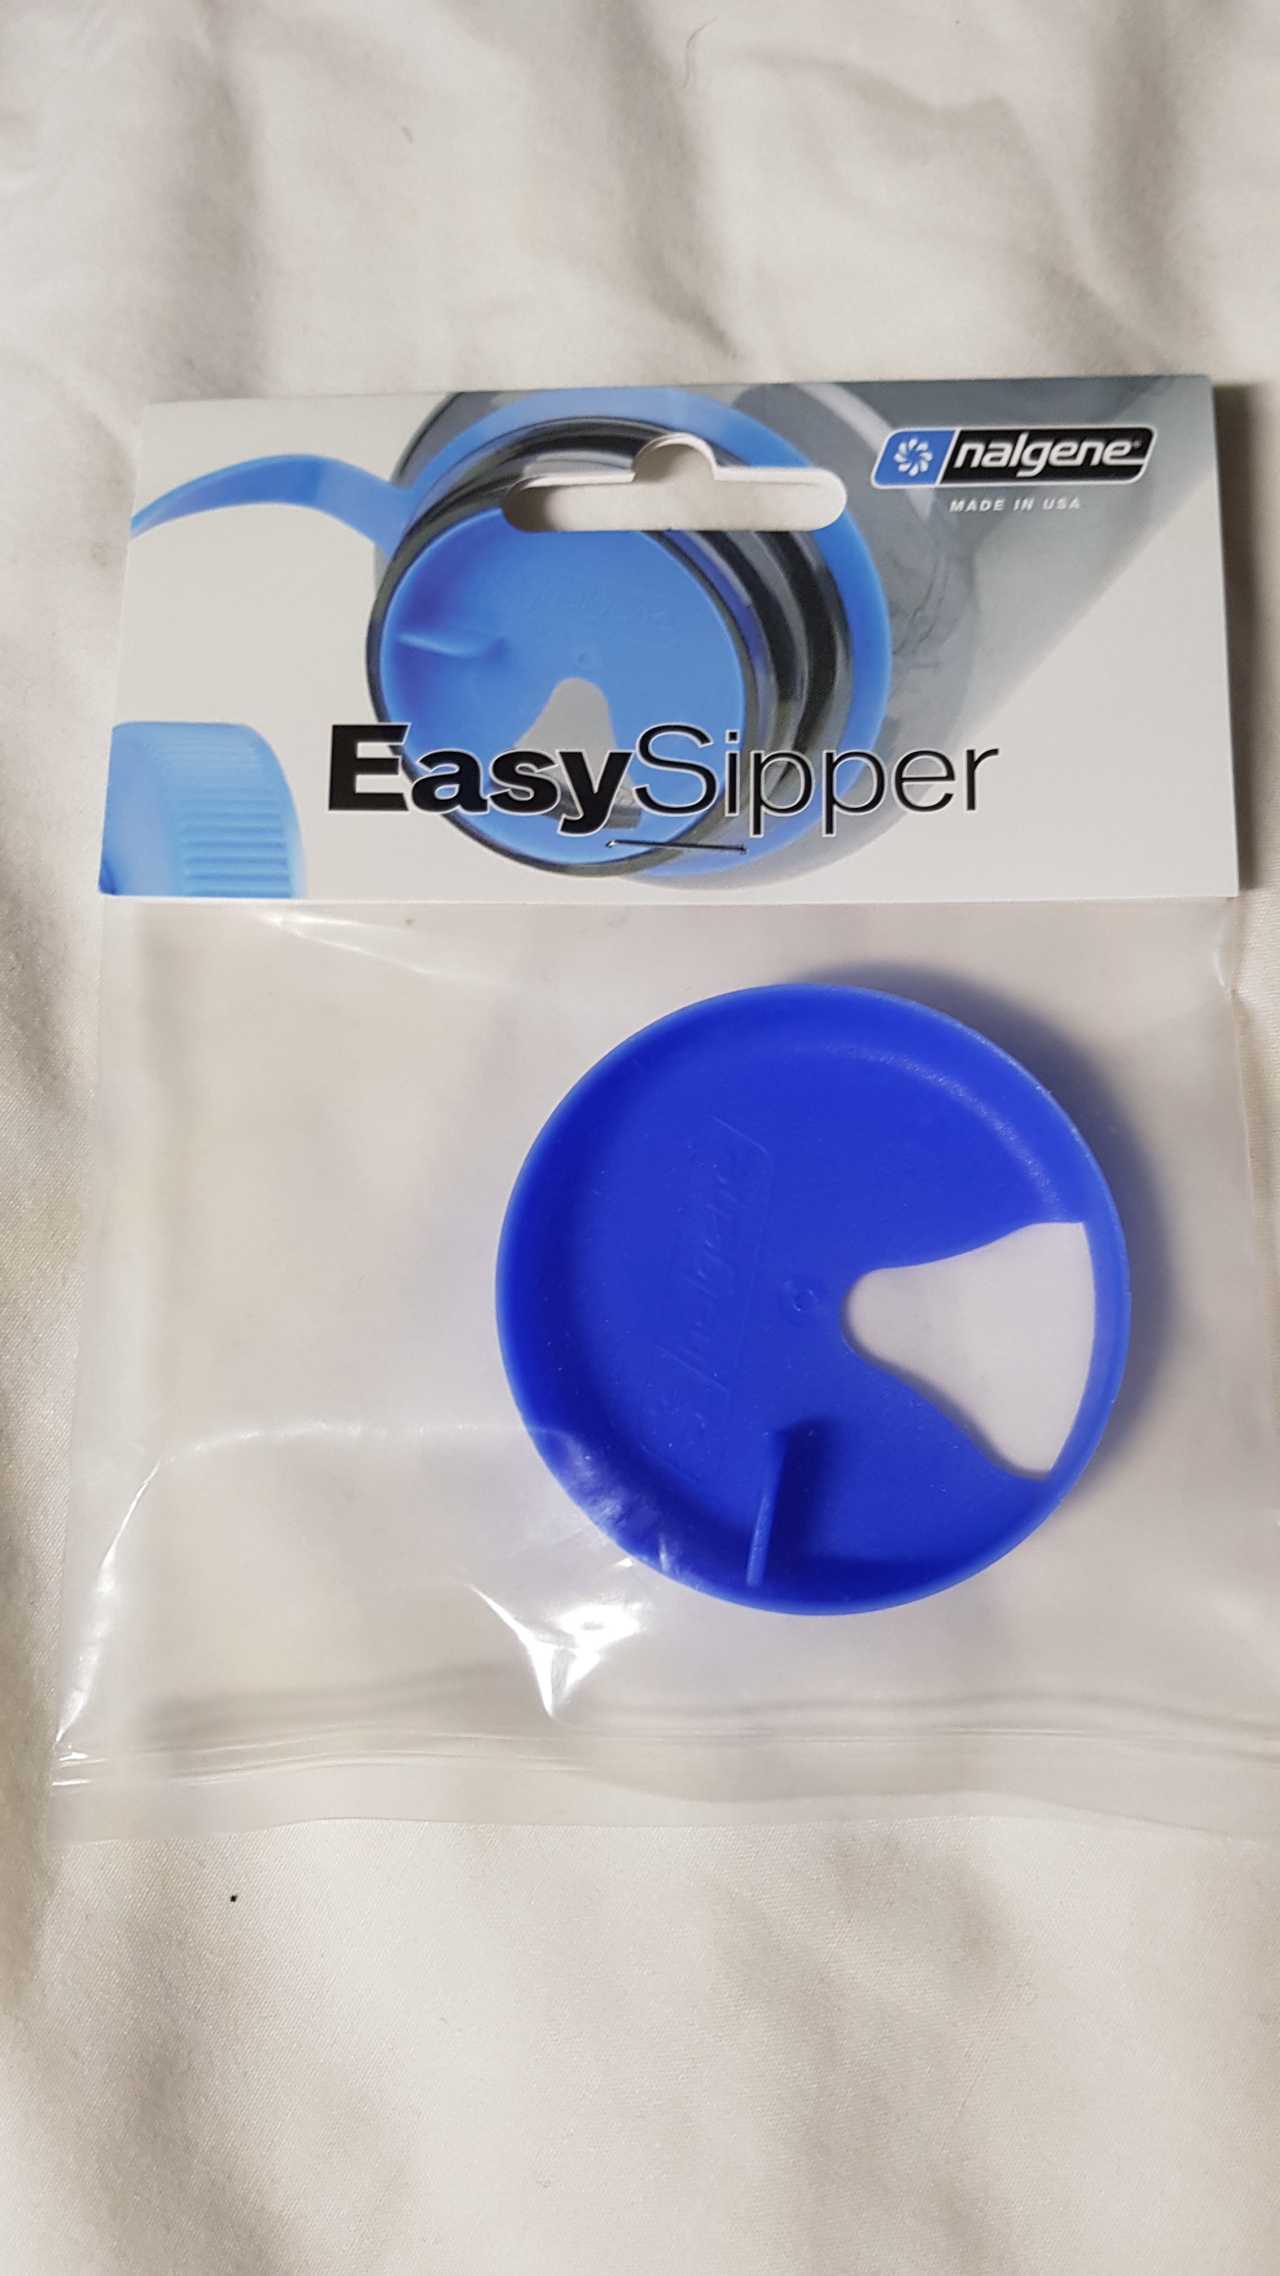
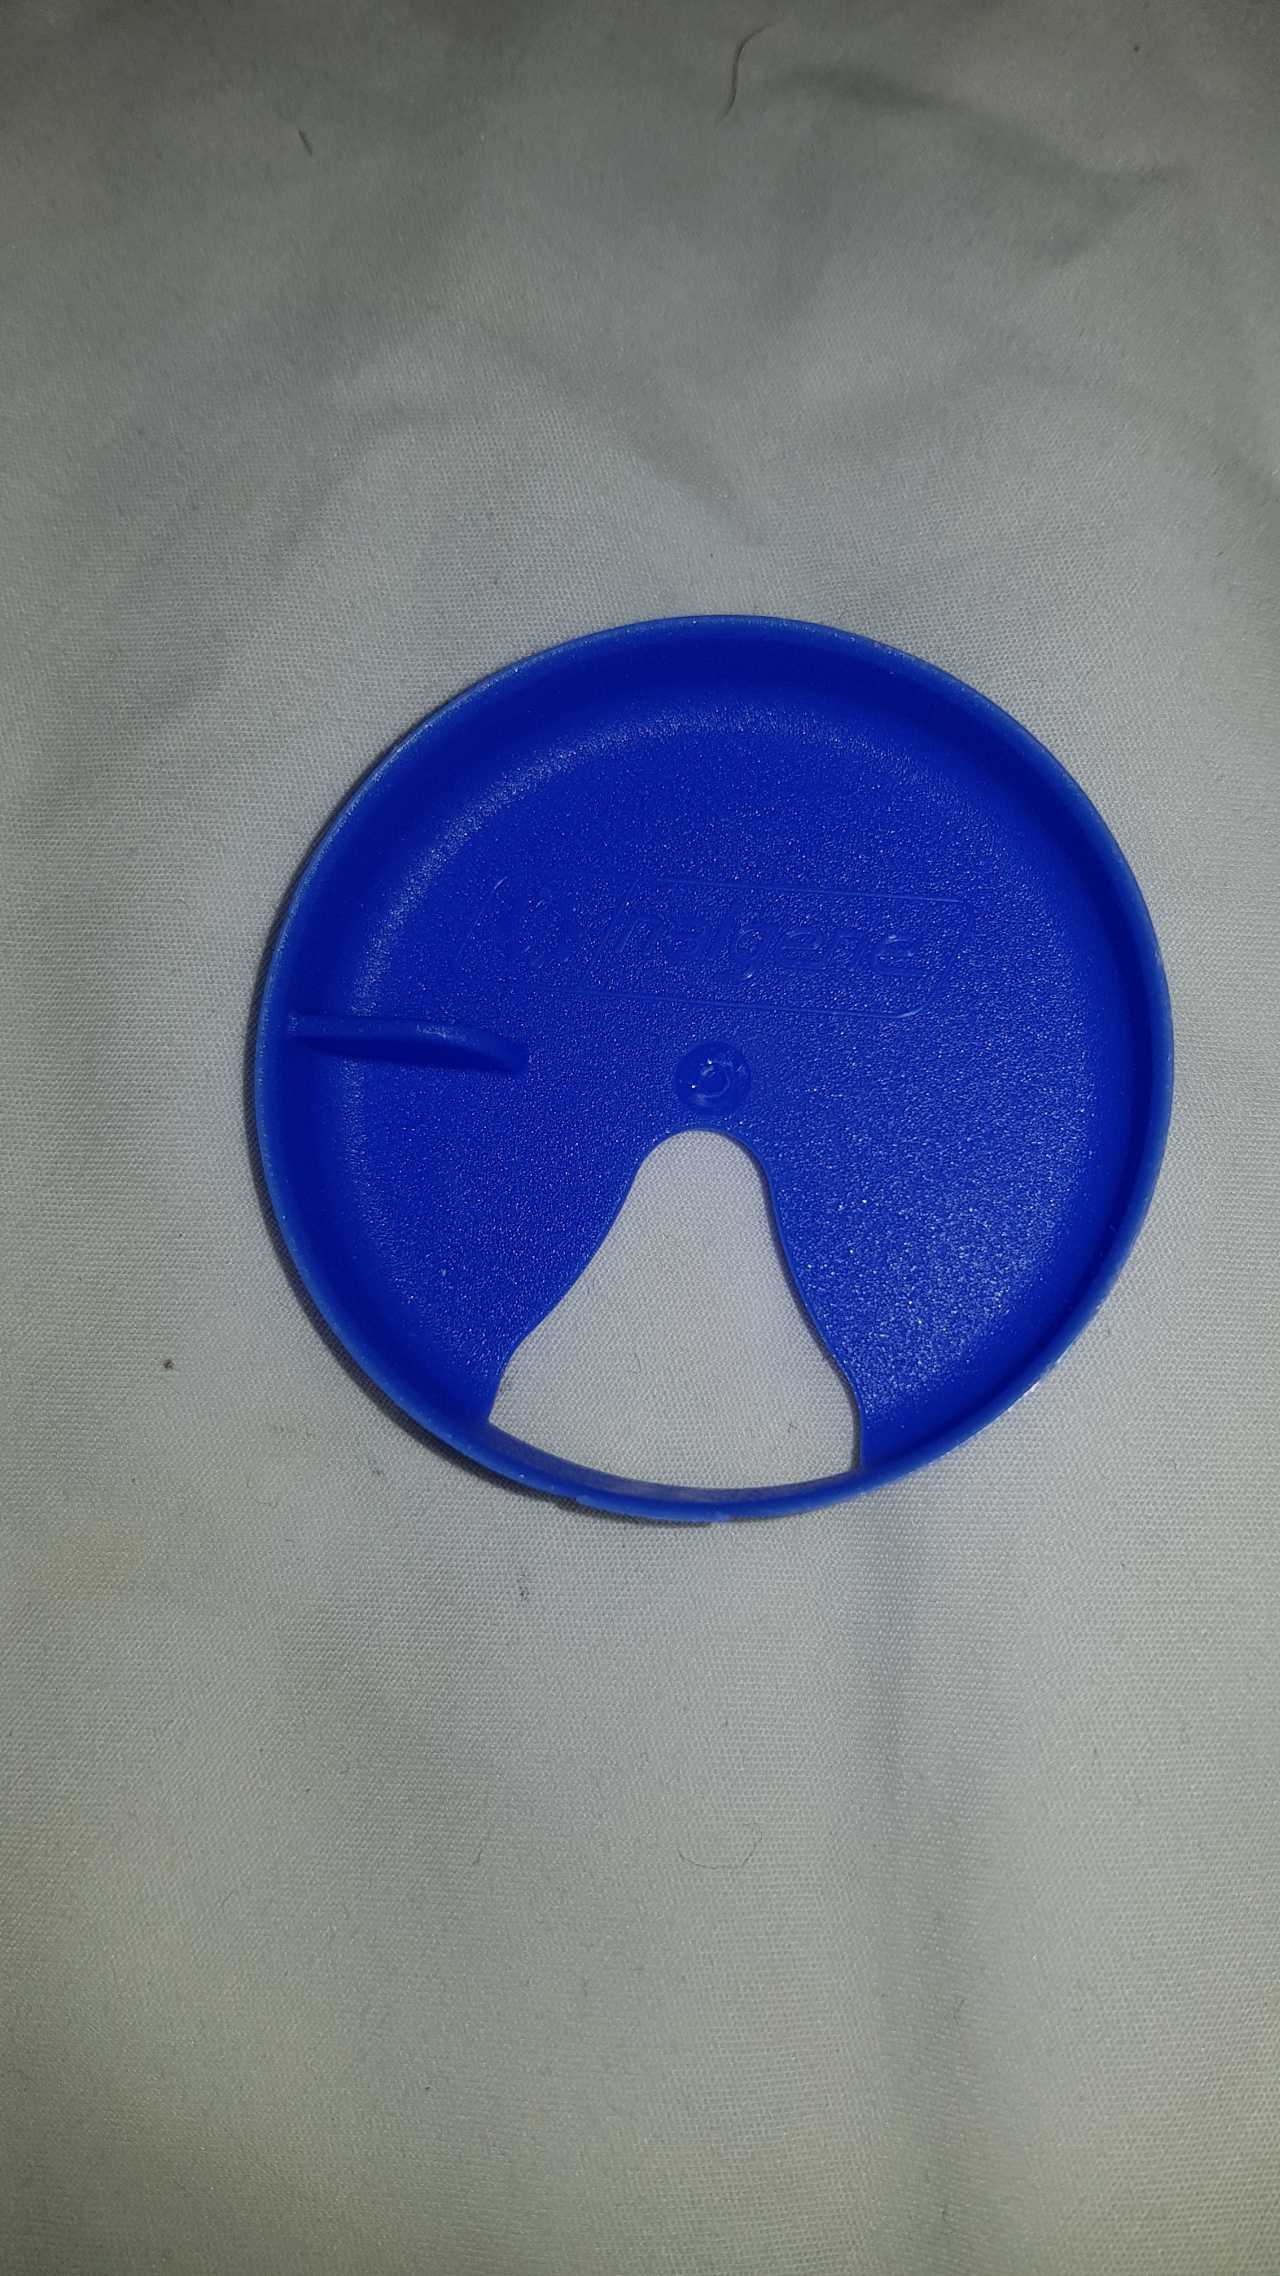
I’m always on the look out for new little products to buy that will improve my life while camping and lately I found this little gem.

Nalgene Sipper Lid
Fig1. – The nalgene sipper on a bottle.

It lets you insert it into a typical wide mouth Nalgene bottle to make it easier to drink from. I agree it was a problem I faced with such a wide mouth on a bottle, which is inconvenient to drink from – especially when on the move.

Nalgene Sipper Lid
Fig2. – The nalgene sipper on a bottle.

It stacks with my Pillid stackable lid as well to allow easier sipping and storage of water treatment options. I love the Nalgene bottles overall with their unbreakable Tritan material and “modding” options for their merchandise. They are only a few dollars on ebay, however currently not many people sell it so it may be hard to acquire one.

Nalgene Sipper Lid
Fig3. – The nalgene sipper on a bottle.